• Home
  • Suggest A Craft
  • DIY Newsletter

Home and Garden

Ideas For DIY

  • About CraftGossip
  • Our Network
    • Bath & Body Crafts
    • Candle Making Ideas
    • Crochet Ideas
    • Cross Stitch
    • Edible Crafts
    • Felting Patterns
    • Glass Art
    • Home & Garden Ideas
    • Indie Crafts
    • Jewelry Making
    • Kids Crafts
    • Knitting Patterns
    • Lesson Plans
    • Needlework
    • Party Ideas
    • Polymer Clay
    • Quilting Ideas
    • Recycled Crafts
    • Scrapbooking
    • Sewing Patterns
    • Card Making
    • DIY Weddings
    • Not Craft Ideas
  • Giveaways
  • Roundups
  • Store
  • Search

JOY Christmas Wreath

September 28, 2017 by Shellie Wilson


Gather a few dry twigs and branches from your garden and try making this joyful wreath!


Materials

Dry branches (small)

• White foam board

• X-acto knife

• Hotglue gun

• Beads and decoration supplies

Step-1: Collect a bunch of dry twigs and branches. Collect them in different sizes.

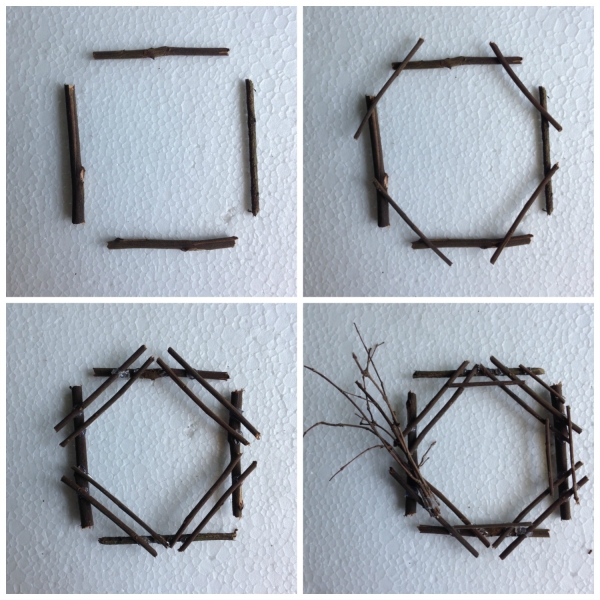
Step-2: Create the wreath base using the dry twigs and branches. You can use hot glue to attach the twigs and branches together, create any pattern you want but make that the pattern is somewhat round.

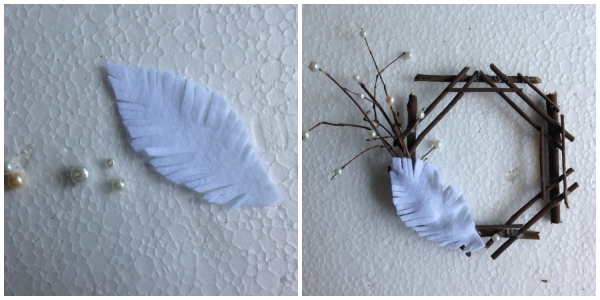
Step-3: Gather some faux pearl beads and other supplies to decorate the wreath. I created a feather pattern from white felt and glued the beads on the small side branches of the wreath.

Step-4: Cut out the letters ‘J’ and ‘Y’ from white foam board, make sure that the size of the letters are proportionate to the size of the wreath. Glue the ‘J’ on the top and the ‘Y’ at the bottom of the wreath, the wreath base is the ‘O’ and it completes the word ‘JOY’.

Add more decoration if you wish to and finally attach a hanging mechanism to complete the wreath.

Happy Crafting!


Related Posts:

  • Birds and Berries Woodland Christmas Holiday Wreath
  • DIY Farmhouse Christmas Candy Cane Wreath
«
»

Have you read?

DIY Kraft Paper Roll Message Board – The Perfect Rustic Organizer You Need

If you love rustic decor with a functional twist, then this DIY Kraft Paper Roll Message Board is the perfect project for you! Whether you need a spot for grocery lists, daily reminders, or inspirational quotes, this chic and practical wall-mounted board is a stylish way to stay organized.

Made with a simple roll of kraft paper, this project is budget-friendly and easy to customize to fit your space. It’s great for kitchens, home offices, or even kids’ rooms—anywhere you need a quick place to jot things down!

Upgrade your home organization with this creative DIY!
Check out the full tutorial here!


Explore

Bedrooms Christmas Craft Ideas Easter Garden and Yard Halloween Holidays Home Decor Kitchens Living Areas Makeovers and Redos More DIY's Organizing Outdoor Decor Porches, Patios and Decks Recycled Crafts Seasonal Trash to Treasure Windows and Walls Wreaths

RSS More Articles

  • Designer Spotlight: TesLime Cross Stitch
  • Crochet Kit – The Arpeggio Set
  • 4 FREE Father’s Day Digital Stamp Sentiments
  • DIY Kraft Paper Roll Message Board – The Perfect Rustic Organizer You Need
  • How to Turn Photos into Beatrix Potter-Style Illustrations Using AI
  • How to make DIY Fabric Flowers
  • Pet Themed Learning Activities
  • 4 FREE Graduation Pattern Papers to Download
  • A Knit Vest to Get You Ready for Summer
  • Unveiling the Creativity of “Don’t Ruffle My Feathers” Quilt Block

Copyright © 2025 · CraftGossip | Start Here | Contact Us | Link to Us | Your Editors | Privacy and affiliate policy