There are childhood milestones you expect to remember forever, and then there are the slightly chaotic details surrounding them. The sudden announcement at bedtime. The tiny tooth wrapped in a tissue. The frantic search for a coin. The delicate midnight operation involving one sleeping child and a hand being slowly pushed beneath their pillow.
Honestly, the Tooth Fairy deserves better working conditions.
Include our free printable tooth fairy letter
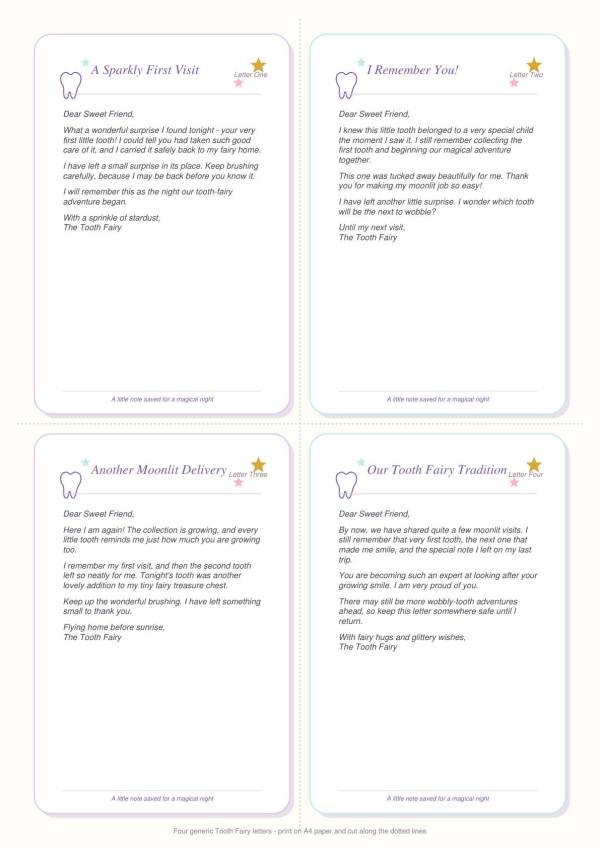
A handmade tooth fairy pillow, pouch or keepsake box gives that precious little tooth a safe place to wait—and makes the late-night exchange far easier for the grown-up helping with the fairy’s administrative duties.
These DIY tooth fairy projects include sewing patterns, crochet designs, felt pockets, recycled containers, clay boxes and no-sew ideas. Some are quick enough to make when the tooth is already wobbling, while others are lovely keepsakes you can prepare ahead of time or give as a handmade gift.
Why Make A Tooth Fairy Pillow Or Pouch?
A loose tooth is incredibly exciting when you are six. It is also incredibly small and surprisingly easy to lose in bedding.
A tooth fairy holder keeps the tooth contained and gives the fairy somewhere obvious to leave a coin, folded note or tiny surprise. Door-hanging designs are especially useful for light sleepers because there is no need to reach beneath the child’s pillow.
Most of these projects use very little fabric, yarn or felt, making them ideal scrap-busting crafts. You can also personalize them with a child’s name, favourite colours, embroidered stars, tiny wings or a pocket made from a treasured fabric remnant.
Easy Felt Tooth Fairy Pillow
This easy felt tooth fairy pillow can be made in around ten minutes and includes a free pattern, so it is a brilliant choice when that wobbly tooth suddenly becomes an urgent craft-room deadline. Felt does not fray, which keeps the sewing simple and makes this approachable for beginners or older children learning basic hand stitching.
The finished tooth has a small pocket for holding both the tooth and the Tooth Fairy’s payment. I would cut several while you already have the template out—these would make sweet handmade gifts for grandchildren, nieces, nephews or children starting school.
Happy Felt Tooth Fairy Pillow
This cheerful tooth-shaped pillow has a little face on the front and a practical pocket on the back. It is designed to be sewn by hand, making it a nice evening project when you want something more personal than a shop-bought holder without dragging out the sewing machine.
The downloadable template takes care of the shape, and the simple design leaves plenty of room for customization. Try adding a bow, stitched eyelashes, rosy cheeks or a tiny felt crown for your household’s official Tooth Fairy representative.
Free Printable Tooth Fairy Pillow Pattern
This scrap-friendly sewing project includes a printable pattern and a dedicated pocket for keeping the tooth safely contained. It is a polished little design without being complicated, so it would suit confident beginners as well as experienced sewists looking for a quick make.
Use white fleece for a soft, cuddly tooth or quilting cotton if you prefer a crisp finish. Small floral prints, stars, gingham and metallic details all work beautifully for the pocket.
Tooth Fairy Pillow With Video Tutorial
Visual learners will appreciate that this tooth fairy pillow comes with both written directions and a video tutorial. The pattern can be sewn using cotton or fleece, but there is also a felt option that can be stitched by hand without a sewing machine.
The colourful mouth doubles as the pocket, which is a clever way to keep the storage area part of the character’s design. It is also an easy detail to change according to the child’s favourite colour or the scraps already sitting beside your machine.
Personalized Tooth Fairy Pillow
A personalized tooth fairy pillow turns a small practical project into a proper childhood keepsake. This modern design includes the child’s name alongside a tooth-shaped pocket and works equally well in bright colours, soft nursery shades or simple monochrome fabrics.
The name can be added with appliqué, a stencil, heat-transfer material or machine embroidery. This is a lovely option for siblings because each child can have a clearly labelled pillow—important when the Tooth Fairy is managing several tiny clients.
Tooth Fairy Door Bag
This personalized door bag is one of the most practical ideas in the collection. The tooth goes into the pocket at the back, and the finished holder hangs from a door handle or bedpost, allowing the exchange to happen without disturbing a sleeping child.
The design combines felt, printed cotton and machine embroidery, giving it a polished finish that feels worthy of becoming a family keepsake. Children can help choose the fabric and colours, which makes the project part of the excitement rather than simply a container that appears after the tooth is lost.
No-Sew Tooth Fairy Door Hanger
Not every magical childhood project needs a sewing machine. This no-sew door hanger uses stiff felt, ribbon, googly eyes and hot glue, and it includes a printable tooth template.
It is a particularly good choice for light sleepers or children who feel unsure about the Tooth Fairy entering their bedroom. They can hang the tooth outside the room, where it can be exchanged without anyone creeping across a floor covered in building blocks.
Tooth Fairy Drawstring Pouch
This small drawstring pouch is simple, secure and quick to sew. The tutorial uses two small pieces of cotton fabric, cotton cord and a printable iron-on design, so it is an excellent project for using offcuts left from a larger sewing project.
The drawstring makes the pouch easy to hang from a bedpost or door handle, and there is enough room inside for a tooth, a coin and a folded letter. Choose muslin for a sweet storybook look or use a favourite novelty print to make it more personal.
DIY Felt Tooth Fairy Pocket
This plush felt tooth includes a stitched face, a pocket on the back and a pair of colourful fairy wings. It can be cut by hand using the supplied template or prepared with a Cricut machine, giving both traditional crafters and cutting-machine owners an option.
Blanket stitching around the edge gives the finished tooth that lovely handmade look, while a small amount of stuffing turns it into a soft miniature pillow. The wings are a particularly charming detail and could be made in glitter felt, metallic fabric or whatever colour happens to be popular in your house this week.
Crochet Tooth Fairy Pouch
Crocheters can make this stuffed tooth-shaped pouch from two panels joined around the edges. A separate pocket is stitched onto the back, leaving enough room for a small treat, coins or a neatly folded note.
The pattern also includes ideas for adding a bow, hair, eyelashes and an embroidered smile. It is a wonderfully adaptable design and a good project for using leftover worsted-weight yarn from your amigurumi basket.
Crochet Tooth Fairy’s Tooth Pillow
This free crochet pattern creates a cute, unisex tooth pillow with its own storage pocket. It can be tucked beside the child’s pillow or finished with a strap so it hangs from a bedpost or door handle.
The project works up quickly, which is useful because loose teeth do not always respect the maker’s schedule. Use traditional white yarn or let the child choose a bright colour for a more playful version.
Air-Dry Clay Tooth Fairy Box
For something completely different, this air-dry clay project creates a little tooth-shaped keepsake box. The two-part box is formed around a temporary inner shape, allowed to dry, smoothed and then decorated with paint and tissue paper.
This is more involved than the quick felt and fabric options, but the finished result has real keepsake appeal. Older children may enjoy helping shape and paint their own box, especially if they are already fascinated by the idea of the Tooth Fairy collecting teeth. Adult supervision is needed for cutting and sanding the dried clay.
Recycled Dental Floss Tooth Fairy Box
I have a soft spot for crafts that turn ordinary packaging into something unexpectedly lovely. This clever project transforms an empty dental floss container into a tiny golden tooth box using primer, paint and an adhesive vinyl design.
The hinged container is small, secure and rather appropriately connected to dental care. The tutorial also includes a printable Tooth Fairy letter that can be personalized, which adds another little layer of magic without creating a great deal of extra work.
Simple Ways To Personalize A Tooth Fairy Holder
A handmade tooth fairy pillow does not need to be elaborate, but a few personal details can make it feel extra special.
Add the child’s name with embroidery, felt letters or iron-on vinyl. Use a scrap of fabric from a baby quilt, favourite dress or nursery project for the pocket. Stitch the year onto the back when the first tooth is lost, or add another tiny embroidered star for each visit.
You could also tuck a miniature envelope into the pocket for letters between the child and the Tooth Fairy. Just be warned that once correspondence begins, the Tooth Fairy may find herself answering questions about where she lives, what she eats and why the payment rates seem to vary between households.
What Should Go In A Tooth Fairy Pouch?
The most important thing is that the tooth can be placed inside securely. A loose pocket is fine for a pillow that stays flat, while a pouch being hung on a door should ideally have a drawstring, flap or snug opening.
Depending on your family tradition, the returned pocket might contain a coin, folded bill, small note, sticker, tiny charm or certificate. Keep anything left overnight age-appropriate and avoid very small extras for younger children who may place them in their mouths.
The container itself is often what children remember. Long after the final baby tooth has disappeared, a handmade pillow or little painted box can be tucked into a memory box alongside hospital bracelets, school photos and all those tiny treasures we somehow cannot bring ourselves to throw away.
Prefer To Buy One Ready-Made?
Let’s be honest, sometimes the tooth is already wobbling and there simply is not time to start another project. These ready-made options are handy for parents who want to keep the Tooth Fairy tradition going without a late-night sewing session.
The Qunclay Tooth Fairy Pillow With Pocket is a sweet little tooth-shaped pillow with a built-in pocket for holding the tooth, a coin or a tiny note. Its compact size makes it easy to place beside the bed rather than trying to retrieve something from beneath a sleeping child’s head.
For something a little more traditional, the Primitives by Kathy Pink Tooth Fairy Pillow has a soft keepsake-style design that can be brought out for every lost tooth. It would also make a lovely birthday or starting-school gift for a child approaching the wobbly-tooth stage.
The Tooth Fairy Door Hanger And Keepsake Pouch Set is particularly useful for light sleepers. The tooth can be left outside the bedroom or hung from the door handle, saving the Tooth Fairy from attempting a midnight pillow extraction.
A Little Tooth Fairy Planning Goes A Long Way
The sensible time to make a tooth fairy pillow is before the tooth falls out.
The realistic time is approximately fifteen minutes after your child announces that the tooth is now sitting in their hand.
Thankfully, several of these projects can be made quickly using felt, fabric scraps or an empty container from the bathroom cupboard. Whether you sew, crochet, glue, paint or model with clay, the result is a small handmade object that turns an ordinary childhood milestone into something much more memorable.
And it gives the Tooth Fairy a clearly marked collection point, which is really the least we can do for someone working the overnight shift.