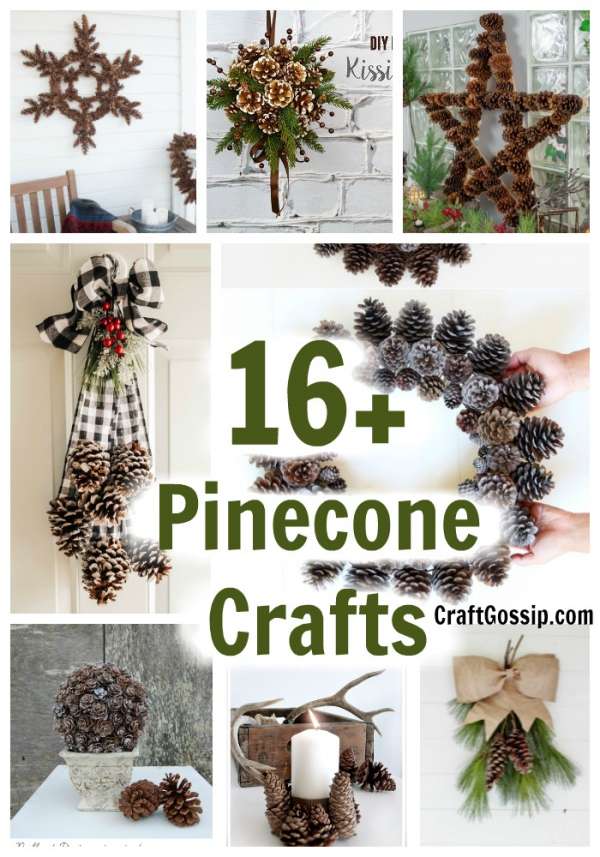
Pinecones, Pine cones, or Conifer cones are perfect for crafting. They are nature’s little Christmas craft item and they are perfect for decorating.
Pine cones are often associated with the fall season and Christmas, but did you know that these versatile natural materials can also be used to create beautiful and unique home decorations all year round? Pine cones are readily available and can be collected for free from your local parks, forests, or even your own backyard. They come in various sizes and textures, making them a versatile and affordable option for creating stunning DIY home decorations.
Whether you’re looking to add a touch of nature to your home decor or just want to create a cozy and inviting atmosphere, pine cones can help you achieve just that. From wall art to wreaths, centerpieces to candle holders, the possibilities are endless when it comes to incorporating pine cones into your home decor.
In this article, we’ll explore some of the most popular and inspiring DIY home decor ideas using pine cones. From simple and elegant to bold and rustic, there’s something for everyone. Whether you’re a seasoned DIYer or a beginner, you’ll find ideas that are easy to follow and customize to suit your personal style and taste.
So, let’s dive into the world of pine cones and discover the endless possibilities of DIY home decorations! Not only will you save money by creating your own unique pieces, but you’ll also get the satisfaction of knowing that you created something beautiful for your home. With a little imagination and some basic materials, you’ll be able to transform pine cones into stunning works of art for your home. Get creative and have fun with it!
You may be lucky enough to have a Pine tree near you and have an abundance of pinecones if not, don’t disappear you can purchase them too.
All of these DIY crafts use pinecones and whilst they can be used to decorate all year round, they are more suitable for Christmas decorating and or fall time. I have tried to include a wide variety of crafts to suit everyone’s decor and crafting abilities. Perfect for rustic decorating this Christmas.
DIY Pinecone Gnomes — CraftBits.com
Pinecone Ski-man — CraftBits.com
Scented Pine Cones — CraftBits.com
Beautiful Fast & Easy DIY Pinecone Wreath
DIY Kissing Ball with Pine Cones
Pine Cone Topiary Step-By-Step Tutorial
Pine Cones – Nature’s Christmas Decoration
How to Make a Pinecone Snowflake Wreath
Large Pinecone Star | Tutorial
DIY: Make a pretty pine cone topiary
Make an all-season twig pinecone garland
The name “cone” derives from Greek konos (pinecone), which also gave the name to the geometric cone. The individual plates of a cone are known as scales. Someone asked me the other day if you can eat pinecones?
Some types of pine cones have a part that is edible. There are about 20 different types of pine trees with cones big enough to harvest pine nuts from but the common pinecone we see in these crafts are not suitable Humans can eat the nut, but not any other parts of the pine cone.
How to Clean your pinecones:
Pinecones are versatile and natural material that can be used in a variety of DIY home decor projects. From wreaths and garlands to candle holders and table centerpieces, pinecones can add a touch of the outdoors to your home decor. However, if you want to use pinecones from your own garden, it is important to clean them properly before crafting. In this article, we will provide step-by-step instructions on how to clean pinecones from the garden for crafting.
Step 1: Collect the Pinecones
Collect the pinecones from the ground or from the branches of pine trees in your garden. Make sure to choose pinecones that are in good condition and are not damaged.
Step 2: Soak the Pinecones
Fill a large basin or bucket with warm water and add a small amount of dish soap. Soak the pinecones in the solution for at least 30 minutes to loosen any dirt or debris.
Step 3: Rinse the Pinecones
Remove the pinecones from the soap solution and rinse them thoroughly with clean water. Make sure to remove all the soap residue from the pinecones.
Step 4: Bake the Pinecones
Preheat your oven to 200°F and place the pinecones on a baking sheet lined with parchment paper. Bake the pinecones for about 30 minutes to kill any insects or eggs that may be inside.
Step 5: Dry the Pinecones
Remove the pinecones from the oven and allow them to cool completely. Once they have cooled, place the pinecones on a sheet of newspaper or paper towels and let them dry completely. This may take several hours or overnight.
Step 6: Store the Pinecones
Once the pinecones are completely dry, store them in a dry, cool place until you are ready to use them for crafting.
How to paint pinecones :
First clean them by wiping them down with a damp cloth or using a mixture of water and vinegar. Let them dry completely before moving on to the next step.
Choose your Paint: You can use any type of paint that works best for your project. Acrylic paints are popular because they dry quickly and come in a wide range of colors. You can also use spray paints, which are especially helpful if you are working with a large number of pinecones.
Preparing the Pinecones: Before painting, you may want to spray the pinecones with a sealer. This will help the paint adhere better and will also protect the natural beauty of the pinecones. Allow the sealer to dry completely before moving on to the next step.
Paint the Pinecones: This is the fun part! Dip your brush in the paint and start painting the pinecones. You can paint them in a solid color or create patterns and designs. Be creative! If you’re using spray paint, hold the can 6-8 inches away from the pinecone and spray in a sweeping motion. Let the paint dry completely before handling the pinecones.
Seal the Paint: Once the paint is dry, you can seal it with a clear sealer to protect it from fading and chipping. You can use a spray sealer or brush-on sealant.
Add Finishing Touches: You can add glitter, sequins, or other embellishments to the pinecones to give them a little extra sparkle



Thanks so much for sharing my pine cone door swag!!
thank you so much for sharing your pinecone crafts. I know it maybe impossible but I would love to see a crochet pinecone applique.. thank you, Anna Parmelee
Thank you for this post. I love creating with pinecones.