• Home
  • Suggest A DIY
  • DIY Newsletter

Home and Garden

Ideas For DIY

  • About CraftGossip
  • Our Network
    • Bath & Body Crafts
    • Candle Making Ideas
    • Crochet Ideas
    • Cross Stitch
    • Edible Crafts
    • Felting Patterns
    • Glass Art
    • Home & Garden Ideas
    • Indie Crafts
    • Jewelry Making
    • Kids Crafts
    • Knitting Patterns
    • Lesson Plans
    • Needlework
    • Party Ideas
    • Polymer Clay
    • Quilting Ideas
    • Recycled Crafts
    • Scrapbooking
    • Sewing Patterns
    • Card Making
    • DIY Weddings
    • Not Craft Ideas
  • Giveaways
  • Roundups
  • Store
  • Search

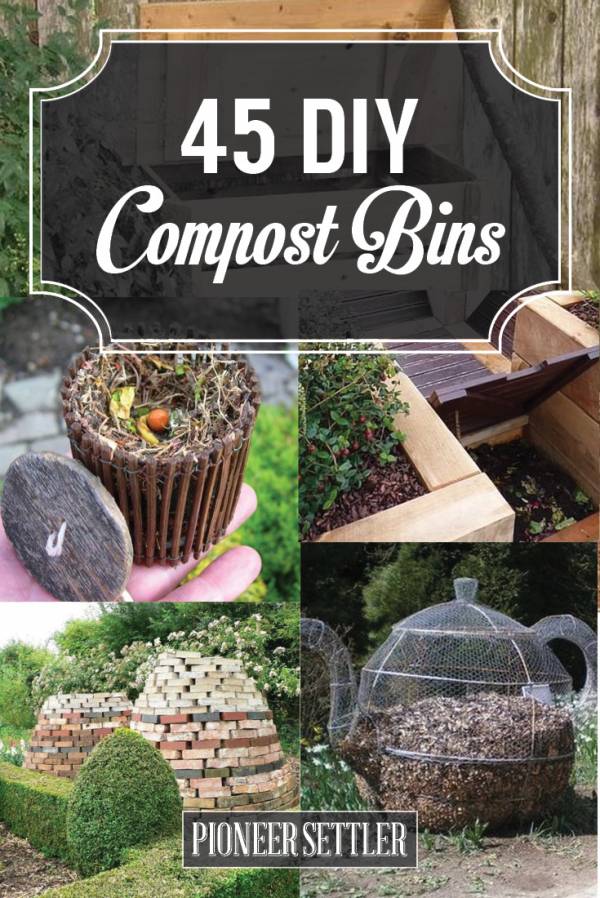
45 DIY Tutorials To Make An Attractive Compost Bin

August 19, 2015 by Larissa Coleman

45compost

A compost bin may not sound like the most attractive thing to have, but if you are a gardener of any sorts, it truly can benefit your over time.  Thanks to this great post from Pioneer Settler, you can build you own compost bin and actually make it look somewhat attractive.  This is the perfect time of year to start your compost bin.  With your gardens starting to bloom and harvest, use the unused portions to start your bin and you’ll be benefiting from it before you know it. 

Homesteading is very popular this year, but what exactly is Homesteading?  Homesteading is a lifestyle centered around self-sufficiency, sustainability, and a close connection to the land. Traditionally, it referred to the process of settling and developing land, often through government programs that provided land grants to settlers. Today, homesteading encompasses a wide range of practices aimed at reducing reliance on external resources and living more independently. 

Find the post here: 45 DIY Compost Bins
20 Outdoor Pallet Ideas For Your Backyard

«
»

Have you read?

DIY Giant Eyeball Lanterns – Creepy Halloween Decoration

When it comes to Halloween, bigger is always better—and these giant eyeball lanterns prove it! With nothing more than plain white paper lanterns, a little paint, and some imagination, you can create huge, spooky eyes that look like they’ve popped right out of a monster movie.

They’re perfect for hanging from ceilings, displaying on porches, or grouping together in a corner for an eerie effect. Best of all, paper lanterns are super inexpensive (you can grab them on eBay, Amazon, or even your local dollar store), which makes this a great budget-friendly craft for big impact Halloween décor.

Supplies You’ll Need

  • Large round white paper lanterns (various sizes look best) 
  • Acrylic paints or craft paints in black, brown, green, red, orange, or blue (for irises) 
  • Wide paintbrush for background color 
  • Small paintbrush for details 
  • Black construction paper or cardstock (optional for spiky “lashes” or accents) 
  • Hot glue gun or strong craft glue 
  • String or fishing line (if you want to hang them) 

Step-by-Step Instructions

Step 1: Prep the Lanterns

  1. Assemble your white paper lanterns according to the package directions. 
  2. Make sure they’re fully open and the wire insert is in place so the surface is taut for painting. 

Step 2: Paint the Iris

  1. Using a wide brush, paint a large circle in the center of the lantern to create the iris. 
  2. Choose spooky colors—green, red, orange, or blue work wonderfully. 
  3. Don’t worry about making it perfectly smooth; streaks and uneven textures add to the eerie, organic look. 

Step 3: Add the Pupil

  1. Once the iris paint is dry, use black paint to fill in the pupil at the very center. 
  2. Make it large enough to stand out against the iris. 

Step 4: Detail the Eye

  • Use a smaller brush to add darker or lighter streaks in the iris for a more realistic effect. 
  • You can even add thin vein lines in red around the iris to give it that bloodshot look. 

Step 5: Optional Spiky Lashes

  1. Cut long triangles from black construction paper or cardstock. 
  2. Glue them around one side of the lantern so they stick out like sharp monster eyelashes. 
  3. This makes the eyeballs look even more monstrous and stylized. 

Step 6: Display Your Giant Eyeballs

  • Hanging: Use string or fishing line to suspend them from ceilings, trees, or porch rafters so they look like floating eyeballs. 
  • Stacked: Place them in corners, along stairs, or even grouped on your lawn for a spooky display. 
  • Tabletop: Use them as oversized Halloween party props. 

Tips & Variations

  • Glowing Eyes: Insert battery-powered LED lights into the lanterns so they glow from the inside. 
  • Rainbow Eyes: Mix up the colors and make a whole rainbow of creepy eyes. 
  • Monster Cluster: Group multiple eyeballs together in different sizes for a scarier effect. 

This DIY Giant Eyeball Lantern craft is quick, cheap, and gives you maximum Halloween spook factor with minimal effort. Whether you make one or a whole creepy collection, your haunted house setup will definitely be eye-catching!


Explore

Bedrooms Christmas Craft Ideas Easter Garden and Yard Halloween Holidays Home Decor Kitchens Living Areas Makeovers and Redos More DIY's Organizing Outdoor Decor Porches, Patios and Decks Recycled Crafts Seasonal Trash to Treasure Windows and Walls Wreaths

RSS More Articles

  • Learning about Georgia for Kids
  • How to Make a Moth Birthday Card
  • DIY Giant Eyeball Lanterns – Creepy Halloween Decoration
  • Designer Spotlight: Artmishka Cross Stitch
  • Freebie Friday – Grungy Pumpkins and Fall Tags Junk Journal Printables
  • Free Paisley Flowers Embroidery Design Review
  • Knit a Log Cabin Blanket with All Your Scraps
  • 16 Big Halloween Crochet Projects You Need to Start Now
  • How to Make Tropical Summer Mini Interactive Album
  • Book Review: Fine Whitework by Jenny Adin-Christie

Copyright © 2026 · CraftGossip | Start Here | Contact Us | Link to Us | Your Editors | Privacy and affiliate policy