• Home
  • Suggest A DIY
  • DIY Newsletter

Home and Garden

Ideas For DIY

  • About CraftGossip
  • Our Network
    • Bath & Body Crafts
    • Candle Making Ideas
    • Crochet Ideas
    • Cross Stitch
    • Edible Crafts
    • Felting Patterns
    • Glass Art
    • Home & Garden Ideas
    • Indie Crafts
    • Jewelry Making
    • Kids Crafts
    • Knitting Patterns
    • Lesson Plans
    • Needlework
    • Party Ideas
    • Polymer Clay
    • Quilting Ideas
    • Recycled Crafts
    • Scrapbooking
    • Sewing Patterns
    • Card Making
    • DIY Weddings
    • Not Craft Ideas
  • Giveaways
  • Roundups
  • Store
  • Search

8 Amazing DIY Painted Faux Floor Rugs

March 14, 2019 by Shellie Wilson

Painted floor rugs are not only amazing to look at but they are practical in so many ways too. Have you ever wanted a rug in an outdoor weathered area? Perhaps it’s a high traffic area where too many pairs of feet are walking, tripping and stepping over? Then hand painted or stencilled floor rugs are the perfect DIY solution.

It really isn’t as hard as it appears. You can use block colors like the faux staircase rug or use large stencils for intricate designs. The key to making these painted faux floor rugs is all in the finishing preparation. You need your DIY painted rug to last. You will need to seal with a clear sealer to help prevent paint chipping. Take a trip to your local hardware store for the best DIY paint advice from the experts. Tell them what your paint surface is and have them show you the best paint to and sealer to use.

Making your own painted faux floor rugs is a great way to save money and to decorate your home on a budget. Make sure you draw out your design on paper first to get an idea of where you want it and how big you want it to look. For more advanced painters, consider adding some tucks and dimension with shadowing to make your painted faux rug look even more realistic.

Finally a rug that is easy to keep clean, perfect for homes with toddlers and kids. I mean kids of all ages make a mess right. How about painting a white shag pile rug in your living room, no kid is going to damage that one.

This bright colored floor rug is by Beautiful Mess, and isn’t it just that, Beautiful!

A simple block design adds dimension to this staircase without the hazard of tripping.

‘

A more simple design with painted mandalas has this faux painted floor rug looking easy.

This Faux floor rug is painted directly on to concrete and it looks amazing.

You will need to layer your stencils and colors to get this intricate painted floor rug design, but it is well worth the look.

Bright and colorful this Faux floor rug would be lovely hand painted DIY on to a toy room floor, no worries about kiddie spills with this rug

Love the traditional look of this faux rug, I literally had to zoom in the be sure. You can grab the pattern here. 

Stencils make this Henna Mehndi design a breeze and you can see the stencils here.

«
»

Have you read?

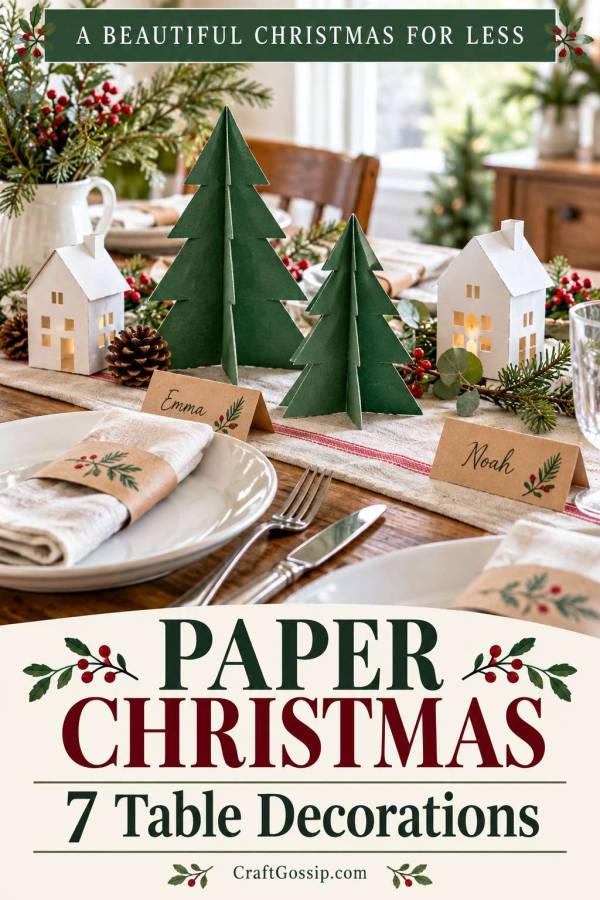
Christmas on a Budget – 7 Christmas Table Decorations You Can Make from Paper to Save Money

Before buying Christmas table decorations, open the paper drawer.

Leftover gift wrap, scrapbook offcuts and plain cardstock can become name cards, little trees and festive table details.

You do not need a cutting machine or a coordinated craft kit. A pair of scissors, a ruler and a little patience will cover most of these projects.

Paper is particularly useful when you want a colour-pop Christmas table on a small budget. Repeat one or two colours across a few simple decorations and the setting starts to feel coordinated.

Pick two or three projects rather than trying to make all seven.

Gather your supplies first

Look for:

  • Cardstock or clean, suitable packaging card.
  • Wrapping-paper scraps.
  • Plain paper.
  • Scissors and a ruler.
  • A pencil and a writing pen.
  • Existing paper glue or double-sided tape.

Card works best for standing decorations. Thin wrapping paper is better for covering a card base.

Make a sample before cutting enough pieces for every guest.

1. Folded name cards

Cut cardstock into rectangles measuring approximately 10 × 8 cm.

Mark the halfway point along the 8 cm sides, then fold to create a standing card with a face approximately 10 × 4 cm.

Write the name before adding embellishments.

A small drawn star or a narrow paper strip is plenty. Check that the name is readable from the guest’s seat.

Saving tip: use the plain side of suitable card and cover unwanted printing only where necessary.

2. Paper napkin bands

Cut paper strips approximately 4 cm wide.

Wrap one around a folded napkin to find the required length, including a small overlap. Secure the ends with tape or glue.

Make the bands loose enough to slide off without tearing.

Use one paper across all settings or repeat a shared colour through different patterns.

Saving tip: gift-wrap offcuts are useful here because the napkin supports the paper.

3. Slot-together paper trees

Draw a symmetrical tree shape with a flat bottom and cut two identical pieces from sturdy cardstock.

On the first tree, cut a slit from the top to the midpoint. On the second, cut from the bottom to the midpoint.

Slide the shapes together at right angles. Adjust the slit width gradually to suit the card thickness.

Test that the tree stands before cutting the rest.

Saving tip: two or three trees can be enough for a small display.

4. A miniature Christmas village

Our paper Christmas town tutorial provides a more detailed project with houses and trees.

Use one colour for a simple village or limit yourself to two coordinating shades.

Allow the glue to dry thoroughly before moving the buildings.

Saving tip: display the village on a sideboard if your dining table needs every centimetre for lunch.

5. Paper angel napkin holders

These paper angel napkin holders make a traditional Christmas detail.

Test the template size with one napkin before preparing a full set. Decorate the card with suitable fabric or paper scraps.

Saving tip: use the same base colour while allowing small differences in the paper covering.

6. Flat paper stars

Draw or trace a simple star onto card.

Cut it out, cover it with paper if needed and add a guest’s name. Place it beside the plate or attach it to a napkin band.

Keep decorative paper away from uncovered food and damp dishes.

Saving tip: a few larger stars are easier to tidy and store than dozens of tiny pieces of confetti.

7. A paper-star wreath

Our paper-star wreath tutorial uses covered card shapes arranged on a ring.

Hang it near the table using a suitable fixing. This gives the dining area a focal point without taking serving space.

Saving tip: use the same paper on the wreath and name cards to connect the room.

Keep all paper decorations away from flames, heat and wet surfaces. Pack dry pieces flat where possible and label the box for next year.

The paper scraps you nearly discarded might be all the Christmas colour your table needs.

Explore

Bedrooms Christmas Craft Ideas Easter Garden and Yard Halloween Holidays Home Decor Kitchens Living Areas Makeovers and Redos More DIY's Organizing Outdoor Decor Porches, Patios and Decks Recycled Crafts Seasonal Trash to Treasure Windows and Walls Wreaths

RSS feed: More Articles More Articles

  • Book Review: Stitches from the Yuletide by Kathy Schmitz
  • Thanksgiving Scrapbook Layouts That Tell the Story Around the Table
  • How To Make Christmas Resin Jewelry: Easy Handmade Pendants, Earrings And Gift Ideas
  • Christmas Bookstore Cross Stitch Design Review: A Cosy Find for Book Lovers
  • The Official Stardew Valley Crochet Book: That Rooster Had Me Hooked
  • 10 Knitted Christmas Bauble Patterns for a Tree Full of Handmade Charm
  • Christmas on a Budget – 7 Christmas Table Decorations You Can Make from Paper to Save Money
  • Easy Christmas Fabric Gift Basket Sewing Pattern (Perfect for Beginners)
  • 12 Christmas Cross Stitch Patterns for Cat Lovers
  • 10 Easy Margarita Recipes for Taco Nights, BBQs and Summer Gatherings

Copyright © 2026 · CraftGossip | Start Here | Contact Us | Link to Us | Your Editors | Privacy and affiliate policy