• Home
  • Suggest A DIY
  • DIY Newsletter

Home and Garden

Ideas For DIY

  • About CraftGossip
  • Our Network
    • Bath & Body Crafts
    • Candle Making Ideas
    • Crochet Ideas
    • Cross Stitch
    • Edible Crafts
    • Felting Patterns
    • Glass Art
    • Home & Garden Ideas
    • Indie Crafts
    • Jewelry Making
    • Kids Crafts
    • Knitting Patterns
    • Lesson Plans
    • Needlework
    • Party Ideas
    • Polymer Clay
    • Quilting Ideas
    • Recycled Crafts
    • Scrapbooking
    • Sewing Patterns
    • Card Making
    • DIY Weddings
    • Not Craft Ideas
  • Giveaways
  • Roundups
  • Store
  • Search

Baby Shower Car Diaper Cake – A Creative Centerpiece That Steals the Show

January 28, 2026 by Shellie Wilson

Remember when diaper cakes were the thing at every baby shower? For a while, they faded a little—maybe we all got distracted by gift registries and Pinterest-perfect hampers. But here’s the truth: diaper cakes are making a comeback, and it’s easy to see why. With the cost of living skyrocketing, practical gifts that still feel special are back in demand. And honestly, what new parent wouldn’t be grateful for a mountain of diapers dressed up as a centerpiece?

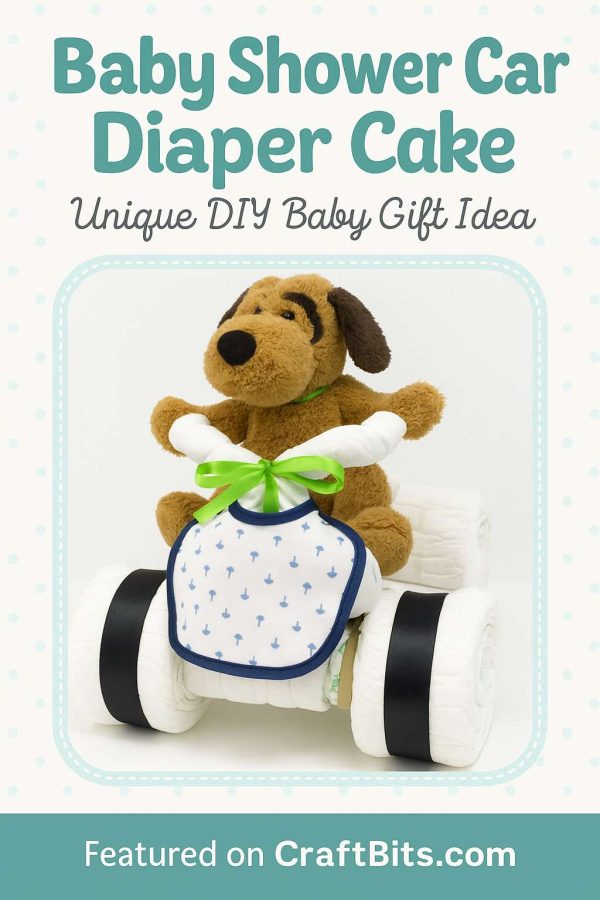
That’s why I love the Baby Shower Car Diaper Cake tutorial from CraftBits. It takes the classic diaper cake idea and gives it a playful twist—turning everyday diapers and baby supplies into the cutest little “car” you’ve ever seen. It’s both a showstopper for the gift table and a stash of essentials the parents will actually use.

Why This Project Works Now More Than Ever

  • Practical yet playful – Diapers are expensive, and gifting them in such a creative way makes the gesture even more thoughtful.

  • Budget-friendly – You can make this with supermarket finds, but it still looks boutique-worthy.

  • Customizable – Match the theme, colors, or even tuck in little toys or bottles to personalize it.

  • Back in fashion – Diaper cakes were once considered a bit “extra,” but in today’s climate they’re a smart and heartfelt gift that parents genuinely appreciate.

The instructions are broken down step by step, so even if this is your first diaper cake, you’ll feel confident. The “wheels” are made by rolling and grouping diapers, then secured with ribbon for a neat finish. Paper towel rolls create the axles, and with a few finishing touches—like a plush toy driver or a baby bottle tucked in—you’ve got a whimsical car that doubles as décor.

It’s sturdy enough to move around and display, but still practical enough to pull apart when the parents are ready to use the diapers.

  • Stick with neutral ribbons if the baby’s gender is a surprise—soft yellow, mint, or polka dots always work.

  • Use strong rubber bands or twine underneath the ribbon to keep things tight and tidy.

  • Display it on a cake board or tray so it’s easy to carry and set up as the shower centerpiece.

The Baby Shower Car Diaper Cake is proof that old trends can circle back stronger than ever. With families watching their budgets, diapers aren’t just cute—they’re gold. This project makes a practical gift feel fun, thoughtful, and memorable. If you’ve got a shower coming up, this one’s a guaranteed crowd-pleaser.

You can grab the full step-by-step guide here: Baby Shower Car Diaper Cake on CraftBits
 

«
»

Have you read?

DIY Macrame Ghost Wall Hanging – Spooky Halloween Decor Made Easy

Every now and then, a craft idea comes along that makes you stop and say, “Now that’s clever!” This DIY macramé ghost wall hanging is exactly that. It takes a timeless craft like macramé and gives it a seasonal twist that feels both fresh and nostalgic.

What I love most about this project is its simplicity. You don’t need to master a dozen knots or spend hours counting stitches—just some cord, a coat hanger or piece of wire, and a little creativity. The lark’s head knots are easy enough for beginners, but the end result looks like something you’d find in a boutique Halloween décor shop.

The design is wonderfully adaptable, too. Want a friendly ghost? Keep the strands long and wispy with big felt eyes. Prefer something spookier? Trim it sharp and give it a dramatic face. The tutorial even suggests brushing out the cords for extra texture or using glow-in-the-dark string for a nighttime surprise—such fun touches!

I also appreciate that this project uses readily available supplies. Most of us have a coat hanger in the closet, some string or rope in the craft bin, and black paper or felt in the junk drawer. It’s the perfect “rainy afternoon” project that turns into a real conversation piece once it’s hanging up.

Displayed over a mantle, on the front door, or even in a window, this ghost has a playful, handmade charm that store-bought décor just can’t match.

Verdict: 5 stars! A quick, affordable, and beginner-friendly Halloween craft that adds big impact to your seasonal decorating.


Explore

Bedrooms Christmas Craft Ideas Easter Garden and Yard Halloween Holidays Home Decor Kitchens Living Areas Makeovers and Redos More DIY's Organizing Outdoor Decor Porches, Patios and Decks Recycled Crafts Seasonal Trash to Treasure Windows and Walls Wreaths

RSS feed: More Articles More Articles

  • Designer Spotlight: Stitching Elf Store
  • Book Review: The Knitter’s Sweater Fitting Bible
  • Nipping and Tucking Digital Stamps: How to Edit, Customize and Perfect Digi Images for Cardmaking
  • Cotton Companion Free Crochet Bag Pattern
  • 2 Crochet Moses Basket Patterns for Babies and Dolls
  • Easy Candy Corn Layered Loaf Soap Cut Into Triangles
  • How to Make a Pumpkin and Crow Halloween Card (and how to fix card mistakes)
  • Felted Daffodil Flower Tutorial Review – Gillian Gladrag
  • 12 Cozy Scrapbook Layout Ideas for Autumn
  • 10 Things To Add To Packet Ramen Noodles To Make Them Gourmet

Copyright © 2026 · CraftGossip | Start Here | Contact Us | Link to Us | Your Editors | Privacy and affiliate policy