• Home
  • Suggest A Craft
  • DIY Newsletter

Home and Garden

Ideas For DIY

  • About CraftGossip
  • Our Network
    • Bath & Body Crafts
    • Candle Making Ideas
    • Crochet Ideas
    • Cross Stitch
    • Edible Crafts
    • Felting Patterns
    • Glass Art
    • Home & Garden Ideas
    • Indie Crafts
    • Jewelry Making
    • Kids Crafts
    • Knitting Patterns
    • Lesson Plans
    • Needlework
    • Party Ideas
    • Polymer Clay
    • Quilting Ideas
    • Recycled Crafts
    • Scrapbooking
    • Sewing Patterns
    • Card Making
    • DIY Weddings
    • Not Craft Ideas
  • Giveaways
  • Roundups
  • Store
  • Search

Christmas Tree Ornament – Painted Rock Robins

October 31, 2018 by Shellie Wilson

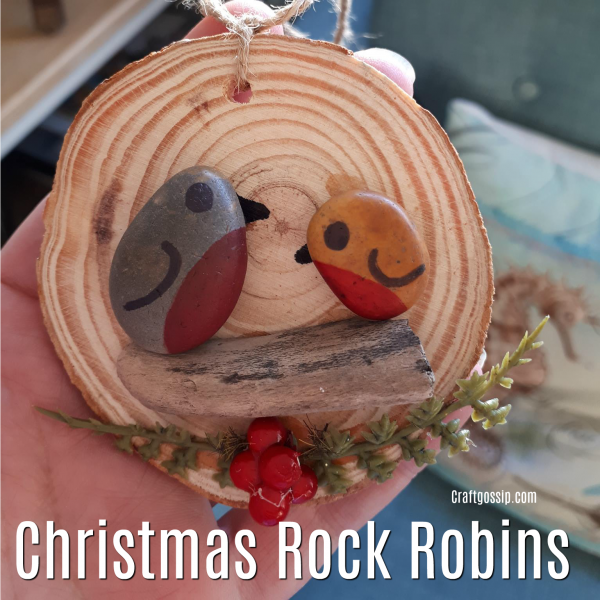
This Christmas craft shows you how to make the cutest little Robin Christmas tree ornament using flat rocks and some paint.

To create this tutorial you will need a wood slice or similar flat surface to make the base. You could use a recycled mason jar lid or another item if you don’t have wood slice.

You will need

Plastic foliage for decoration

String for hanging

2 rocks

Wood stick for perch

paints or sharpie marker pens

Craft Glue

We highly recommend using paint pens when working with rocks, they have a fine point and are far easier to draw with.

The process for this Christmas craft is very easy, Start by creating your Robin birds with marker pens or paint. I prefer marker pens as they are easy to manage.

Once dried glue your rocks into place on the wood slice. Add the wood perch and Finish it off by attaching a string and some foliage at the bottom.


Looking for DIY Christmas tree decorations and crafts? Check these out

Mini Felt Christmas Tree 

Twig Christmas Tree

3D wood Christmas tree 

Christmas Tree Tee-Pee Play tent

Upcycled Book Page Christmas Tree

Fabric Balls Christmas Tree 

Plastic placemat hack Tree

Funky Fabric Tree

Felt Tree


Related Posts:

  • How to Make a Christmas Tree Star from Recycled…
  • 10 Dollar Tree Jenga Block Crafts For Christmas
«
»

Have you read?

Turn Any Vase into a High-End Aged Pottery Look – The Easy DIY Hack You Need

Love the look of those high-end aged pottery vases but not the designer price tag? This DIY Aged Vase tutorial from Restore Decor and More is a game-changer! Using just a few simple household materials, you can transform any ordinary glass or ceramic vase into a stunning, antique-inspired piece that looks straight out of a luxury home store.

This easy and budget-friendly technique adds a beautiful weathered texture, giving your vase that rustic, old-world charm. Whether you’re into farmhouse, boho, or modern organic decor, this DIY project is the perfect way to add character to your home.

Want to see how it’s done? Check out the full tutorial and give your home decor a stylish makeover today!  Read it here!

Explore

Bedrooms Christmas Craft Ideas Easter Garden and Yard Halloween Holidays Home Decor Kitchens Living Areas Makeovers and Redos More DIY's Organizing Outdoor Decor Porches, Patios and Decks Recycled Crafts Seasonal Trash to Treasure Windows and Walls Wreaths

RSS More Articles

  • The Art of Embroidery Design: A Workshop for Developing Your Own Original Stitching
  • Plant Lovers, This DIY Pillow Project Is for You
  • Easy Dangle Earrings – Free Crochet Pattern
  • 9 FREE Mean Girls as Bratz Dolls Coloring Pages
  • Wonder Clips vs. Cheap Clones: The Real Truth After Testing Different Brands
  • Turn Any Vase into a High-End Aged Pottery Look – The Easy DIY Hack You Need
  • How to Stitch with Variegated Floss
  • Sun Activities for Kids
  • 12 Scrapbook Layout Ideas That Use Tags
  • Knits with Sheep

Copyright © 2025 · CraftGossip | Start Here | Contact Us | Link to Us | Your Editors | Privacy and affiliate policy

Copyright © 2025 · Sprinkle Theme on Genesis Framework · WordPress · Log in