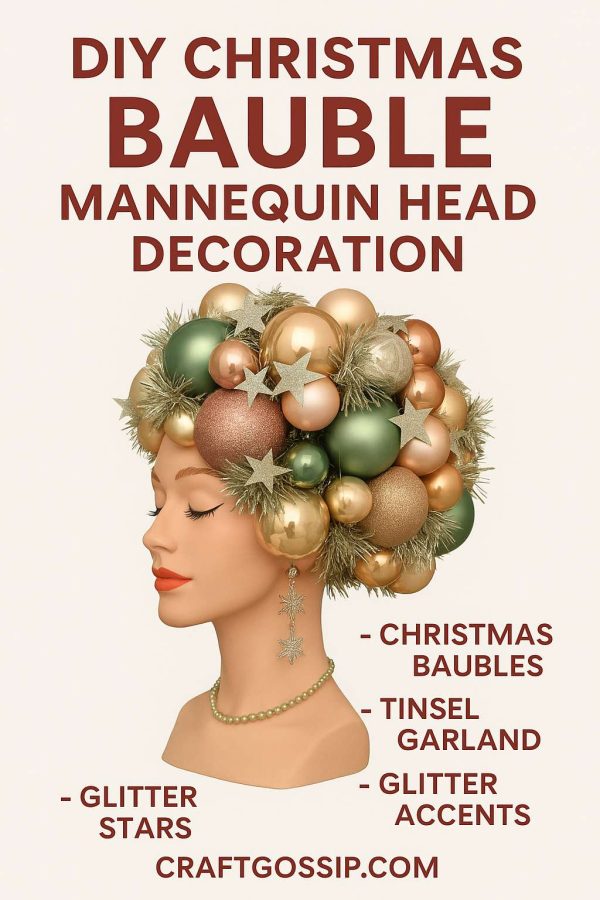
If you’re looking for a show-stopping holiday centerpiece, this mannequin head Christmas decoration is a fabulous way to add glam, sparkle, and a little humor to your décor. It’s part vintage kitsch, part modern glam, and entirely unforgettable. Think of it as a conversation starter that can sit on your entryway table, dining buffet, or even as a quirky Christmas party decoration.
This project is easy to customize with your favorite colors—go traditional red and green, elegant gold and silver, or soft pastels for a whimsical look.
Supplies You’ll Need:
- 1 mannequin head (styrofoam or plastic works fine)
- Assorted Christmas baubles (variety of sizes—small, medium, large)
- Hot glue gun + glue sticks
- Tinsel garland (silver, gold, or matching your color scheme)
- Glitter stars, snowflakes, or other small embellishments
- Faux greenery picks (optional, to tuck between baubles)
- Jewelry accents (beads, faux pearls, old costume earrings/necklaces)
- Spray paint or craft paint (optional, if you want to paint the head base)
Step-by-Step Instructions
1. Prepare the Head
If you’re using a plain mannequin head, give it a quick wipe down. Optional: paint the face white for a stylized retro look, or leave it skin-tone for a more natural base.
2. Plan the “Hairstyle”
Before gluing, lay out your ornaments on the table. Start with the biggest baubles, then fill in with smaller ones. You want the shape to mimic hair volume—fuller on top, tapering down around the ears and back.
3. Start Gluing
Using your hot glue gun, begin attaching the largest baubles around the crown and top of the head. Hold each one in place until the glue sets. Continue around the sides and back, keeping the ornaments tight together.
4. Fill the Gaps
Add medium and small baubles to fill in spaces. Don’t worry if a little head shows through—you’ll cover those with tinsel or greenery.
5. Add Sparkle and Tinsel
Once the baubles are secure, tuck strands of tinsel garland between them. Glue on glitter stars or snowflake cut-outs for extra shine. Faux pine sprigs also look great tucked in for a festive texture.
6. Dress It Up
Give your mannequin some holiday glam by adding costume jewelry. A beaded necklace, sparkly earrings, or even a strand of pearls instantly takes her from plain mannequin to Christmas diva.
7. Display
Place your finished bauble head on a mirrored base or cake stand for extra drama. She’ll sparkle under the lights and quickly become everyone’s favorite holiday guest.
Tips & Variations
- Use shatterproof ornaments if you want it to last from year to year.
- Spray paint older or mismatched baubles to fit your color theme.
- Add fairy lights by weaving a battery-operated string through the ornaments.
- For a vintage look, stick to pastel pinks, mint green, and gold.
- For a glam look, go all metallic with silver, gold, and bronze.
This DIY mannequin Christmas decoration is playful, chic, and over-the-top in the best way. Every time I walk past mine, I can’t help but smile—because Christmas should always feel a little magical and a lot of fun.