• Home
  • Suggest A DIY
  • DIY Newsletter

Home and Garden

Ideas For DIY

  • About CraftGossip
  • Our Network
    • Bath & Body Crafts
    • Candle Making Ideas
    • Crochet Ideas
    • Cross Stitch
    • Edible Crafts
    • Felting Patterns
    • Glass Art
    • Home & Garden Ideas
    • Indie Crafts
    • Jewelry Making
    • Kids Crafts
    • Knitting Patterns
    • Lesson Plans
    • Needlework
    • Party Ideas
    • Polymer Clay
    • Quilting Ideas
    • Recycled Crafts
    • Scrapbooking
    • Sewing Patterns
    • Card Making
    • DIY Weddings
    • Not Craft Ideas
  • Giveaways
  • Roundups
  • Store
  • Search

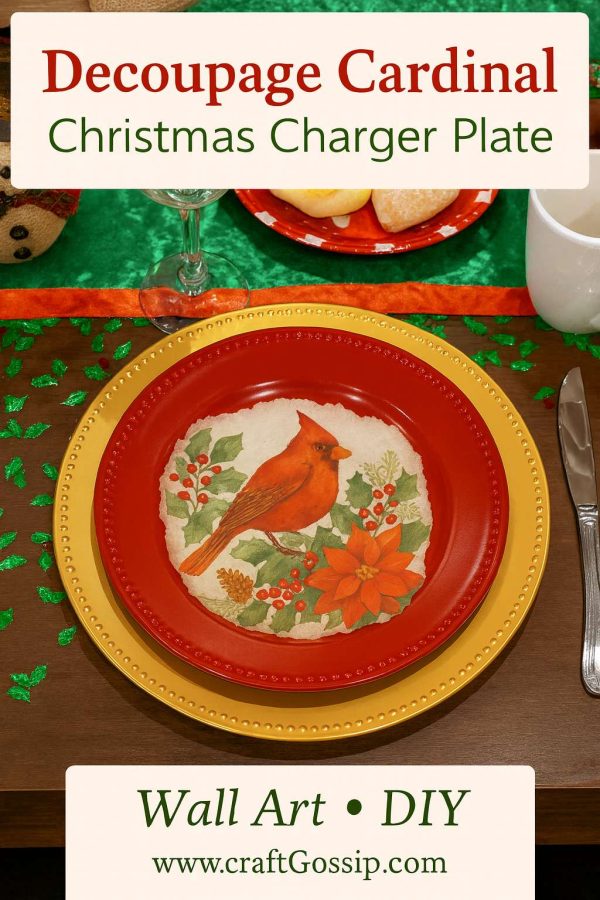
DIY Decoupaged Robin Charger Plate – A Festive Christmas Craft

November 17, 2025 by Shellie Wilson

Every holiday season I like to bring out one or two new handmade décor pieces for the house. It’s not about spending a fortune on decorations but rather adding a personal, heartwarming touch. This year’s favorite? A decoupaged robin charger plate made from Dollar Tree finds. Whether you hang it as wall art, use it as a festive dinner charger, or place it in the center of your Christmas tablescape, this project adds that perfect cozy charm to your holiday setting.

Why Robins for Christmas Décor?

Robins (and cardinals, depending on where you live) are often linked with winter and Christmas. Their bright red feathers stand out beautifully against snowy backdrops and symbolize warmth, cheer, and even loved ones watching over us. Pairing the robin motif with poinsettias and holly brings in all the nostalgia and color of a traditional Christmas.

Materials You’ll Need

You only need a few basics for this project, and most can be found at the dollar store or craft stash you already have:

  • 1 Red charger plate (plastic ones from Dollar Tree work perfectly) 
  • 1 Christmas napkin with a robin/cardinal design 
  • Mod Podge (matte or gloss) 
  • Foam brush or soft bristle brush 
  • Scissors 
  • Plastic wrap/cling film (to smooth wrinkles without tearing) 
  • Clear acrylic sealer spray (optional for durability if you’ll use it at the table) 

Step-by-Step Tutorial

Step 1 – Prep Your Plate

Wipe down the charger plate with a damp cloth to remove dust and fingerprints. This ensures your napkin adheres smoothly.

Step 2 – Separate Napkin Layers

Napkins are usually 2–3 ply. Carefully peel away the white backing layers until you’re left with just the printed robin layer. This thinner layer blends beautifully when decoupaged.

Step 3 – Create Torn Edges

Instead of cutting, gently tear around the robin and poinsettia design. Torn edges help the napkin blend more naturally into the plate, giving that charming “soft edge” effect instead of harsh cut lines.

Step 4 – Apply Mod Podge

Brush a thin coat of Mod Podge onto the center of the charger where the design will sit. Work quickly but evenly.

Step 5 – Place the Napkin

Lay the napkin down gently, starting at one edge and smoothing as you go. Place cling wrap on top, then use your fingers to gently press out wrinkles and bubbles without ripping the delicate napkin.

Step 6 – Seal the Design

Brush another coat of Mod Podge over the top of the napkin, working from the center outwards. Allow to dry completely, then apply a second coat for protection.

Step 7 – Optional Protective Seal

If you’ll be using your charger plate at the dinner table, spray with a clear acrylic sealer to protect it from spills and stains. (Remember, these are decorative only—don’t serve food directly on them.)

«
»

Have you read?

DIY Giant Eyeball Lanterns – Creepy Halloween Decoration

When it comes to Halloween, bigger is always better—and these giant eyeball lanterns prove it! With nothing more than plain white paper lanterns, a little paint, and some imagination, you can create huge, spooky eyes that look like they’ve popped right out of a monster movie.

They’re perfect for hanging from ceilings, displaying on porches, or grouping together in a corner for an eerie effect. Best of all, paper lanterns are super inexpensive (you can grab them on eBay, Amazon, or even your local dollar store), which makes this a great budget-friendly craft for big impact Halloween décor.

Supplies You’ll Need

  • Large round white paper lanterns (various sizes look best) 
  • Acrylic paints or craft paints in black, brown, green, red, orange, or blue (for irises) 
  • Wide paintbrush for background color 
  • Small paintbrush for details 
  • Black construction paper or cardstock (optional for spiky “lashes” or accents) 
  • Hot glue gun or strong craft glue 
  • String or fishing line (if you want to hang them) 

Step-by-Step Instructions

Step 1: Prep the Lanterns

  1. Assemble your white paper lanterns according to the package directions. 
  2. Make sure they’re fully open and the wire insert is in place so the surface is taut for painting. 

Step 2: Paint the Iris

  1. Using a wide brush, paint a large circle in the center of the lantern to create the iris. 
  2. Choose spooky colors—green, red, orange, or blue work wonderfully. 
  3. Don’t worry about making it perfectly smooth; streaks and uneven textures add to the eerie, organic look. 

Step 3: Add the Pupil

  1. Once the iris paint is dry, use black paint to fill in the pupil at the very center. 
  2. Make it large enough to stand out against the iris. 

Step 4: Detail the Eye

  • Use a smaller brush to add darker or lighter streaks in the iris for a more realistic effect. 
  • You can even add thin vein lines in red around the iris to give it that bloodshot look. 

Step 5: Optional Spiky Lashes

  1. Cut long triangles from black construction paper or cardstock. 
  2. Glue them around one side of the lantern so they stick out like sharp monster eyelashes. 
  3. This makes the eyeballs look even more monstrous and stylized. 

Step 6: Display Your Giant Eyeballs

  • Hanging: Use string or fishing line to suspend them from ceilings, trees, or porch rafters so they look like floating eyeballs. 
  • Stacked: Place them in corners, along stairs, or even grouped on your lawn for a spooky display. 
  • Tabletop: Use them as oversized Halloween party props. 

Tips & Variations

  • Glowing Eyes: Insert battery-powered LED lights into the lanterns so they glow from the inside. 
  • Rainbow Eyes: Mix up the colors and make a whole rainbow of creepy eyes. 
  • Monster Cluster: Group multiple eyeballs together in different sizes for a scarier effect. 

This DIY Giant Eyeball Lantern craft is quick, cheap, and gives you maximum Halloween spook factor with minimal effort. Whether you make one or a whole creepy collection, your haunted house setup will definitely be eye-catching!


Explore

Bedrooms Christmas Craft Ideas Easter Garden and Yard Halloween Holidays Home Decor Kitchens Living Areas Makeovers and Redos More DIY's Organizing Outdoor Decor Porches, Patios and Decks Recycled Crafts Seasonal Trash to Treasure Windows and Walls Wreaths

RSS More Articles

  • DIY Giant Eyeball Lanterns – Creepy Halloween Decoration
  • Designer Spotlight: Artmishka Cross Stitch
  • Freebie Friday – Grungy Pumpkins and Fall Tags Junk Journal Printables
  • Free Paisley Flowers Embroidery Design Review
  • Knit a Log Cabin Blanket with All Your Scraps
  • 16 Big Halloween Crochet Projects You Need to Start Now
  • How to Make Tropical Summer Mini Interactive Album
  • Book Review: Fine Whitework by Jenny Adin-Christie
  • Learning Numbers for Preschoolers
  • 6 Free Celestial Coloring Pages

Copyright © 2026 · CraftGossip | Start Here | Contact Us | Link to Us | Your Editors | Privacy and affiliate policy