• Home
  • Suggest A Craft
  • DIY Newsletter

Home and Garden

Ideas For DIY

  • About CraftGossip
  • Our Network
    • Bath & Body Crafts
    • Candle Making Ideas
    • Crochet Ideas
    • Cross Stitch
    • Edible Crafts
    • Felting Patterns
    • Glass Art
    • Home & Garden Ideas
    • Indie Crafts
    • Jewelry Making
    • Kids Crafts
    • Knitting Patterns
    • Lesson Plans
    • Needlework
    • Party Ideas
    • Polymer Clay
    • Quilting Ideas
    • Recycled Crafts
    • Scrapbooking
    • Sewing Patterns
    • Card Making
    • DIY Weddings
    • Not Craft Ideas
  • Giveaways
  • Roundups
  • Store
  • Search

How To Make A Dollar Tree Easter Basket Craft Makeover

March 1, 2019 by Shellie Wilson

How To Make A Dollar Tree Easter Basket Craft Makeover

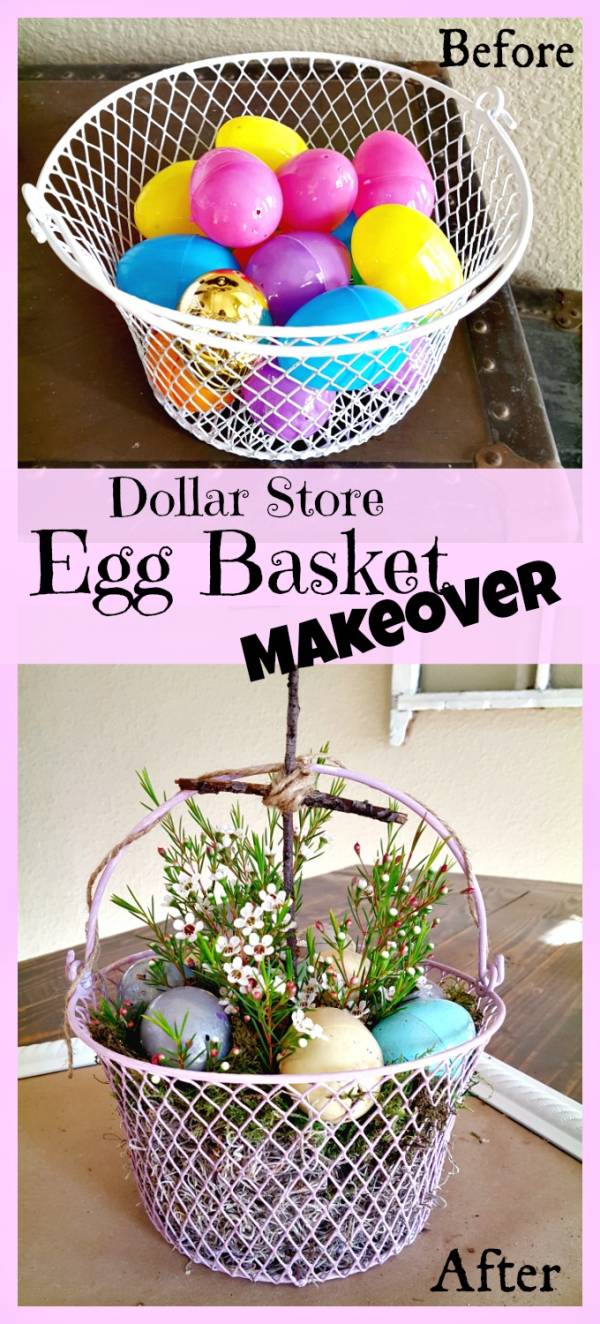
If you’re looking for a super-easy and budget-friendly way to transform the inexpensive baskets from the Dollar Store into stunning Easter décor, you’re in the right place! These simple baskets, which are often found for just a dollar, can be effortlessly upgraded into beautiful Easter centerpieces or festive party decorations with just a few crafting supplies. Whether you’re hosting an Easter brunch or looking for that perfect touch of décor for your home, this project is the perfect solution to make your holiday celebrations extra special without breaking the bank.

You can see the full tutorial on how to hack your baskets and turn them into something truly unique and beautiful by visiting the link here. This Easter craft is a DIY decoration that uses easily accessible supplies from the Dollar Tree or any discount store, making it a great project for crafters on a budget. What’s even better is that most of these items can be found in dollar stores all over the world, making this craft accessible no matter where you are.

Not only are these Easter crafts perfect for your own home décor, but they also make wonderful, thoughtful gifts to share with friends and loved ones at Easter time. Imagine gifting a handmade Easter basket filled with goodies or using them as charming little gift baskets — they’re sure to bring smiles and joy to anyone who receives them. Easter is the perfect time to craft a personalized gift, and this project is an easy way to create something meaningful and special with your own hands.

So, grab some baskets from the Dollar Store, get your crafting supplies ready, and check out the full tutorial to make your own beautiful Easter decorations that are sure to brighten up your home and make this Easter even more memorable!


Related Posts:

  • Create a Gorgeous Dollar Tree Easter Wreath That…
  • 10 Dollar Tree Jenga Block Crafts For Christmas
«
»

Have you read?

How to Make Textured Wall Art: Easy DIY Canvas Art

There’s something magical about textured wall art. It’s got depth, personality, and that “I spent a fortune at a boutique gallery” vibe—without the boutique price tag. And the best part? You don’t need to be a trained artist to create it. If you can spread butter on toast, you can make this.

I made my first DIY textured canvas art on a rainy Saturday afternoon, with a cup of tea on the table and a curious dog sniffing my paint tray (Aloo was very unimpressed). A couple of hours later, I had a statement piece that looked like it belonged in a high-end décor magazine—except it cost me less than a takeaway dinner. Since then I have been obsessed and even made a Halloween Ghost one which you can see over here on our sister blog.

Whether you want a calming neutral piece for above the sofa or a bold modern texture for a gallery wall, this technique works for all styles.

Why You’ll Love Making Your Own Textured Canvas Art

  • Budget-Friendly: Store-bought textured art can cost hundreds—yours will cost a fraction. 
  • Custom Colours: Match your décor exactly (no more “almost” shades). 
  • Therapeutic Process: There’s something soothing about smoothing plaster and watching your art take shape. 
  • One-of-a-Kind: No one else will have the exact same piece hanging on their wall. 

Supplies You’ll Need

Canvas – Any size you like; larger canvases make a bigger impact.

Joint compound, spackle, or lightweight plaster – This is what creates the texture. You’ll find it in the hardware store’s paint aisle.

Putty knife or palette knife – For spreading and sculpting the texture.

Acrylic paint – Choose your main colour(s). Matte paints give a modern, designer look.

Paintbrush or sponge – For applying your colour after the texture dries.

Drop cloth or old sheet – To protect your workspace.

Optional:

  • Metallic paint for highlights 
  • Sandpaper for a smoother finish 
  • Stencils or combs for patterned textures 

Step-by-Step: How to Make Textured Wall Art

1. Prepare Your Workspace

Spread out your drop cloth and set your canvas on a flat surface. This can get a little messy, so old clothes are a must.

2. Apply the Texture

Scoop some joint compound or spackle onto your putty knife. Spread it over the canvas in sweeping motions, as if you’re frosting a cake.

  • For a smooth, modern look, keep your strokes even. 
  • For a rustic, organic feel, let the plaster peak and ripple naturally. 
  • For patterned textures, press in stencils, combs, or even bubble wrap for an imprint. 

3. Let It Dry Completely

Depending on how thick you applied the texture, this can take anywhere from 12–24 hours. Patience is key here—painting too soon can ruin the effect.

4. Paint Your Design

Once dry, use acrylic paint to cover the texture. Neutrals like beige, ivory, or warm grey work beautifully for a minimalist look.

  • Want a bold statement? Go for deep navy, charcoal, or even emerald green. 
  • For a luxe finish, lightly dry-brush metallic gold or bronze over the raised areas to make the texture pop. 

5. Hang and Admire

Once the paint is dry, your art is ready for its gallery debut—aka your living room wall.

Tips for Gorgeous Results

  • Mix Texture Heights: Add thicker plaster in some areas and thinner layers in others for depth. 
  • Use Two Tones: Layer a darker base coat, then brush a lighter shade over the raised texture for a dimensional effect. 
  • Practice First: Try a small canvas before committing to a large statement piece. 

Creating your own textured wall art is a satisfying, budget-friendly way to bring designer style into your home. The process is relaxing, the materials are affordable, and the result is a unique piece that looks far more expensive than it is.

So next time you’re tempted to scroll online for pricey wall décor, grab a canvas, some plaster, and your favourite paint colours—you might just surprise yourself with how chic your creation turns out.


Explore

Bedrooms Christmas Craft Ideas Easter Garden and Yard Halloween Holidays Home Decor Kitchens Living Areas Makeovers and Redos More DIY's Organizing Outdoor Decor Porches, Patios and Decks Recycled Crafts Seasonal Trash to Treasure Windows and Walls Wreaths

RSS More Articles

  • DIY Reusable Bowl Covers: Eco-Friendly and Stylish Kitchen Essential
  • Super Cute Ghost Cross Stitch Patterns
  • Knit a Sweet Striped Vest for Kids
  • DMC American Football Embroidery Pattern – A Fun and Sporty Stitch for Game Day Fans
  • Disney Scrapbook Mini Album Project
  • Free Crochet Pattern One Hour Slippers – Quick, Cozy and Perfect for Gifting
  • Craft the Ultimate Multitasking Messenger Bag
  • Self-Love Spell Bath Bomb: Venus Ritual for Witchcraft and Beauty Spells
  • These Viral Whiskey Cocktails Are All You Need This Fall
  • Build a Paper City with Free Printables

Copyright © 2025 · CraftGossip | Start Here | Contact Us | Link to Us | Your Editors | Privacy and affiliate policy