• Home
  • Suggest A Craft
  • DIY Newsletter

Home and Garden

Ideas For DIY

  • About CraftGossip
  • Our Network
    • Bath & Body Crafts
    • Candle Making Ideas
    • Crochet Ideas
    • Cross Stitch
    • Edible Crafts
    • Felting Patterns
    • Glass Art
    • Home & Garden Ideas
    • Indie Crafts
    • Jewelry Making
    • Kids Crafts
    • Knitting Patterns
    • Lesson Plans
    • Needlework
    • Party Ideas
    • Polymer Clay
    • Quilting Ideas
    • Recycled Crafts
    • Scrapbooking
    • Sewing Patterns
    • Card Making
    • DIY Weddings
    • Not Craft Ideas
  • Giveaways
  • Roundups
  • Store
  • Search

DIY Dollar Tree Fabric Pumpkins

September 5, 2018 by Shellie Wilson

DIY Dollar Tree Pumpkins

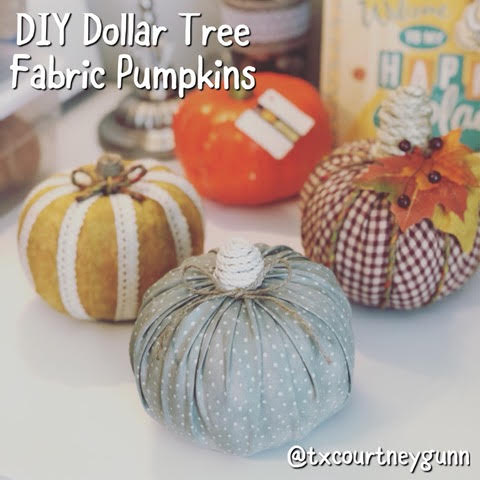
(Approximate cost per pumpkin project $1.85)

For the yellow pumpkin (gives a quilted look)

1. Cut strips of fabric that measure from top of pumpkin to bottom. Strips measure approximately 2 inches wide and 8 inches long.

2. Gently twist the stem off pumpkin. It will come out with a small wooden stake. Just pull it out or break it off.

3. Using matte Mod Podge and a foam brush, apply Mod Podge to the back of a fabric strip. Secure the strip to the pumpkin by placing it on top of the pumpkin and wrapping it around to the the bottom.

4. Continue wrapping strips of fabric, one at a time, around the pumpkin, making sure to overlap each strip on the one before it.

5. Once it is covered, secure the bottom and top of pumpkin with extra Mod Podge. If any fabric is sticking out on the sides, secure with Mod Podge until you get the look you are trying to achieve.

6. Next, add lace. I cut strips of Dollar Tree lace and only used Mod Podge to secure it to the top and bottom of the pumpkin.

7. Using hot glue and twine, wrap the stem with twine and attach it to the top of pumpkin with hot glue. Make sure to periodically add glue as you wrap the twine around stem. Finish it off by adding a bow with some hot glue.

For the red check or green pumpkin: (gives a tufted look)

1. Cut a 20×20 fabric square.

2. Place pumpkin in middle and gather fabric up all around it to top of pumpkin.

3. Use a zip tie (you could use floral wire) to hold fabric on top. Don’t secure zip tie too tight so that you can manipulate the fabric and get the look you want by pulling/loosening fabric.

4. Tighten the zip tie (it will look like you have a fluffy fabric stem) and start trimming extra fabric to the length you want the stem to be.

3. Then using hot glue, attach the jute/rope and start wrapping it around the “fabric stem” until it is at the height you want. Secure the jute/rope with hot glue each time you wrap it around.

4. Add a bow to the green one and some leaves and berries to the red* pumpkin.

*The red one has fall colored rope that I just wrapped around over and over to make the segments. Do not cut it into individual steps like the lace on the yellow one.

BIO: Courtney Gunn

I am a stay at home mom who loves all things crafting, DIY, bargain shopping, planning, baking, and organizing. Creating fun projects on the cheap, is some of my favorite type of projects to complete!

Social Media
Instagram: @txcourtneygunn
YouTube Channel: https://www.youtube.com/channel/UC6et-bhsylsmmSKWEdqscSQ
Blog: https://www.livinginorganizedchaosblog.com 

Related Posts:

  • 15 DIY Dollar Tree Pizza Tray Christmas Wreaths
  • Create a Gorgeous Dollar Tree Easter Wreath That…
«
»

Have you read?

Homesteading is Trending! Here’s Why The Practical Guide to Homesteading is the Ultimate Step-by-Step Blueprint for Beginners Looking to Live Off-Grid

If you’ve ever dreamed of ditching the urban grind and living a more sustainable, self-reliant life, The Practical Guide to Homesteading is the book you’ve been waiting for. Whether you’re looking to grow your own food, raise livestock, or become energy independent, this comprehensive guide is the perfect starting point for beginners.

Timberline Preparedness offers step-by-step strategies that are not only affordable but practical, making this guide accessible to anyone, no matter where you live. From creating energy-efficient homes to harvesting rainwater, the author covers essential aspects of homesteading in a way that’s clear, actionable, and beginner-friendly.

One of the standout features of this book is its versatility. The author doesn’t just focus on rural living—there are tailored solutions for urban and suburban spaces too. Even if you’re working a full-time job, you’ll find easy-to-follow advice for fitting homesteading into your daily routine without feeling overwhelmed.

What I appreciated most were the in-depth sections on food preservation, water management, and energy solutions. The book dives into various ways to preserve food without relying on electricity, such as dehydration and canning, as well as simple but effective methods of rainwater harvesting. For those interested in growing food, the gardening strategies outlined can be adapted to any space, from a small urban garden to larger rural plots.

Another highlight is the section on livestock. The book provides valuable insights on choosing the right animals for your resources and goals, ensuring that you can start small and scale up gradually. It also covers zero-waste living, financial planning, emergency preparedness, and DIY sustainable construction, giving readers the tools they need to build a homestead from the ground up.

This book is not just for dreamers; it’s for doers. The practical advice, combined with the author’s straightforward writing style, makes it easy for anyone to begin their homesteading journey. Whether you’re taking your first step toward self-sufficiency or expanding an existing homestead, The Practical Guide to Homesteading is an invaluable resource.

In short, this guide is an essential read for anyone seeking to live a more sustainable, fulfilling life, no matter where they are. With its clear instructions, approachable advice, and emphasis on practicality, it’s the perfect blueprint for building a homestead and embracing a self-sufficient lifestyle. Highly recommended!


Explore

Bedrooms Christmas Craft Ideas Easter Garden and Yard Halloween Holidays Home Decor Kitchens Living Areas Makeovers and Redos More DIY's Organizing Outdoor Decor Porches, Patios and Decks Recycled Crafts Seasonal Trash to Treasure Windows and Walls Wreaths

RSS More Articles

  • Book Review: Upcycle – Transform Everyday Objects into Stylish Sustainable Home Decor
  • 6 FREE Wedding Elements Digital Stamps to Download
  • Create a Fun and Stylish DIY Circle Skirt for Back-to-School with Spoonflower Fabric
  • DMC Spring Flowers Embroidery Pattern – A Fresh and Floral Stitch for All Seasons
  • Knit a Glasses Holder for Your Bedside Table
  • How to Make a Travel Tag Mini Album
  • Homesteading is Trending! Here’s Why The Practical Guide to Homesteading is the Ultimate Step-by-Step Blueprint for Beginners Looking to Live Off-Grid
  • Stay In Crochet Cardigan | Free Crochet Pattern
  • Red, White And YUM! Irresistible 4th of July Treats Everyone Will Devour
  • Designer Spotlight: Crystal Feather Crafts

Copyright © 2025 · CraftGossip | Start Here | Contact Us | Link to Us | Your Editors | Privacy and affiliate policy