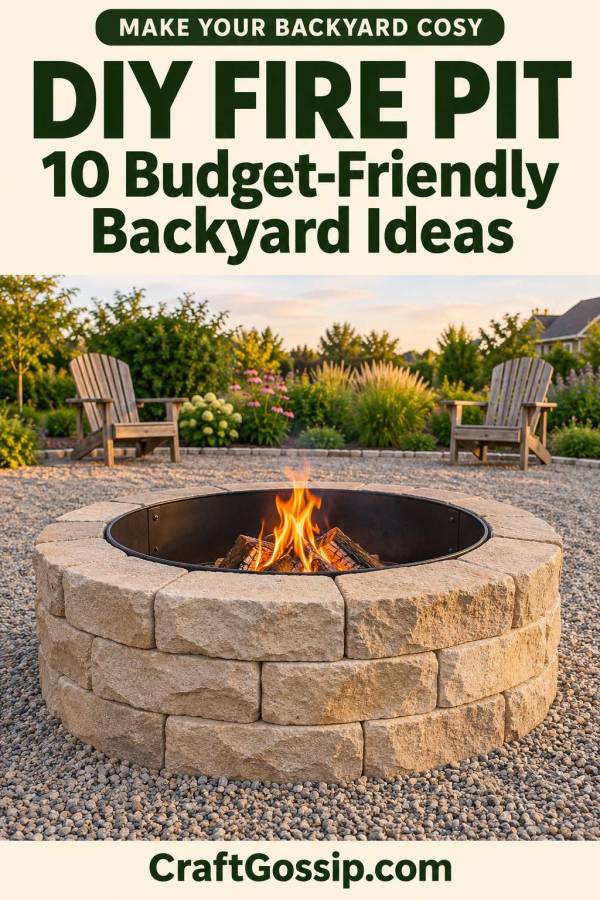
There is something about a backyard fire pit that makes an ordinary evening feel like a little occasion. Pull up a chair, put the kettle on before heading outside, and suddenly nobody seems quite so interested in disappearing back to their screens.
A DIY fire pit can also give an awkward patch of garden a purpose. That bare corner you keep meaning to do something with? It might become your favourite place to sit when the weather cools.
The trick is choosing a project that suits your space, your budget and the amount of building you actually want to do. A simple fire pit kit and a tidy seating area can be every bit as inviting as a large custom installation.
Before buying a trolley full of blocks, though, there are a few things worth sorting out. Materials, drainage, local rules and the space around the fire all matter.
Here are ten backyard fire pit ideas, followed by a practical guide to planning your build without letting a modest project turn into an accidental landscaping bill.
What Is the Easiest DIY Fire Pit for Beginners?
For many beginners, a purpose-made wood-burning fire pit kit is the most straightforward building option.
Look for a system with compatible wall blocks, a suitable insert or liner, and clear installation instructions. You still need to prepare the site properly, but you avoid guessing whether unrelated materials will work together.
If your main goal is an inviting outdoor gathering space, a manufactured fire bowl with a DIY seating area may involve even less construction.
Choose the fire-containing component first. Design the decorative area around it second.
That order can save a surprising amount of measuring, returning and muttering in the hardware aisle.
Check These Things Before You Build
Start with your local council and fire authority. Rules can affect whether a fire pit is allowed, its location, its construction and when you may use it. Smoke nuisance requirements matter too.
For Australian readers, check restrictions in your own state and council area. Queensland readers can start with the Queensland Fire Department’s outdoor fire guidance and check current restrictions before every use.
Next, confirm:
- The required clearance from buildings, fences, vegetation and other combustible materials.
- Whether your chosen design is allowed at ground level or must be raised.
- The manufacturer’s requirements for the base, drainage, ventilation and surrounding space.
- Whether underground services run through any area you intend to excavate.
- Whether smoke is likely to drift towards neighbouring windows or washing lines.
A small fire pit still needs adequate space. Making the bowl smaller does not automatically make a cramped courtyard suitable.
10 DIY Fire Pit Ideas for Your Backyard
1. A Round Fire Pit Kit With a Simple Seating Area
A circular kit is a good starting point if you want the familiar campfire look without designing the structure from scratch.
Choose a colour that works with your existing paving or garden edging. Repeat that colour elsewhere and the whole area will feel more considered.
Keep the first stage manageable: build the approved fire pit system, position your existing chairs, and add further landscaping later.
Best for: Beginners wanting a permanent backyard feature.
2. A Square Fire Pit for a Modern Garden
A square fire pit works well with straight garden paths, rectangular patios and contemporary outdoor furniture.
Use a kit designed for a square configuration. Curved blocks, rectangular blocks and liners are not automatically interchangeable.
Simple finishes look particularly effective here. Charcoal, warm grey or sandy tones can create a clean backdrop without competing with the garden.
Best for: Gardens with strong straight lines.
3. A Fire Bowl With a DIY Gravel Gathering Area
Sometimes the cleverest DIY project is the area surrounding the fire.
A purpose-made fire bowl can become the centrepiece of a defined gravel seating zone, provided the installation follows its ground-protection and clearance requirements.
Gravel outside the appliance can help define the space, but it does not automatically protect everything underneath from heat. Follow the bowl manufacturer’s instructions.
For other ways to improve the surrounding garden gradually, browse our budget-friendly backyard DIY ideas.
Best for: A backyard makeover with less masonry work.
4. A Rustic Brick-Look Fire Pit
Brick brings a lovely established feel to a garden, especially beside cottage planting and weathered outdoor furniture.
For this look, choose a fire pit system with a brick-style exterior or a properly designed masonry construction with suitable refractory materials where required.
Old bricks can be tempting, but appearance alone does not tell you whether they are suitable for repeated heat exposure.
Save unidentified salvage for a separate decorative project unless its suitability has been confirmed.
Best for: Cottage gardens and traditional outdoor spaces.
5. A Stone-Look Fire Pit With Matching Edging
A stone-look kit can help a new fire pit settle into an established garden.
The useful decorating trick is repetition. Pick up one shade from the fire pit in nearby edging, pots or a separate path.
You do not need to rebuild the whole garden to make the new feature belong.
Use components intended for the installation rather than collecting random stones for the fire chamber.
Best for: Natural-looking gardens with existing stone features.
6. A Compact Fire Pit Area With Two Comfortable Chairs
A fire pit area does not need six matching seats and an outdoor sofa.
Two comfortable chairs can make a much more useful setup for a couple who want somewhere pleasant to sit after dinner.
Mark out the required clearances, chair positions and walking routes before committing. If everything only fits when nobody moves, the layout needs another look.
Best for: Smaller backyards with sufficient safe clearance.
7. A Fire Pit With a Separate Paved Seating Zone
Paving can make chair legs more stable and create a defined gathering area.
However, ordinary patio paving should not be treated as a ready-made fire chamber or assumed safe beneath every fire pit. Confirm how the selected system protects the surface and what foundation it requires.
A separate paved seating area also gives you somewhere useful to sit when the fire is not lit.
Best for: A more permanent outdoor room.
8. A Fire Pit With a Freestanding Bench Nearby
A bench can give the area structure without surrounding the entire fire.
Keep combustible seating outside the required clearance zone, allow comfortable circulation, and avoid positioning a bench where people must squeeze past the fire to leave.
Loose chairs opposite the bench give you flexibility as the group changes.
For related furnishing and garden projects, our outdoor DIY ideas on a budget offer more inspiration.
Best for: Family gardens where flexible seating matters.
9. A Fire Pit Area With Solar Path Lighting
A fire provides atmosphere, but it should not be your only source of light.
Solar path lights can help mark the route back to the house without introducing trailing cables. Place them outside the heat zone and away from foot traffic.
For a handmade accent elsewhere in the garden, try this DIY plant pot lighthouse with a solar light. It makes a cheerful addition to a separate garden bed or entrance.
Best for: Making the whole gathering area easier to use after dark.
10. A Fire Pit Makeover Using Furniture You Already Own
Before buying anything decorative, gather your existing outdoor chairs, side tables and suitable lighting.
You may discover that the missing ingredient is a clear layout rather than new furniture.
Clean everything, remove the broken pot collection, and repeat one or two colours. Keep cushions and other combustible accessories well away from the fire.
Best for: Keeping the styling budget under control.
How to Build a DIY Fire Pit Using a Kit
These steps explain the usual planning and assembly sequence. Your selected kit’s installation instructions determine the dimensions, materials and construction details.
Step 1: Choose the System
Select the fuel type, finished size and style before purchasing base materials.
For a beginner wood-burning project, look for a complete system with a specified insert or lining arrangement.
Gas fire features need compatible, purpose-designed components and appropriately qualified installation where required. Treat fuel connections as a separate professional task.
Step 2: Mark Out the Whole Area
Mark the outside edge of the fire pit, the required clearances and the seating positions.
Put your chairs in place and walk through the layout.
Check that people can approach, sit down and leave without stepping into the clearance zone.
Step 3: Prepare the Foundation
Follow the kit’s requirements for excavation, base material, compaction and levelling.
Do not build directly over roots, loose organic material or buried debris.
Plan drainage at this stage. A sunken bowl of rainwater is rather less appealing than the cosy garden feature you had in mind.
Step 4: Dry-Fit the First Course
Arrange the first row of blocks without adhesive or mortar.
Check the level across several directions and confirm the dimensions against the insert and instructions.
Correcting the first course now is much easier than persuading a finished wall to stop leaning.
Step 5: Assemble the Walls
Build to the specified height and pattern.
Use only the mortar, adhesive or dry-stack method approved for that system. Preserve any required air openings and observe curing times.
More height is not automatically an improvement. It changes the structure and may affect the way the system works.
Step 6: Install the Insert or Lining
Fit the specified insert, firebrick or other approved lining as directed.
A thin metal ring is not a universal solution for making any surrounding block suitable. Compatibility, spacing and the base design still matter.
Step 7: Check Before the First Fire
Confirm that the structure is stable, required curing is complete, drainage works and the area is clear.
Follow the manufacturer’s first-use instructions and check local fire restrictions again before lighting.
How Much Does a DIY Fire Pit Cost?
The honest answer depends on what you include.
A headline price for a few blocks may leave out the insert, foundation, delivery and the entire seating area.
Compare projects using this simple budget:
| Budget item | What to include |
|---|---|
| Fire pit system | Blocks, insert or bowl, caps and required accessories |
| Site preparation | Excavation, waste removal and equipment hire |
| Foundation | Specified base materials and compaction |
| Assembly | Approved mortar or adhesive, if required |
| Surrounding area | Edging, paving or gravel outside the fire chamber |
| Finishing touches | Seating, lighting, tools and a suitable cover |
| Delivery | Heavy materials can be expensive to transport |
Price the complete list locally before buying.
To keep costs down, reduce the decorative scope first. Reuse chairs, keep the surrounding area modest and add extras over time.
Materials to Avoid Guessing With
A fire pit is one project where “it was free” is not enough information about a material.
Avoid using timber as the fire-containing wall. Do not assume ordinary concrete blocks, decorative pebbles, river stones, planters or salvaged metal containers are suitable for direct fire exposure.
Choose products specifically intended for the job and follow the installation specifications.
Also keep ordinary paint, decorative sealers and general-purpose construction adhesives away from hot surfaces unless the product and fire pit manufacturer explicitly approve that use.
DIY Fire Pit Questions
Can I Build a Fire Pit With Ordinary Pavers?
Some systems use paving or walling products as part of an approved design. That does not mean every paver is suitable for direct flame or repeated high heat.
Choose a specified system and follow its lining and foundation requirements.
Does a Fire Pit Need Drainage?
The design needs a way to manage rainwater. The correct solution depends on the pit, soil and installation.
Follow the system instructions rather than drilling holes or adding drainage layers at random.
What Goes in the Bottom of a Fire Pit?
Use the material specified for your particular system. There is no single combination of sand, gravel or rock that suits every fire pit.
Can I Put a Fire Pit on a Deck?
Do not assume a heat mat makes a wood or composite deck suitable. The appliance instructions and local rules must explicitly allow the installation, including surface protection and clearances.
How Do I Use a Wood-Burning Fire Pit Responsibly?
Burn suitable dry, seasoned firewood, keep water ready and have an adult continuously attend the fire. Never use petrol or other flammable liquids to start it.
Extinguish the fire completely before leaving or going to bed. Follow fire authority guidance on cooling the embers, and do not bury them under sand or soil.
Make the Space Useful Beyond Fire Pit Nights
The best backyard fire pit area should still be somewhere you enjoy sitting when the fire is cold.
Comfortable chairs, an easy path and a place for a cup of tea will do more for everyday use than an elaborate arrangement nobody wants to maintain.
Start with the right fire pit system, give the foundation proper attention, and let the finishing touches happen gradually.
There is no need to build an entire outdoor resort before inviting someone over for an evening in the garden.


Leave a Reply