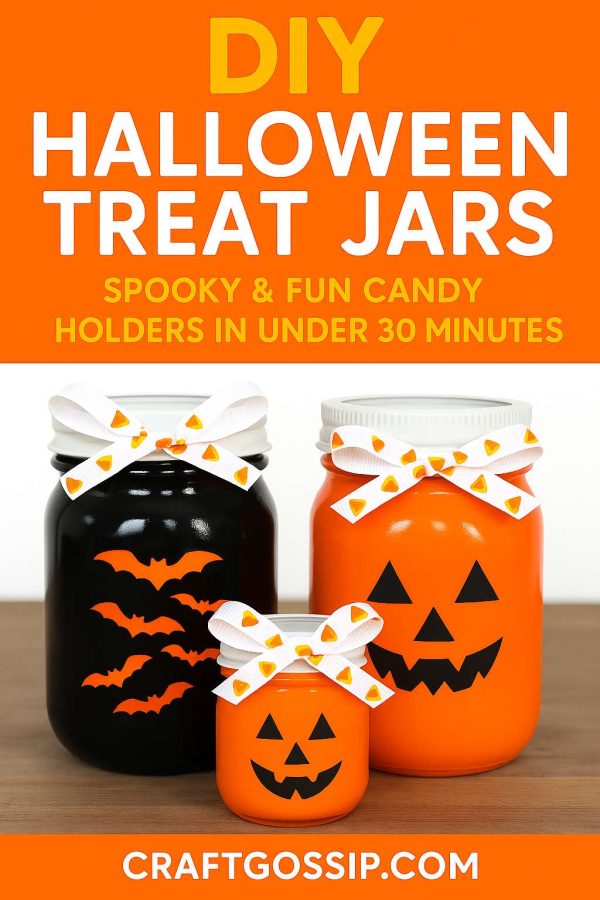
Halloween is the season for playful scares, sweet treats, and just a touch of crafty magic. These DIY Halloween treat jars are not only quick to make, but they also add a festive pop to your home, party table, or gift baskets. Whether you’re hosting a spooky soirée, surprising the grandkids, or prepping for a neighborhood candy swap, these jars will steal the show.
Forget the store-bought plastic buckets—these handmade Halloween jars have personality! You can customize them with Jack-o’-lantern faces, flying bats, ghosts, or even glittery black cats. Best of all, they can be made in under half an hour, even if you’ve never painted a jar before.
Materials You’ll Need
- Mason jars or recycled glass jars – 16 oz or pint-size works perfectly
- Acrylic craft paint – black, orange, white, or purple
- Foam paint brushes – for smooth coverage
- Halloween stickers or vinyl decals – Jack-o’-lantern faces, bats, ghosts, or witch hats
- Painter’s tape – if creating your own stencils
- Ribbon or washi tape – Halloween-themed patterns work best
- Hot glue gun – optional, for securing ribbons or embellishments
- Clear acrylic sealer – optional, for a glossy finish
- Candy or small toys – to fill your jars
Step-by-Step Instructions
1. Prep Your Jars
Wash and dry your jars thoroughly to remove any residue. If you’re using recycled jars, soak them in warm soapy water to peel off labels.
2. Apply Stickers or Stencils
Before painting, place your Halloween decals (Jack-o’-lantern faces, bats, or ghosts) onto the outside of the jar. Press them down firmly so paint won’t seep underneath.
Tip: If you can’t find decals you like, cut your own shapes out of adhesive vinyl or use painter’s tape to create simple designs.
3. Paint the Jars
Using a foam brush, apply two to three thin coats of acrylic paint over the outside of the jar and over the stickers. Let each coat dry before applying the next.
- Orange paint + Jack-o’-lantern face = Classic pumpkin jar
- Black paint + bat shapes = Spooky night scene
- White paint + ghost cutouts = Cute, friendly spirits
4. Peel the Stickers
Once the paint is completely dry, carefully peel off your stickers to reveal the clear glass “windows” in your design. This creates that magical see-through effect for candy.
5. Add Finishing Touches
Decorate the jar lids with Halloween ribbon, washi tape, or fabric. Secure with hot glue if necessary. You can also paint the lids to match your theme.
6. Fill with Treats
Pour in your favorite Halloween candies—think candy corn, orange-wrapped chocolates, or even mini toys. The clear windows let the treats peek through, adding to the fun.
Creative Variations
- Glow-in-the-Dark Jars – Use glow-in-the-dark paint for a spooky nighttime surprise.
- Glitter Glam – Add a layer of Mod Podge and glitter for sparkly witchy vibes.
- Kids’ Craft Party – Let kids choose their own jar designs with washable paints.
- Gothic Chic – Use black lace and metallic silver paint for a more grown-up Halloween style.
Tips for Success
- Use foam brushes instead of bristle brushes to avoid visible brush marks.
- If you want to wash and reuse the jars later, apply paint only to the outside and avoid dishwashers.
- Layering paint in thin coats gives the smoothest finish.
- For extra durability, seal your jars with a clear acrylic spray.
Why You’ll Love These Halloween Treat Jars
- Fast – Make them in 30 minutes or less
- Budget-Friendly – Use jars you already have and leftover craft paint
- Customizable – Choose colors, faces, and ribbons to match your style
- Giftable – Perfect for teachers, neighbors, or party favors
These quick and easy Halloween treat jars are proof that a little creativity goes a long way. With just a few supplies, you can transform plain glass jars into festive, functional décor that doubles as a candy holder. Whether you go cute, spooky, or somewhere in between, your Halloween table (and your candy stash) will thank you.