• Home
  • Suggest A DIY
  • DIY Newsletter

Home and Garden

Ideas For DIY

  • About CraftGossip
  • Our Network
    • Bath & Body Crafts
    • Candle Making Ideas
    • Crochet Ideas
    • Cross Stitch
    • Edible Crafts
    • Felting Patterns
    • Glass Art
    • Home & Garden Ideas
    • Indie Crafts
    • Jewelry Making
    • Kids Crafts
    • Knitting Patterns
    • Lesson Plans
    • Needlework
    • Party Ideas
    • Polymer Clay
    • Quilting Ideas
    • Recycled Crafts
    • Scrapbooking
    • Sewing Patterns
    • Card Making
    • DIY Weddings
    • Not Craft Ideas
  • Giveaways
  • Roundups
  • Store
  • Search

DIY No-Sew Primitive Zombie Dolls – Creepy Halloween Craft

September 30, 2025 by Shellie Wilson

Primitive crafts don’t always have to be sweet and Christmassy. With a few spooky tweaks, you can transform the same rustic style into something that feels perfectly creepy for October. These no-sew primitive zombie dolls are quick to make, delightfully imperfect, and just the right balance of eerie and fun.

Whether you’re decking out your Halloween party, spooking up your mantel, or just want something ghoulishly handmade, these dolls will definitely raise eyebrows (and maybe goosebumps).

Supplies You’ll Need

  • Drop cloth, muslin, or scrap fabric (pre-washed and tea/coffee-dyed for that aged look)

  • Doll or gingerbread-style template (any simple body outline works)

  • Fabric scissors or pinking shears

  • Hot glue gun & glue sticks

  • Polyester stuffing or cotton filling

  • Black, red, and green acrylic paint or fabric paint

  • Old buttons, scraps of lace, ribbon, or twine

  • Embroidery floss or black marker for “stitches” (optional)

  • Sandpaper for distressing edges

Step-by-Step Instructions

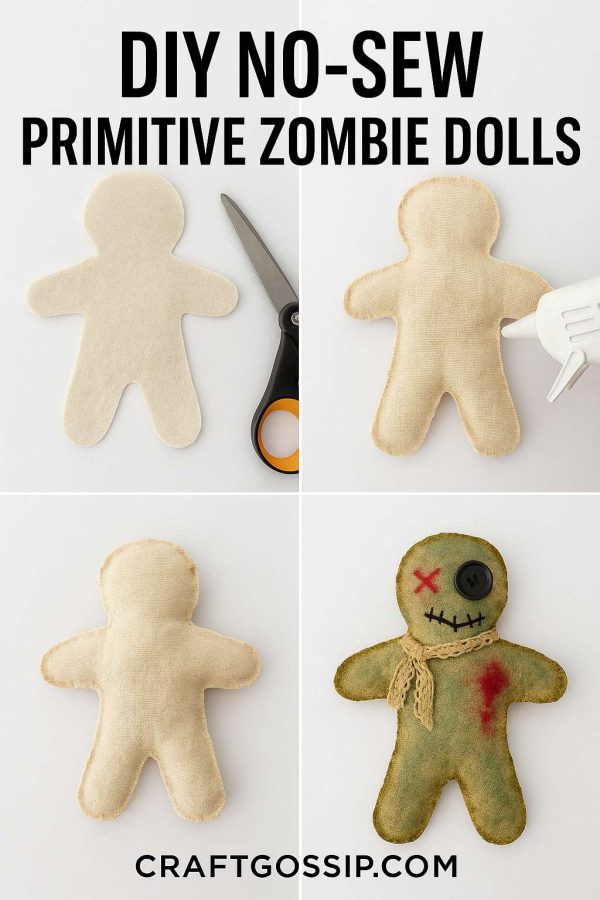
Step 1 – Cut Your Doll Shapes

Trace your doll or gingerbread man template onto your fabric. Cut two shapes for each doll (front and back). Imperfect edges add to the spooky charm, so don’t stress about neatness.

Step 2 – Glue the Edges

Glue the two pieces together around the edge, leaving a small gap at the bottom for stuffing. Work slowly in sections so the glue bonds before cooling.

Step 3 – Stuff Your Doll

Add polyester filling, pushing it into the arms, legs, and head first, then the body. You want it to look lumpy and uneven—that’s part of the zombie effect. Glue the opening closed.

Step 4 – Distress the Fabric

Lightly sand the edges or pull a few threads loose for that ragged, decayed look. You can even dab on a little diluted black or brown paint for “dirt.”

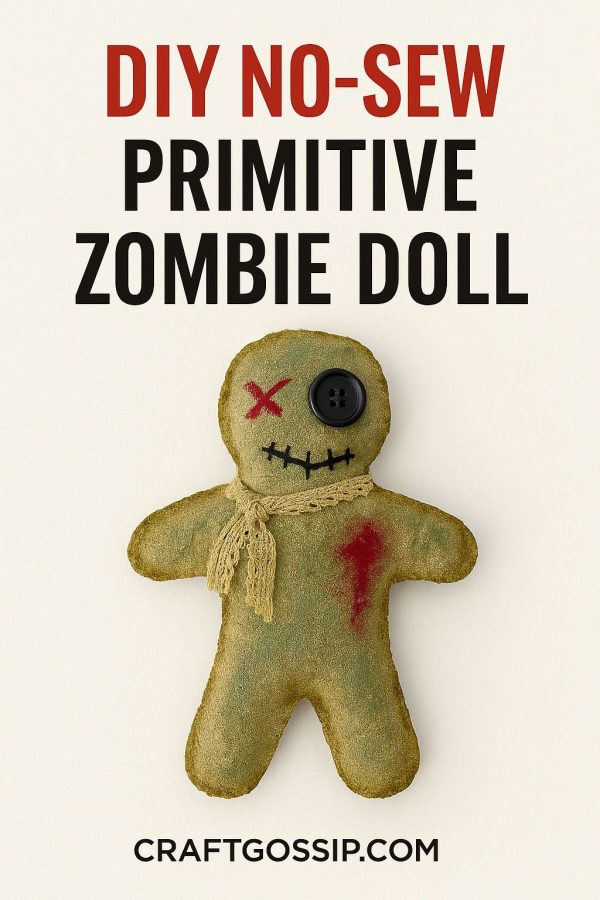
Step 5 – Add the Zombie Details

  • Eyes: Glue mismatched buttons, or paint one eye big and the other tiny. A red X or black stitch marks also work great.

  • Mouth: Paint on a crooked smile or stitch across the face with black thread for a Frankenstein vibe.

  • Skin: Use green or gray paint to give your zombie doll a sickly complexion. Add red paint splatters for a “bloody” look.

  • Clothes: Tie on scraps of lace or ribbon, shred them up, and glue in place for ragged zombie attire.

Step 6 – Display

Perch them on your mantel, nestle them in a bowl of faux cobwebs, or line them up on your porch with a pumpkin or two.

Related Posts:

  • DIY Eyeball Plant – Creepy Halloween Craft with Ping…
  • DIY Venus Fly Trap Plant – Creepy Cute Halloween Craft
«
»

Have you read?

Easy Patriotic Mason Jar Cricut Craft for Summer Decorating

Mason jars really do earn their keep in the craft room, don’t they? One minute they’re holding buttons, the next they’re filled with flowers, fairy lights, paintbrushes, or the random collection of pens that somehow migrates from every drawer in the house.

This Stars & Stripes 4th of July Mason Jar Cricut Craft from CraftBits is a simple red, white, and blue project that turns plain pint-size mason jars into festive patriotic decorations. It uses paint, white vinyl, a Cricut machine, and a stars-and-stripes SVG file to create a clean, bold design that works beautifully for 4th of July table decor, patriotic porch styling, summer BBQs, Memorial Day, Labor Day, and Veterans Day displays.

You can find the full tutorial here: Stars & Stripes 4th Of July Mason Jar – Cricut Craft.

What I like about this project is that it looks polished without being overly complicated. The jars are painted red and blue, then finished with white vinyl decals cut using a Cricut. The tutorial uses a Cricut machine with a fine point blade, standard grip mat, premium white vinyl, transfer tape, weeding tool, paint, clear glaze, and two pint-size mason jars with at least one smooth side.

The instructions walk you through painting the jars with 2–3 coats, sealing them with clear glaze, uploading the SVG into Cricut Design Space, resizing the design, cutting and weeding the vinyl, applying it with transfer tape, and sealing again before filling the jars with flowers, flags, or other embellishments.

These jars would be adorable lined up down the centre of a picnic table, tucked into a porch display, or grouped on a mantel with mini flags and battery candles. I especially like the idea of using faux white flowers so they can be packed away and reused next year — because let’s be honest, holiday decorating is much easier when half the job is already sitting in a labelled storage tub.

If you are already planning a front porch refresh, this project pairs nicely with our 15 DIY 4th of July porch decor ideas, which includes mason jar accents, patriotic wreaths, painted rocks, custom doormats, and budget-friendly red, white, and blue styling ideas. CraftGossip also notes that mason jars work beautifully for porch tables, windowsills, drinks stations, battery candles, fairy lights, flags, and wrapped cutlery.

A few handy tips before you start: make sure your jars are clean and dry before painting, let every coat cure properly, and use the smoothest side of the jar for your vinyl. Raised lettering on mason jars can make vinyl placement a bit fiddly, and nobody needs to be arguing with transfer tape the night before guests arrive.

For supplies, this is a natural place to mention a Cricut machine, white permanent vinyl, transfer tape, weeding tools, mason jars, clear spray glaze, and red and blue craft paint. Amazon works well for general Cricut supplies and mason jars, while Cricut-branded materials or vinyl bundles are a helpful affiliate fit if you’re turning this into a shopping-supported post. A small Cricut scraper or spatula is also worth having nearby because it helps the vinyl transfer cleanly without bubbles.

You could also change the look depending on your decorating style. Use navy and burgundy paint for a more vintage Americana look, bright red and royal blue for a party table, or chalk paint if you like a softer farmhouse finish. Add twine around the rim, tuck in mini flags, fill them with sparklers for display only, or use them as utensil holders for a backyard BBQ.

This is a lovely beginner Cricut project because it uses a simple vinyl application on a small surface. It gives you a finished project that looks impressive, but it doesn’t require a huge material list or complicated layering. And if you’ve been saving jars because “they might be useful one day,” congratulations — one day has officially arrived.

Explore

Bedrooms Christmas Craft Ideas Easter Garden and Yard Halloween Holidays Home Decor Kitchens Living Areas Makeovers and Redos More DIY's Organizing Outdoor Decor Porches, Patios and Decks Recycled Crafts Seasonal Trash to Treasure Windows and Walls Wreaths

RSS More Articles

  • Pocket Emotional Support Chickens
  • All About Cross Stitch Project Bags
  • Get into the Details with the Sashiko Tee Knitting Pattern
  • How To Add In-Seam Pockets To A Dress, Skirt Or Pants
  • Wet Felted Hot Water Bottle Cover Tutorial Review – Gillian Gladrag
  • 12 Masculine Scrapbook Layout Ideas for Boys and Teens
  • Claire Easy Granny Stitch Cardigan Crochet Pattern Review
  • Easy Patriotic Mason Jar Cricut Craft for Summer Decorating
  • How To Sew A Tube Top: 10 Easy Tube Top Sewing Tutorials
  • Tropical Bird Crafts and Learning Activities

Copyright © 2026 · CraftGossip | Start Here | Contact Us | Link to Us | Your Editors | Privacy and affiliate policy