• Home
  • Suggest A Craft
  • DIY Newsletter

Home and Garden

Ideas For DIY

  • About CraftGossip
  • Our Network
    • Bath & Body Crafts
    • Candle Making Ideas
    • Crochet Ideas
    • Cross Stitch
    • Edible Crafts
    • Felting Patterns
    • Glass Art
    • Home & Garden Ideas
    • Indie Crafts
    • Jewelry Making
    • Kids Crafts
    • Knitting Patterns
    • Lesson Plans
    • Needlework
    • Party Ideas
    • Polymer Clay
    • Quilting Ideas
    • Recycled Crafts
    • Scrapbooking
    • Sewing Patterns
    • Card Making
    • DIY Weddings
    • Not Craft Ideas
  • Giveaways
  • Roundups
  • Store
  • Search

DIY Scrap Fabric Christmas Wreath

November 11, 2018 by Shellie Wilson

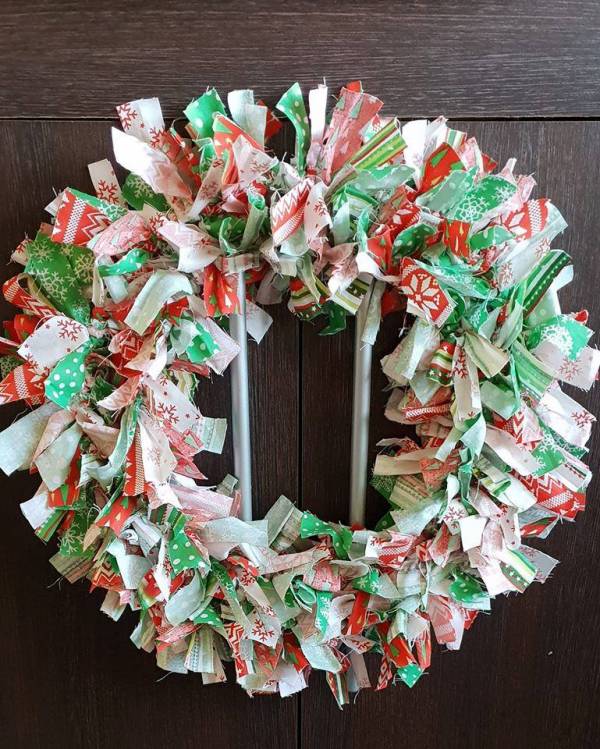
This free Christmas craft shows you how to make a country wreath using fabric scraps. This DIY craft tutorial is a great way to make a Christmas wreath. It is easy for kids to make too. The Christmas wreath looks shabby and is perfect for a Farmhouse styling.


What you need

Fabric Scraps or swatches
Wire coat hanger
Optional Christmas decorations
Holly
Bows

Instructions

This Christmas wreath craft has been made using upholstery fabric swatch samples that have been cut into strips.

Start by bending your coat hanger into a circle. Leave the hook at the top to hang it with.

Take your fabric and cut it into around 12 inch (30 cm) strips that are 2 inch (5 cm) wide.

Take your fabric strip and tie it into a knot around the wire circle. Keep doing this until the circle can no longer fit any more fabric strips on it.

This is a very simple craft but it looks great when completed so stick with it.

You will need lots of fabric strips for this project it will depend on how tight and full you want your wreath.

When you are finished use some plastic holly, bells or other decorations to decorate your wreath.

This image was contributed by Melanie G.

Related Posts:

  • 15 Scrap Fabric Items You Can Make For Your Home
  • 10 Halloween Crafts Made From Scrap Wood
«
»

Comments

  1. Rita says

    November 24, 2018 at 1:46 pm

    Think I will go start one of these now. I have Christmas fabric that I bought in jelly roll cuts.

Have you read?

Turn Any Vase into a High-End Aged Pottery Look – The Easy DIY Hack You Need

Love the look of those high-end aged pottery vases but not the designer price tag? This DIY Aged Vase tutorial from Restore Decor and More is a game-changer! Using just a few simple household materials, you can transform any ordinary glass or ceramic vase into a stunning, antique-inspired piece that looks straight out of a luxury home store.

This easy and budget-friendly technique adds a beautiful weathered texture, giving your vase that rustic, old-world charm. Whether you’re into farmhouse, boho, or modern organic decor, this DIY project is the perfect way to add character to your home.

Want to see how it’s done? Check out the full tutorial and give your home decor a stylish makeover today!  Read it here!

Explore

Bedrooms Christmas Craft Ideas Easter Garden and Yard Halloween Holidays Home Decor Kitchens Living Areas Makeovers and Redos More DIY's Organizing Outdoor Decor Porches, Patios and Decks Recycled Crafts Seasonal Trash to Treasure Windows and Walls Wreaths

RSS More Articles

  • The Art of Embroidery Design: A Workshop for Developing Your Own Original Stitching
  • Plant Lovers, This DIY Pillow Project Is for You
  • Easy Dangle Earrings – Free Crochet Pattern
  • 9 FREE Mean Girls as Bratz Dolls Coloring Pages
  • Wonder Clips vs. Cheap Clones: The Real Truth After Testing Different Brands
  • Turn Any Vase into a High-End Aged Pottery Look – The Easy DIY Hack You Need
  • How to Stitch with Variegated Floss
  • Sun Activities for Kids
  • 12 Scrapbook Layout Ideas That Use Tags
  • Knits with Sheep

Copyright © 2025 · CraftGossip | Start Here | Contact Us | Link to Us | Your Editors | Privacy and affiliate policy

Copyright © 2025 · Sprinkle Theme on Genesis Framework · WordPress · Log in