• Home
  • Suggest A Craft
  • DIY Newsletter

Home and Garden

Ideas For DIY

  • About CraftGossip
  • Our Network
    • Bath & Body Crafts
    • Candle Making Ideas
    • Crochet Ideas
    • Cross Stitch
    • Edible Crafts
    • Felting Patterns
    • Glass Art
    • Home & Garden Ideas
    • Indie Crafts
    • Jewelry Making
    • Kids Crafts
    • Knitting Patterns
    • Lesson Plans
    • Needlework
    • Party Ideas
    • Polymer Clay
    • Quilting Ideas
    • Recycled Crafts
    • Scrapbooking
    • Sewing Patterns
    • Card Making
    • DIY Weddings
    • Not Craft Ideas
  • Giveaways
  • Roundups
  • Store
  • Search

Easy Easter Garland Spring Decor

March 17, 2018 by Shellie Wilson

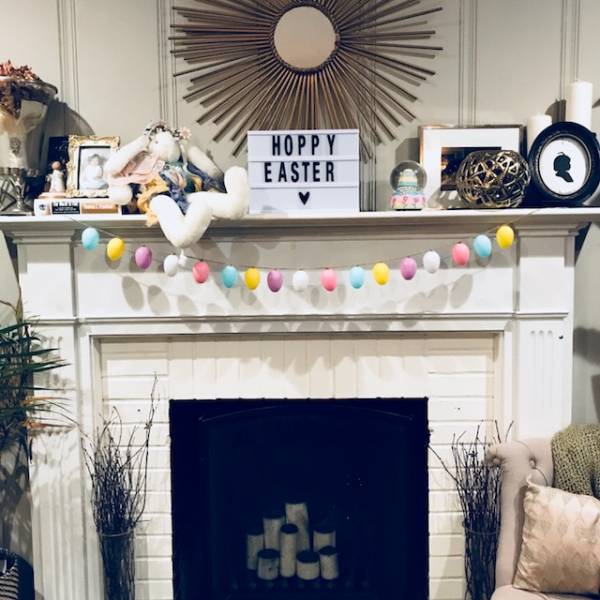
This bright and colourful Easter Egg garland is super easy to make and can dress up any mantle or bannister. The decoration is perfect for Springtime Gatherings and home decor. This Easter tutorial uses cheap plastic dollar store eggs. Check out more SVG files and bundles over at Design Bundles
What you need
Plastic Easter Eggs
Twine
Scissors
Ruler
image5.jpeg
Instructions
Step 1 – Measure out twine the length of mantle or bannister and add an extra 2 feet for knotting the twine and hanging.
Step 2 – Break the plastic eggs in half and use the “bottom” part of the egg to knot the twine The plastic Easter eggs should already come with 4 holes (2 on the top of the egg and 2 on the bottom).
image6.jpeg
Step 3 – Next, weave the twine into one of the “bottom” holes and out the other end and double knot the twine at the the top of the egg. For the first egg, be sure to leave some slack at the end of your garland for hanging. Close the egg back together.
image7.jpeg
 
Step 4 – Add the next egg and separate about 6-8 inches apart and double knot the twine at the top. Repeat process until done.
image8.jpeg
Step 5 – When you’re finally done, be sure to close up all your eggs back together ! It’ll look like a string of Christmas lights.
image9.jpeg
Step 6 – After you’re done, you can tie and hang this beautiful garland onto your mantle or bannister.
Step 7 (Optional) –  If you’d like to add more to your eggs, you can add stickers for a fun look, gold leaf them for more pizzazz or even use puff paint or pen to write on them for a fun message.

Related Posts:

  • DIY Easter Bunny Egg Centerpiece – The Perfect…
  • Easter Centerpiece And Table Setting Ideas for Spring
«
»

Have you read?

How to make a Summer Wreath with Hydrangeas

Learn to make a DIY u Summer Wreath with Hydrangeas using vibrant coral hydrangeas, dainty wildflowers, and a large multi-ribbon bow. . I will guide you through the process step-by-step! I have included lists of the required supplies and tools so that you will have everything you need to recreate this vibrant Summer wreath right along with me as you follow along my easy to follow video tutorial. This colorful Summer wreath will add a lovely pop of color to any front door, and it would also make a wonderful gift

Explore

Bedrooms Christmas Craft Ideas Easter Garden and Yard Halloween Holidays Home Decor Kitchens Living Areas Makeovers and Redos More DIY's Organizing Outdoor Decor Porches, Patios and Decks Recycled Crafts Seasonal Trash to Treasure Windows and Walls Wreaths

RSS More Articles

  • Artistic Stitches: Exploring Punch Needle Tattoo Designs
  • Knit Dinosaurs on a Circular Knitting Machine
  • Emily’s Paris Scarf – Crochet Kit
  • 30 Big Block Quilts For Beginners Or Time Poor Quilters
  • FREE Patchwork Pouch Pattern
  • Book Review: Secret Stories of Lost Beasts
  • Etsy Spotlight: 1955 Baby Doll Nightgown & Bloomers Pattern
  • Baby Banner and Mini Album Project
  • Color Wheel Block Tutorial by Red Pepper Quilts
  • How to Paint Melamine Furniture

Copyright © 2025 · CraftGossip | Start Here | Contact Us | Link to Us | Your Editors | Privacy and affiliate policy