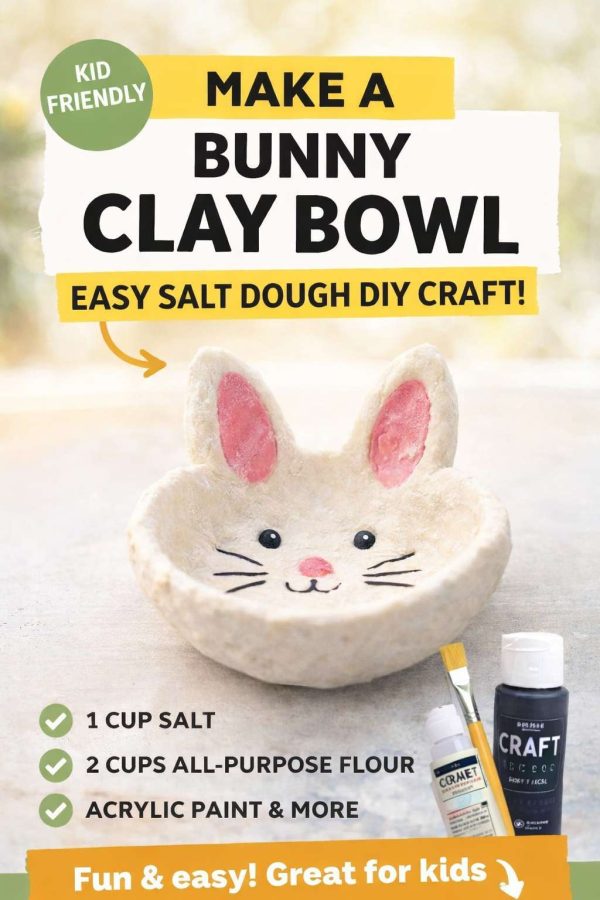
I have such a soft spot for this bunny bowl. It’s one of those projects that looks adorable on the table but is actually very forgiving to make – which is exactly what you want when kids are involved. If you can roll dough, pinch edges, and laugh when an ear goes a bit wonky, you’re already qualified.
This salt dough bunny bowl is perfect for Easter, spring crafting days, classroom projects, or just a quiet afternoon at the kitchen table. It uses the same old-school salt dough recipe many of us grew up with, and honestly, there’s something comforting about that. No fancy tools, no expensive supplies – just flour, salt, water, and a bit of imagination.
Salt Dough Bunny Bowl Tutorial (Kid-Friendly & Beginner Approved)
This project works beautifully with children because the shape doesn’t need to be perfect. In fact, slightly uneven ears and hand-shaped edges make it even cuter.
What You’ll Need
For the salt dough
1 cup salt
2 cups all-purpose flour
1 cup water
For shaping and decorating
Toothpick
Black craft pen or permanent marker
Acrylic craft paint (white, pink, black – optional grey or pastel shades if you want variety)
Paintbrush
Extras
Cookie sheet
Small bowl (for shaping)
Acrylic sealer (optional, but recommended)
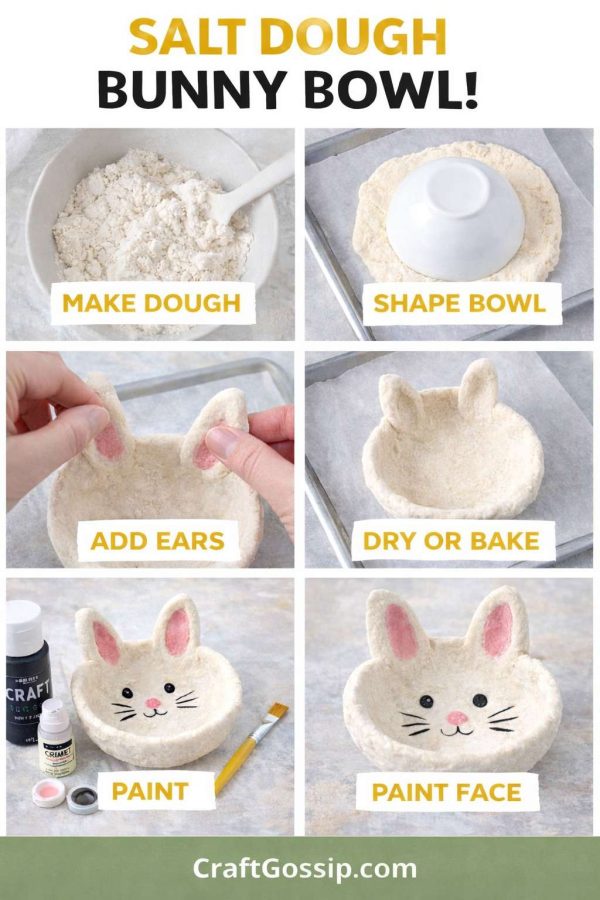
Step 1: Make the Salt Dough
In a large bowl, mix the salt and flour together until combined. Slowly add the water, mixing as you go, until a soft dough forms. You’re aiming for a playdough-like texture – smooth, pliable, and not sticky.
If the dough feels too wet, add a sprinkle of flour. If it’s crumbly, add a teaspoon of water at a time until it comes together.
Step 2: Shape the Bunny Bowl Base
Take a ball of dough about the size of a small orange. Press it flat, then gently drape it over an upside-down bowl on your cookie sheet. Press and smooth the dough so it forms a shallow bowl shape.
Use your fingers to pinch and tidy the rim. Don’t worry about cracks or fingerprints – those little imperfections actually add to the handmade charm.
Step 3: Add the Bunny Ears
Roll two small sausage-shaped pieces of dough and flatten them slightly. These will be the ears. Attach them to the top edge of the bowl, pressing gently so they stick firmly.
Use your fingers to shape the ears upright or slightly floppy – both look adorable. If needed, smooth the join with a tiny bit of water on your fingertip.
Step 4: Create the Bunny Face
Use a toothpick to lightly mark where the eyes, nose, and mouth will go. This is especially helpful for kids so they don’t rush straight to paint.
At this stage, you can also gently smooth the inside of the bowl with your fingers so it’s comfortable to hold small treats or trinkets later.
Step 5: Dry or Bake
You can air dry the bowl for several days, turning it occasionally so it dries evenly. If you’re short on time, bake it in a low oven (around 120–140°C / 250–285°F) for 2–3 hours, checking regularly. The goal is to dry it out, not brown it.
Let the bowl cool completely before painting.
Step 6: Paint the Bunny Bowl
Paint the entire bowl white as a base coat and allow it to dry. Add pink to the inner ears and nose, then use black paint or a craft pen to draw on the eyes, whiskers, and mouth.
This is where personalities really shine – some bunnies end up sweet, some cheeky, and some a little surprised looking. All of them are perfect.
Step 7: Seal (Optional but Recommended)
If the bunny bowl will be handled often or used year after year, seal it with a clear acrylic sealer. This helps protect the paint and gives it a longer life.
How to Use Your Bunny Bowl
These bunny bowls are ideal for holding Easter eggs, wrapped chocolates, jewellery, hair clips, or tiny treasures collected on walks. They also make lovely handmade gifts for grandparents, teachers, or neighbours – especially when made by little hands.
This is one of those crafts that isn’t about perfection. It’s about slowing down, getting a bit messy, and making something together that feels special. And honestly? Those slightly crooked ears usually end up being everyone’s favourite part.