• Home
  • Suggest A DIY
  • DIY Newsletter

Home and Garden

Ideas For DIY

  • About CraftGossip
  • Our Network
    • Bath & Body Crafts
    • Candle Making Ideas
    • Crochet Ideas
    • Cross Stitch
    • Edible Crafts
    • Felting Patterns
    • Glass Art
    • Home & Garden Ideas
    • Indie Crafts
    • Jewelry Making
    • Kids Crafts
    • Knitting Patterns
    • Lesson Plans
    • Needlework
    • Party Ideas
    • Polymer Clay
    • Quilting Ideas
    • Recycled Crafts
    • Scrapbooking
    • Sewing Patterns
    • Card Making
    • DIY Weddings
    • Not Craft Ideas
  • Giveaways
  • Roundups
  • Store
  • Search

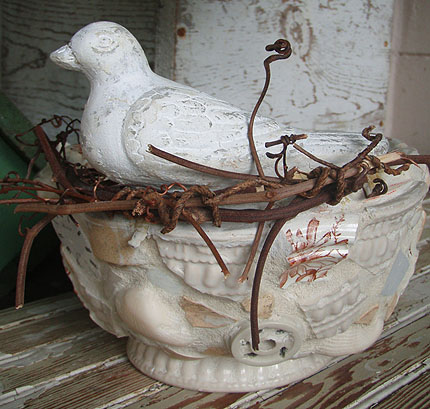
Mosaic Bird Bowl

July 25, 2010 by Amanda Formaro


Susie over at From My Home to Yours made this wonderful mosaic bird bowl. She was inspired by a project in a magazine from 2005 and has been wanting to make it ever since.

Stop by and see how Susie made this lovely mosaic bird bowl from her stash of broken pottery.
«
»

Have you read?

DIY Faux Candy Apples: Easy Glossy Fall Decorations

There is something wonderfully nostalgic about a shiny red candy apple. It brings back memories of fairgrounds, sticky fingers and trying to work out how to take that first bite without losing a tooth.

These DIY faux candy apples capture that same cheerful look, only this batch belongs on your autumn decorating tray. Made with artificial apples, red craft paint and a glossy finish, they make lovely little decorations for a kitchen shelf, Halloween display or fall centerpiece.

I love the contrast between that bright, candy-like shine and a rustic basket filled with leaves and pinecones. It is a simple way to add something a little unexpected among all the pumpkins.

This tutorial creates a painted, glossy version inspired by the pictured apples. If you want the raised drips and little puddle of “candy” around the bottom, there is an optional way to build those details before painting.

Skill level: Beginner
Makes: As many apples as you choose
Time: Allow several short crafting sessions, plus drying and curing time
Use: Indoor decorations only. These apples are not edible.

What You’ll Need

  • Artificial apples with a firm surface, preferably rigid papier-mâché or another paintable material
  • Bright red acrylic craft paint
  • Water-based, high-gloss craft varnish suitable for your apple’s surface
  • Wooden dowels or plain craft sticks
  • Soft synthetic paintbrush
  • Small detail brush
  • Craft glue suitable for the apple and wooden stick
  • Suitable tool for making a small stem hole
  • Fine sandpaper, optional for rigid surfaces
  • Compatible primer, if required
  • Silicone craft mat or another protected work surface
  • Small drying support to hold the apple by its stick
  • Ribbon, faux leaves and a basket or tray for styling

For optional raised candy drips:

  • Paintable, air-drying dimensional craft medium compatible with your apple
  • Small palette knife or craft spatula
  • Small rigid craft disc, slightly wider than the apple’s base

Check your paint and varnish labels before starting. Artificial apples vary considerably, and a finish that works on rigid papier-mâché may behave differently on soft foam or flexible plastic.

How to Make Faux Candy Apples

1. Prepare the Artificial Apple

Wipe away dust and allow the apple to dry. Remove the original stem if it pulls out easily.

Check for prominent seams or rough patches. On a rigid apple, gently smooth these with fine sandpaper if needed. Avoid sanding through the outer skin of a foam apple.

If the surface is slick plastic, use a primer specifically intended for that material. Test your products on an inconspicuous spot before coating the whole apple.

That little test is far less annoying than watching your lovely red paint peel off halfway through the project.

2. Add the Wooden Stick

Use the existing stem opening where possible. If it needs enlarging, carefully make a hole just wide enough for your wooden dowel or craft stick.

Add a small amount of suitable glue and insert the stick. Aim for enough depth to hold it securely without pushing through the bottom of the apple.

Let the glue set before using the stick as a painting handle. For hollow, rigid apples, make the opening with a tool appropriate to the material rather than forcing the stick through.

Leave enough wood showing above the apple to give it that familiar fairground candy apple look.

3. Add Raised Drips, If Desired

For a smooth candy apple, skip straight to painting.

To create the thicker coating shown in the inspiration image, use a compatible dimensional craft medium to form a few rounded drips near the lower edge. Follow its instructions for layer thickness and drying.

For a pooled base, attach the apple to a small rigid craft disc with suitable glue. Use the dimensional medium to disguise the disc’s edge with an irregular, gently rounded outline.

Keep the details modest. A few uneven drips look more convincing than a perfectly matching row around the apple.

Allow the medium to dry completely before painting. This step creates the raised shape; the clear varnish added later provides the shine.

4. Paint the Apple Red

Brush on a thin, even coat of red acrylic paint.

Let it dry according to the paint label, then apply another coat if the original colour still shows through. Green apples may need additional coverage, while red artificial apples can be quicker to finish.

Paint any raised drips and the optional base the same red so everything looks like one continuous coating.

Bright red gives a classic candy apple finish. A deeper cherry red creates a richer look that works beautifully with Halloween decorations.

Keep the wooden stick unpainted, and allow the paint to dry and cure as directed before adding varnish.

5. Apply the Glossy Finish

Hold the apple by its securely attached stick and brush on your chosen high-gloss varnish according to the product instructions.

Use smooth strokes and avoid repeatedly brushing areas that have started to set. Check the underside for runs before placing the apple in its drying support.

Use one gloss product as supplied. There is no need to mix Mod Podge with another glaze.

A compatible brush-on gloss glaze, such as DecoArt Triple Thick, can provide a shiny finish on suitable rigid craft surfaces. Test it first and follow the current label directions.

Do not pour on a heavy layer to make the drips. The optional dimensional step provides that shape without relying on a puddle of varnish to dry.

6. Let the Finish Cure

Support the apple so the wet coating does not touch your work surface. You can clamp the stick securely with the apple hanging below it, provided the glue has fully set.

Allow the finish to cure for the time specified by the manufacturer. Dry to the touch does not always mean ready to wrap, stack or store.

If another coat is needed, follow the product’s recoating instructions. Once the main surface has set sufficiently, coat any small area missed around the underside and allow that to cure too.

Wait until the finish is fully cured before adding ribbon or placing the apples against fabric and decorative leaves.

Styling Your Faux Candy Apples

Arrange three apples in a shallow basket with faux maple leaves, miniature pumpkins and a few pinecones. Let the sticks lean at slightly different angles for a relaxed display.

For another handmade element, our Dollar Tree strainer pumpkin brings a lovely mix of metal mesh, twine and autumn textures to a seasonal shelf.

If you prefer a softer, botanical look, pair the glossy red apples with cream-coloured pressed flower pumpkins. The contrast between shiny apples and delicate flowers keeps the arrangement interesting.

You could also make a decorative autumn leaf bowl for your display. Place heavier apples in a sturdy insert rather than relying on the leaf bowl to support them.

Keep faux apples separate from actual food, especially at parties. A small “Decorative only” tag is useful if your display is likely to tempt little hands.

Easy Variations to Try

Halloween Poison Apples

Use deep burgundy or black paint beneath the gloss finish. Tie a narrow black ribbon around each stick and display them beside a little “Poison Apples” sign.

Christmas Candy Apples

Keep the classic red finish and add gingham ribbon, evergreen sprigs and miniature decorations. They make a cheerful addition to a gingerbread-themed display.

Vintage Fairground Apples

Tie on small kraft-paper tags with red-and-white baker’s twine. Group the apples in a wooden crate with striped ribbon for an old-fashioned carnival feel.

Tips for a Better Finish

If the paint beads or peels: Stop and check whether the apple needs a compatible primer. More paint will not fix poor adhesion.

If the gloss looks cloudy: Give it the full recommended drying time. If it stays cloudy, the coating may be too thick or the paint beneath it may not have cured sufficiently.

If brush marks are obvious: Use a clean, soft brush and avoid working the coating after it begins to set.

If the apple feels sticky: Allow more curing time before handling. Persistent tackiness can indicate incompatible products, so test one apple before making a whole batch.

If the stick wobbles: Secure it before painting. A loose handle makes every later step harder than it needs to be.

Storing Your Handmade Apples

Once fully cured, store the apples in a rigid box with dividers so they do not rub against one another. Keep them away from heat and avoid leaving them pressed against plastic wrapping.

A few glossy red apples can brighten a whole autumn arrangement. Tuck them among the leaves, let those wooden sticks peek out of the basket, and enjoy a little fairground nostalgia on your kitchen shelf.


Explore

Bedrooms Christmas Craft Ideas Easter Garden and Yard Halloween Holidays Home Decor Kitchens Living Areas Makeovers and Redos More DIY's Organizing Outdoor Decor Porches, Patios and Decks Recycled Crafts Seasonal Trash to Treasure Windows and Walls Wreaths

RSS feed: More Articles More Articles

  • Free Animal Person Embroidery Design Review
  • DIY Halloween Sock Pumpkins: Easy Fuzzy Pumpkins With Ghosts, Stripes and Witch Hats
  • Free Felting Tutorial Friday: Felt Into Autumn with Heidi Feathers
  • Knit a Classic Aran Cardigan with this Free Knitting Pattern
  • Printable Letter Books for Preschoolers
  • How to Make an Interactive Halloween Mini Scrapbook Album
  • 10 Ice Cubes That Instantly Elevate Champagne
  • Setting Up a Beginner Craft Space? A Practical Shopping List
  • Thrift Store Upcycling: Rustic Pumpkin Decorations From Glass Bowls
  • Mini Pumpkins and Jack o’Lanterns to Cross Stitch

Copyright © 2026 · CraftGossip | Start Here | Contact Us | Link to Us | Your Editors | Privacy and affiliate policy