• Home
  • Suggest A DIY
  • DIY Newsletter

Home and Garden

Ideas For DIY

  • About CraftGossip
  • Our Network
    • Bath & Body Crafts
    • Candle Making Ideas
    • Crochet Ideas
    • Cross Stitch
    • Edible Crafts
    • Felting Patterns
    • Glass Art
    • Home & Garden Ideas
    • Indie Crafts
    • Jewelry Making
    • Kids Crafts
    • Knitting Patterns
    • Lesson Plans
    • Needlework
    • Party Ideas
    • Polymer Clay
    • Quilting Ideas
    • Recycled Crafts
    • Scrapbooking
    • Sewing Patterns
    • Card Making
    • DIY Weddings
    • Not Craft Ideas
  • Giveaways
  • Roundups
  • Store
  • Search

Mother’s Day Gift Guide 2025: My Top Amazon Picks She’ll Actually Love

May 9, 2025 by Shellie Wilson

Alright, let’s be real—Mother’s Day sneaks up on us every single year. Suddenly, it’s May, and you’re scrambling to find something that says, “Hey, Mom, you’re amazing,” without resorting to last-minute drugstore flowers (though no shame if that’s your move—moms love flowers).

Luckily, Amazon’s got a killer Mother’s Day gift roundup (check it out here), and I’ve combed through it to find the best of the best. Whether your mom’s a spa queen, a tech guru, or the sentimental type, these picks will make her feel extra loved.

1. For the Mom Who Deserves a Spa Day

Luxury Robe & Slipper Set – Because every mom deserves to lounge like royalty. Pair it with a lavender-scented candle or a jade roller set for ultimate relaxation vibes.

2. For the Sentimental Queen

Custom Photo Jewelry or Engraved Keepsake – Necklaces with kids’ birthstones, engraved bracelets, or even a digital photo frame pre-loaded with family pics? Instant tears (the happy kind).

3. For the Tech-Savvy Mom

Kindle Paperwhite – If she’s a bookworm, this is a game-changer. No glare, waterproof, and holds thousands of books. Bonus: Get her a Kindle Unlimited subscription for endless reading.

4. For the Chef Extraordinaire

Instant Pot Duo Crisp – Because air frying + pressure cooking = mealtime magic. Throw in a fancy olive oil set or personalized cutting board for extra brownie points.

5. For the Always-On-the-Go Mom

Yeti Rambler Tumbler – Keeps drinks hot or cold for hours, and it’s basically indestructible. Pair it with a stylish tote bag or insulated lunchbox for the win.

6. For the Green Thumb

Indoor Herb Garden Kit – Fresh basil at her fingertips? Yes, please. Or go big with a smart garden system that does the work for her.

7. For the Mom Who Has Everything

Subscription Box – Wine, books, skincare—there’s a box for every interest. It’s the gift that keeps giving (and reminds her of you all year).

Final Tip: Don’t Forget the Card!

Even if you go all out, a handwritten note is what she’ll really treasure. (Pro tip: Amazon has cute personalized cards too.)

Shop the full Amazon Mother’s Day collection here and score fast shipping so you’re not in a panic on May 12th.

What’s your go-to Mother’s Day gift? Drop your ideas in the comments—I’m always looking for inspo!

P.S. Moms, if you’re reading this, yes, this is a hint
«
»

Have you read?

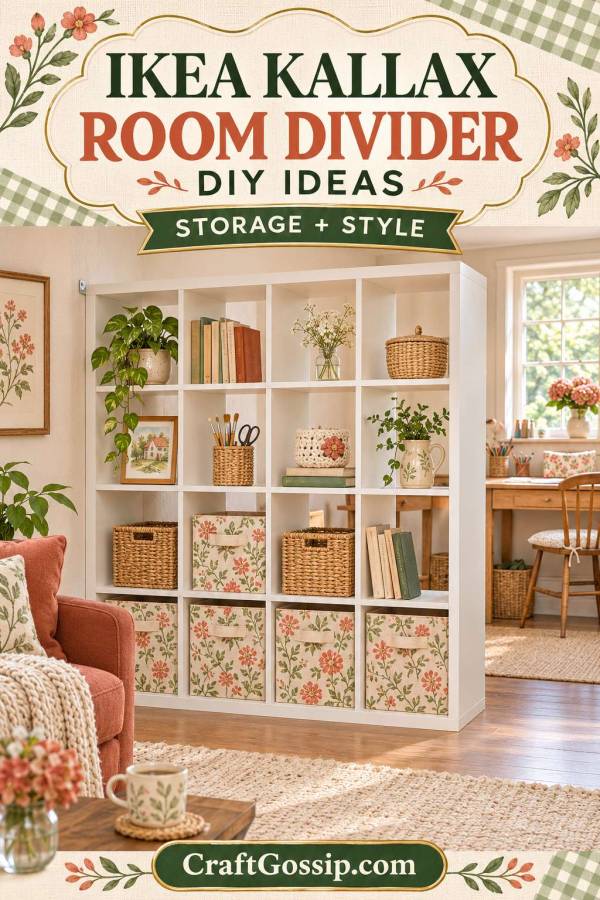
IKEA KALLAX Room Divider DIY: Create a Cosy Corner With Storage and Style

Open-plan living sounds lovely until your craft supplies, the dining table and someone’s homework all start sharing the same square metre. Sometimes you don’t need another room quite so much as a little separation—a corner that feels like yours, with somewhere to put the things that keep migrating across the house.

An IKEA KALLAX room divider DIY can help create that boundary while giving you useful storage. Those familiar square compartments can hold baskets of yarn, paperwork, books and the everyday bits that don’t need to be on display. Leave some cubes open and you can still enjoy views through the room.

What I like about this approach is that the creative part can be wonderfully manageable. You can personalise the storage boxes, repeat colours from your cushions and add a few handmade touches without rebuilding the shelving.

The key is planning both sides of the divider. A shelf against a wall has one public face. A shelf dividing a room has two, and the back of a jumble of cables is rarely anybody’s decorating goal.

Can You Use IKEA KALLAX as a Room Divider?

Yes. IKEA describes KALLAX as suitable for room-divider use, but it also requires the furniture to be securely anchored. Room-divider styling doesn’t remove that requirement.

Start with the current IKEA KALLAX range and check the instructions for your exact model. Plan its position around a suitable anchoring arrangement before buying accessories.

A position with one end near a wall may suit your layout, but proximity alone doesn’t secure the unit. Ask IKEA or a competent installer how to anchor your chosen model in that orientation. If the intended position cannot accommodate the required anchoring, choose another position or a purpose-built divider.

Decide What Your Divider Needs to Do

Before choosing a size, finish this sentence: “I want to separate…”

Perhaps it’s a craft corner from the lounge, a desk from the dining area or the front door from the main living space. That answer helps you decide how much height and visual screening you need.

A lower arrangement can mark a boundary while keeping the room visually connected. A taller arrangement can screen more of the view, but it also has a greater presence in the room.

KALLAX creates visual separation. It won’t provide the sound isolation of a wall, and open cubes won’t give complete privacy.

What You Need for This KALLAX Divider Project

  • A KALLAX unit suited to your space
  • The assembly instructions and required anchoring equipment
  • Wall fixings appropriate to your wall, selected with suitable advice
  • Compatible inserts, boxes or baskets
  • A tape measure and low-tack floor-marking tape
  • Decorative paper or fabric for personalising removable storage boxes
  • Card, scissors and an adhesive suitable for the box material
  • A few lightweight decorative pieces

You can keep the DIY work focused on the removable storage accessories. That makes it easier to refresh the look later and avoids relying on decorative additions to support the furniture.

How to Plan and Style an IKEA KALLAX Room Divider

Mark Out the Footprint

Use low-tack tape on a suitable floor surface to mark the unit’s width and depth. Check that the tape won’t damage the finish first.

Walk around the outline with the room in normal use. Pull out dining chairs, open nearby doors and imagine carrying a laundry basket past it. Include space for storage boxes to pull out and insert doors to open.

For reference, IKEA’s white 147 × 147cm KALLAX is listed at 39cm deep. Check the actual measurements of the model you choose, especially if adding a compatible underframe.

Check the View From Both Sides

Stand where you usually sit, then walk to the other side. Which parts of the room would you like to screen? Where does daylight enter?

Try positioning closed storage where it interrupts the view of clutter, while keeping other cubes open. You don’t have to fill every compartment for the divider to feel finished.

I’d start with fewer boxes than you think you need. It’s much easier to add another basket than to bring the light back after you’ve built a wall of storage.

Assemble and Anchor Before Decorating

Assemble the unit in an orientation permitted by its instructions and complete the required anchoring before loading it.

Follow the model’s load limits and installation guidance. Keep dense supplies low, distribute contents sensibly and check fastenings as instructed. Baskets of books or craft tools can become heavy surprisingly quickly.

If your divider needs extra height, choose a suitable taller model rather than improvising a stack of units.

Plan Which Side Opens Where

Think about who needs each compartment. Craft supplies should open towards the craft area; household storage might be more useful from the living-room side.

Check how each insert looks from behind before committing to the arrangement. Some accessories are designed primarily for access from one side, even though the shelving itself can be viewed from both.

Use a quick paper sketch to map the cubes. Label them “yarn,” “paperwork,” “books” and “open” before spending money on matching boxes.

Easy DIY Fabric Fronts for Storage Boxes

This is the little makeover I’d start with: personalise plain removable boxes with coordinated fabric panels.

Choose rigid boxes with flat fronts. Measure each front and cut a piece of card slightly smaller, leaving handles, seams and folding sections clear.

Wrap the card in fabric, folding the excess neatly behind it. Secure the fabric to the card, then attach the finished panel to the box using an adhesive appropriate for its surface. Test first, particularly on fabric-covered or coated boxes.

Let everything dry before returning the boxes to the shelves. Keep panels clear of pull handles so they don’t get tugged loose every time someone reaches for a charger.

If the back of the box is visible from the other room, coordinate that face too. These panels are decorative; they don’t add strength or change the box’s load capacity.

Five KALLAX Room Divider Ideas to Make It Feel Like Home

A Craft Corner With a Calm Living-Room Side

Keep project boxes and frequently used supplies accessible from your workspace. On the lounge side, repeat a small palette of baskets, books and a few favourite objects.

Our CraftGossip paper-craft storage in KALLAX shelving offers ideas for organising paper, inks and other supplies. Use it for storage inspiration while following current instructions for your own installation.

A Cottage-Style Divider With Floral Fabric

Pair a white unit with soft floral box fronts, woven textures and a little gingham. Pick colours already present in the room so the shelving feels connected to the furniture around it.

A handmade piece in one open cube gives the arrangement personality without turning every shelf into a display.

A Coastal Divider With Rope Baskets

Combine pale finishes, blue fabric and natural textures for a relaxed coastal look.

Our CraftBits DIY rope basket tutorial is a lovely companion project for lightweight storage. Measure the finished basket, including handles, against your shelf opening rather than assuming it will fit.

A Home-Office Divider That Hides Paperwork

Use compatible closed storage to reduce the view of folders and office supplies from the main room. Leave some cubes open for books and a simple display.

Keep cables along a safe, planned route rather than trailing them through the walkway. Put charging equipment where it has appropriate ventilation and easy access.

A Colourful Divider With Personality

Choose patterned box fronts in two or three repeated colours. Add a framed print and one or two handmade objects, then let the repetition do the work.

There’s nothing wrong with cheerful storage. Sometimes the thing that makes you put the yarn away is having a particularly lovely box to put it in.

How to Keep the Project Affordable

Start with a sound unit and a workable installation plan. If buying second-hand, check for missing hardware, damaged joints, swollen panels and signs of previous alterations.

Add storage accessories gradually. Make two matching fabric fronts first, live with them for a few days, then decide whether the room needs more.

Price the whole project, including delivery, suitable fixings, installation help and inserts. A modest shelving price can become a different budget once every cube has acquired a door.

Common KALLAX Room Divider Questions

Can I use it in the middle of a room?

Only where the required anchoring can be achieved appropriately. Don’t assume that a central position is suitable simply because the unit stands upright. Get advice for the exact model and location.

Is this suitable for renters?

It can be, provided you can meet the installation requirements and obtain any necessary permission. Adhesive strips don’t replace the specified furniture restraints.

Can I add legs or castors?

Check compatibility with your exact unit. A compatible IKEA underframe may be an option, but improvised legs or wheels change how the furniture is supported. This project keeps the original structure intact.

How do I get more privacy?

Use compatible closed inserts and opaque boxes where screening matters most. Check the view at seated and standing heights. For complete privacy, a shelving divider alone may not suit the space.

A successful IKEA KALLAX room divider DIY gives each part of a room a clearer purpose. Once the placement, access and anchoring are sorted, you can enjoy choosing the fabrics, baskets and little handmade details. That’s where a familiar cube shelf starts feeling like part of your home.

Explore

Bedrooms Christmas Craft Ideas Easter Garden and Yard Halloween Holidays Home Decor Kitchens Living Areas Makeovers and Redos More DIY's Organizing Outdoor Decor Porches, Patios and Decks Recycled Crafts Seasonal Trash to Treasure Windows and Walls Wreaths

RSS feed: More Articles More Articles

  • Wet Felting with a Hand-Held Sander – My Honest Experience (and Safety Tips You’ll Actually Use)
  • How to Make Cross Stitch Christmas Gift Tags With Small Fabric Scraps
  • Thanksgiving Turkey Scrapbook Layouts to Gobble Up
  • 10 DIY Angel Jewelry Tutorials For Christmas
  • Single and Loving It Spaghetti: Easy Bolognese for One
  • Crochet Christmas Dove Ornaments With a Printable Gift Poem
  • DIY Fire Pit: 10 Backyard Ideas You Can Make on a Budget
  • 5 Christmas Ornament Quilt Patterns That Add Instant Holiday Charm
  • 15 Christmas Cards Using Patterned Paper Scraps
  • 10 Christmas Stocking Knitting Patterns Worth Bringing Out Every Year

Copyright © 2026 · CraftGossip | Start Here | Contact Us | Link to Us | Your Editors | Privacy and affiliate policy