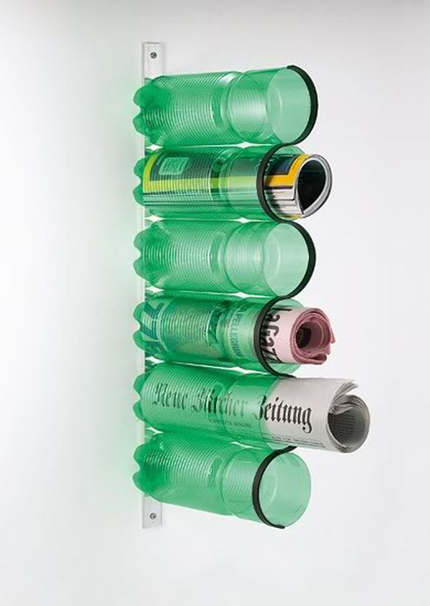
Style Motivation posted about 20 DIY Magazine Rack Projects and this rack made from plastic bottles was one of them. I’m curious just how well this would really work? What else could you use it for? I’d love to hear your creative uses, so let me know in the comments!
Comments
Have you read?
How To Custom Build Your Own Built In Desks
Custom built-in desks can be a great addition to any home or office space. They can maximize the use of available space, provide ample storage, and be tailored to fit your specific needs and style. While hiring a professional to build a custom desk can be expensive, building your own can be easier than you might think and can save you a significant amount of money. In this article, we’ll explore the steps involved in building your own custom built-in desk.
Make Your Own Custom Built-In Desk – A Beautiful Mess
How To Build A Small DIY Writing Desk With Drawer – Part 1 – Addicted 2 Decorating®
DIY Your Built-In Floating Desk in 6 Steps | DIY Passion
How We Built A DIY Built In Desk and Storage | Renovation Bay-Bee
How to DIY a ‘built-in’ homework desk that kids will love | Real Homes
How to Make a Built In Desk | Upcycling At Its Best | Sunny Side Design
DIY – Built-in Desk – Remodelando la Casa
DIY Home Office Desk | San Diego DIY | Domestic Blonde
THIS FLOATING SHELF HAS A SECRET!
If you’re a beginner looking to make your own desk, there are a few tips and tricks that can help you get started. Here are some basic tools you’ll need and tips that can make building a desk easier:
- Basic tools: To get started with building a desk, you’ll need some basic tools. These include a circular saw or jigsaw, a power drill, a level, a measuring tape, a framing square, a hammer, and a set of screwdrivers. Additionally, you may need other tools depending on your specific design and materials, such as a sander, a router, or a nail gun.
- Choose the right materials: Choosing the right materials can make building a desk easier. Plywood, for example, is an affordable and easy-to-work-with material that can be used for the desktop and shelves. Solid wood, such as pine or oak, is another popular option for desks. It’s important to choose materials that are sturdy and will hold up over time.
- Have a plan: Before you start building your desk, it’s important to have a plan in place. This includes a detailed sketch or blueprint of the desk, as well as a list of all the materials and tools you’ll need. Having a plan can help you stay organized and avoid mistakes.
- Cut accurately: When cutting the wood for your desk, it’s important to be accurate. This can be done by using a circular saw or jigsaw, as well as a framing square and a straight edge. By making precise cuts, you can ensure that all the pieces fit together correctly.
- Use clamps: Clamps can be a useful tool when building a desk. They can help hold pieces of wood in place while you drill or screw them together, and they can also help keep the desk level. Be sure to use clamps that are strong enough to hold the wood securely in place.
- Sand and finish: After your desk is built, be sure to sand and finish it. This will help give the desk a smooth surface and protect it from scratches and stains. A coat of paint or stain can also help give the desk a polished look.
- Take your time: Building a desk can be a time-consuming process, especially if you’re new to woodworking. Take your time and don’t rush the process. If you make a mistake, don’t be afraid to start over or make adjustments. Remember that practice makes perfect, and with each desk you build, you’ll become more confident and skilled.
Make Your Own Wooden Lap Desks
DIY Projects For Your Bathroom Vanity
If you take wider plastic bottles, you could turn it into a toilet paper holder. You’d need to cut slits so you could push each roll out.
Strangely, this project reminds me of those old pneumatic tubes used for mail.
Perfect to store rolls of fusibles or interfacings or even wrapping paper.
Anything that you keep in rolls, like the previous commenter noted. I was thinking about all my rolled up machine quilting pantos. Right now they are jumbled in a box. do you have instructions? What is the black material that goes down the front – tape?
I might use smaller bottles, you could cover them with fabric, washi tape, etc.
I wasn’t able to locate the instructions for this. I’m guessing it was probably in a print magazine at one time.
Cool, I like it! How about tools, such as, screwdrivers & pliers. Paintbrushes, pencils, pens, markers, crayons, remote controls, boxed foil & saran wrap, rolls of fabric, and rulers. That’s about all I can think of for now.
Great for storing smaller rolls & scraps of craft vinyl.