• Home
  • Suggest A DIY
  • DIY Newsletter

Home and Garden

Ideas For DIY

  • About CraftGossip
  • Our Network
    • Bath & Body Crafts
    • Candle Making Ideas
    • Crochet Ideas
    • Cross Stitch
    • Edible Crafts
    • Felting Patterns
    • Glass Art
    • Home & Garden Ideas
    • Indie Crafts
    • Jewelry Making
    • Kids Crafts
    • Knitting Patterns
    • Lesson Plans
    • Needlework
    • Party Ideas
    • Polymer Clay
    • Quilting Ideas
    • Recycled Crafts
    • Scrapbooking
    • Sewing Patterns
    • Card Making
    • DIY Weddings
    • Not Craft Ideas
  • Giveaways
  • Roundups
  • Store
  • Search

Quick Thrift Store Lamp Makeover

December 29, 2019 by Shellie Wilson

The thrift store can be the perfect place to find hidden gems that just need a little DIY update to make them look like new. These lamps were purchased for a few dollars, but after a coat of paint and a unique update to the shades, they look like a million bucks! Best of all, this idea is easy to customize to fit whatever your decor style and color scheme are. You can see the full tutorial here.
«
»

Have you read?

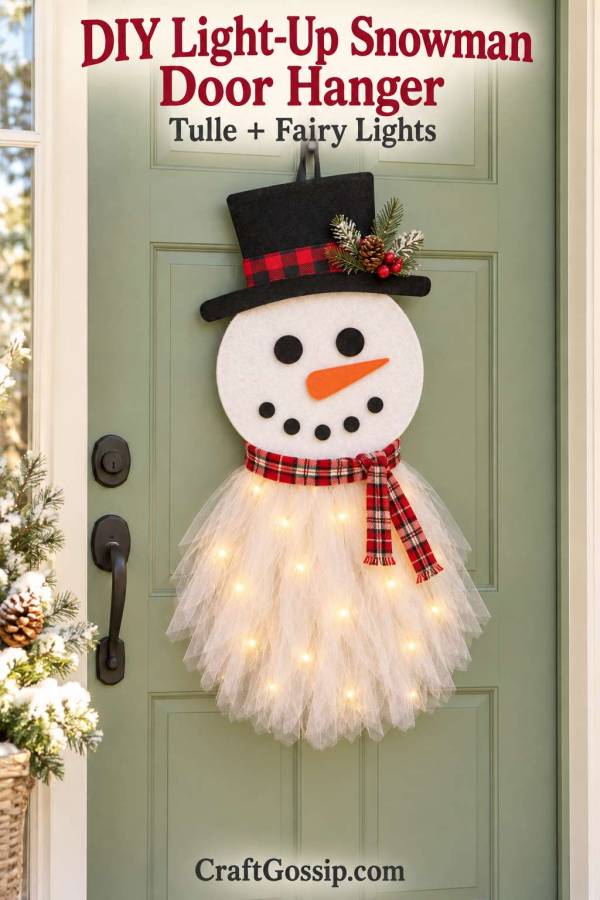
DIY Snowman Door Hanger Using Tulle and Fairy Lights

There is something about a snowman in a slightly wonky hat that makes a front door feel welcoming. Add a checked scarf and a gentle glow from fairy lights, and you have a Christmas decoration with plenty of personality, without needing a sewing machine or an expensive wreath frame.

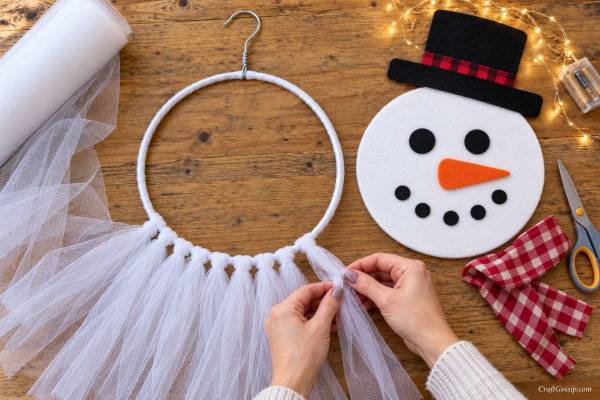
This DIY snowman door hanger using tulle and fairy lights starts with an ordinary wire coat hanger. A white fabric-covered circle creates the face, soft tulle hangs underneath to form a floaty body, and a flat black felt top hat finishes the look.

If you liked our light-up ghost wreath using a wire coat hanger, this is a cheerful Christmas variation on the same household supply. The important difference is the face backing. Tulle alone will not hold a carrot nose and smile neatly, so we are giving those features something sturdy to sit on.

I like this sort of decoration because there is room to use what you already have. A scrap of checked fabric becomes a scarf, leftover felt becomes the hat, and that hanger lurking in the laundry finally gets a more interesting job.

Project Details

  • Skill level: Beginner friendly
  • Estimated making time: Allow approximately 1½ to 2 hours, plus glue drying time
  • Main techniques: Tying tulle strips, cutting felt and simple hand stitching
  • Display location: Indoors or on a dry, sheltered door with suitable lights
  • Approximate size: A 25 to 30 cm face with 25 to 35 cm of tulle hanging below it, plus the hat

This makes a stylised snowman with a round face and a soft, flowing body. If you prefer a traditional stacked-circle silhouette, our Christmas snowman wreath tutorial offers another approach.

Materials

  • One flexible wire coat hanger with its original hook
  • Soft white tulle on a roll approximately 15 cm wide, around 25 to 30 metres to start
  • One piece of firm white craft foam large enough to cover your circular frame
  • White felt large enough to cover the craft foam
  • Black felt for the hat, eyes, smile and optional body buttons
  • Firm craft foam to support the felt hat
  • Orange felt for a flat carrot-shaped nose
  • A lightweight fabric strip approximately 8 to 10 cm wide and 70 to 90 cm long for the scarf
  • One short strand of battery-operated LED fairy lights
  • Batteries suitable for your lights
  • White ribbon or fabric strips for wrapping the wire
  • White and black thread
  • Hand-sewing needle
  • Small cable ties or strong cord
  • Fabric glue suitable for your chosen materials
  • Hot glue gun and glue sticks, optional for decorative accents
  • Pliers
  • Scissors
  • Ruler or measuring tape
  • Pencil and paper for templates
  • Suitable door hook or wreath holder

Optional finishing touches include a small faux greenery sprig, a ribbon hatband or a lightweight snowflake.

Tulle quantity tip: Thirty strips measuring 70 cm long use 21 metres of tulle. Forty strips at the same length use 28 metres. Start with fewer strips and check the fullness before cutting the rest.

Choose soft tulle rather than stiff decorative mesh. You want a gentle snowy drape, and your fingers will appreciate the difference while tying all those knots.

Before You Begin

Lay out the hanger, face backing and hat materials together.

The circular hanger will sit behind the snowman’s face. The tulle attaches along its lower curve, while the scarf hides the join between the face and the hanging strips.

For the hat, a flat felt top hat with a firm backing is easier to secure than a bulky costume hat. It also sits more comfortably against a door.

Test your fairy lights before attaching anything. Keep the battery pack accessible throughout the project, rather than discovering at the end that you have beautifully glued the switch out of reach.

How to Make a Tulle Snowman Door Hanger

1. Shape the Wire Coat Hanger

Gently bend the triangular body of the hanger into a circle approximately 25 to 30 cm across, keeping the twisted neck and original hanging hook intact.

Use pliers to ease out the corners gradually. The former bottom bar should become part of the circular perimeter, leaving an open centre.

Lay the frame on your work surface and check that it sits reasonably flat. A slightly imperfect circle is fine, but a twisted frame will make the face lean forward.

Wrap the circular wire with white ribbon or narrow fabric strips, leaving the hook free. Secure the ends with thread or a small amount of suitable glue.

2. Make the Supported Snowman Face

Place the circular frame on the firm white craft foam and trace around its outside edge.

Cut out the circle, allowing approximately 5 mm extra around the edge so it conceals the wire.

Cut a matching white felt circle and glue it to the front of the foam. Allow the glue to dry according to its instructions.

This smooth white panel is the snowman’s face. It gives the eyes, carrot nose and smile a reliable backing instead of leaving them dangling between tulle strips.

Set it aside for now. Attach the tulle to the frame before fitting the face.

3. Cut the White Tulle Strips

Cut an initial batch of 30 strips, each approximately 60 to 70 cm long.

Once folded and tied, they will hang roughly 25 to 33 cm below their attachment points, depending on the length and knot.

Cut one test strip first and hold it against the frame. Shorten it if you want a compact decoration, particularly if your door has a handle or letterbox nearby.

You can add more strips later, so there is no need to cut the entire roll straight away.

4. Tie the Tulle Along the Lower Curve

Position the frame with the hook at the top.

Starting at the lowest point of the circle:

  1. Fold a tulle strip in half.
  2. Place the folded loop behind the wire.
  3. Bring both loose ends over the wire and through the loop.
  4. Pull gently to form a snug lark’s head knot.

Continue on either side of the centre, covering approximately the lower third of the circle, from about four o’clock to eight o’clock.

Slide the knots together as you work. The loose ends should hang below the frame.

Lift the hanger occasionally to check the shape. The strips at the sides start higher on the circle, so you may need to trim their ends later to create a rounded body.

5. Secure the Face to the Frame

Place the face panel over the front of the circular frame, with the felt facing out.

Using a needle and strong white thread, make small attachment loops through the backing close to its edge and around the wire behind it. Attach at the top, both sides and two points near the lower edge.

Keep the bottom attachments clear of the tulle knots. Add extra attachment points if the panel lifts away from the frame.

The panel should cover the circular wire and sit just in front of the tulle attachment line. The scarf will conceal the lower join.

6. Add the Snowman’s Face

Cut:

  • Two black felt circles approximately 2 cm across for the eyes
  • One orange felt carrot shape approximately 6 to 8 cm long
  • Five small black felt circles for a curved smile

Arrange everything before gluing.

Position the eyes in the upper half of the face, leaving room for the hat brim. Place the carrot nose beneath them, angled slightly sideways, and arrange the small circles into a smile.

Glue the pieces to the white felt using a compatible fabric glue and allow them to dry.

Keep the nose flat and lightweight. A large projecting cone can catch on the door and pull at the face backing.

A slightly crooked carrot nose is perfectly acceptable. Snowmen have never been known for their formal portrait poses.

7. Make and Attach the Black Top Hat

Draw a flat top-hat shape on paper. For a 25 to 30 cm face, try a brim approximately 30 to 35 cm wide and a crown approximately 18 to 22 cm wide.

Hold the paper template against the snowman before cutting your materials.

Cut the hat shape from firm craft foam, then cover its front with black felt. Add a narrow ribbon or fabric hatband.

Position the brim over the upper edge of the face. Secure the hat backing to the upper wire frame at two or more points using strong thread or small cable ties through discreet holes in the backing.

Keep the hanger hook exposed above the hat. Adjust the hat height or make a small reinforced opening if necessary.

Support the hat from the wire frame, rather than relying on glue between the hat and face.

8. Add the Scarf

Fold the scarf fabric lengthwise to create a finished width of approximately 4 to 5 cm.

Lay its centre across the lower edge of the face, covering the tulle knots. Take the ends around the sides of the frame and secure them loosely at the back, bringing the remaining tails forward at one side.

Use a few hand stitches to hold the scarf to the wrapped wire.

Explore

Bedrooms Christmas Craft Ideas Easter Garden and Yard Halloween Holidays Home Decor Kitchens Living Areas Makeovers and Redos More DIY's Organizing Outdoor Decor Porches, Patios and Decks Recycled Crafts Seasonal Trash to Treasure Windows and Walls Wreaths

RSS feed: More Articles More Articles

  • Stitch a Play Mat with a Gorgeous Butterfly
  • 20 Non-Candy Halloween Treat Ideas for Kids, Classrooms and Trick-or-Treaters
  • DIY Snowman Door Hanger Using Tulle and Fairy Lights
  • Whipped Manuka Honey Body Butter – Ultra-Rich DIY Moisturizer for Dry, Mature Skin
  • How to Wet Felt an Embellished Clutch Purse by Natasha Smart Textiles
  • 10 Cute Halloween Scrapbook Layout Ideas
  • Book Review: The Wandering Knitter
  • Book Review: Irresistibly Cute Mini Amigurumi – 62 Tiny Crochet Projects
  • 10 Easy Overnight Oats Recipes That Are Full of Flavour
  • Storage Solutions for Threads, Rulers and Quilting Notions (Without Turning Your Sewing Room Into Chaos)

Copyright © 2026 · CraftGossip | Start Here | Contact Us | Link to Us | Your Editors | Privacy and affiliate policy