• Home
  • Suggest A Craft
  • DIY Newsletter

Home and Garden

Ideas For DIY

  • About CraftGossip
  • Our Network
    • Bath & Body Crafts
    • Candle Making Ideas
    • Crochet Ideas
    • Cross Stitch
    • Edible Crafts
    • Felting Patterns
    • Glass Art
    • Home & Garden Ideas
    • Indie Crafts
    • Jewelry Making
    • Kids Crafts
    • Knitting Patterns
    • Lesson Plans
    • Needlework
    • Party Ideas
    • Polymer Clay
    • Quilting Ideas
    • Recycled Crafts
    • Scrapbooking
    • Sewing Patterns
    • Card Making
    • DIY Weddings
    • Not Craft Ideas
  • Giveaways
  • Roundups
  • Store
  • Search

Rhinestone Flamingo

November 4, 2011 by Amanda Formaro

Rhinestone Flamingo
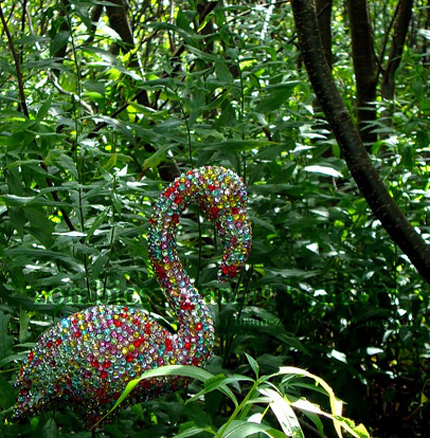
Oh my! How fun and creative is this?? Now I’m feeling bad for getting rid of that ugly plastic flamingo left in the shed from the previous owner of my house. What a great way to change up an outdated lawn ornament. See it at zombies wearing helmets — Like a rhinestone cowboy?.

«
»

Comments

  1. Bernice Walker says

    August 12, 2012 at 4:36 pm

    Waay 2 cool gonna do this very soon. Thanks for this share!!!

  2. Bonnie says

    January 29, 2013 at 11:09 am

    I love this! I found it on Pinterest and I told my boyfriend that the only way we would have a flamingo in the yard would be if it looked like this. Thank you for sharing!

  3. Ruth ready says

    April 10, 2013 at 12:49 pm

    Where did you find these rhinestones for the flamingo ? I’ve looked everywhere, and all I can find are the tiny ones used for nails. I’ve looked at Joann’s, michaels, dollar stores. Send me the info to find them. What size stones did you use ?

    • Amanda Formaro says

      April 11, 2013 at 6:57 am

      Hi Ruth. Please click through to the designer’s site and ask over there. We didn’t create or make the project, we’ve just featured it. She would be the best person to answer your question.

  4. Cindy says

    July 9, 2014 at 7:54 pm

    What kinda glue do u use to adhere rhinestones to flamingo?

    Thanks

  5. roberta martin (@only1rjhm) says

    August 21, 2016 at 8:56 pm

    i made one of these and after a little more than a year the silver backing came off the stones ( i bought a big tub at hobby lobby) and used gem glue. i’m not sure what went wrong. any suggestions to keep that from happening? once the backing is gone, the color isnt there. thanks! 🙂

    • Teresa says

      May 14, 2017 at 11:19 pm

      I’m working on 2 of them right now. I’m using silicone and they are not moving. Putting a sealer on afterwards.

Have you read?

How to Make Textured Wall Art: Easy DIY Canvas Art

There’s something magical about textured wall art. It’s got depth, personality, and that “I spent a fortune at a boutique gallery” vibe—without the boutique price tag. And the best part? You don’t need to be a trained artist to create it. If you can spread butter on toast, you can make this.

I made my first DIY textured canvas art on a rainy Saturday afternoon, with a cup of tea on the table and a curious dog sniffing my paint tray (Aloo was very unimpressed). A couple of hours later, I had a statement piece that looked like it belonged in a high-end décor magazine—except it cost me less than a takeaway dinner. Since then I have been obsessed and even made a Halloween Ghost one which you can see over here on our sister blog.

Whether you want a calming neutral piece for above the sofa or a bold modern texture for a gallery wall, this technique works for all styles.

Why You’ll Love Making Your Own Textured Canvas Art

  • Budget-Friendly: Store-bought textured art can cost hundreds—yours will cost a fraction. 
  • Custom Colours: Match your dĂ©cor exactly (no more “almost” shades). 
  • Therapeutic Process: There’s something soothing about smoothing plaster and watching your art take shape. 
  • One-of-a-Kind: No one else will have the exact same piece hanging on their wall. 

Supplies You’ll Need

Canvas – Any size you like; larger canvases make a bigger impact.

Joint compound, spackle, or lightweight plaster – This is what creates the texture. You’ll find it in the hardware store’s paint aisle.

Putty knife or palette knife – For spreading and sculpting the texture.

Acrylic paint – Choose your main colour(s). Matte paints give a modern, designer look.

Paintbrush or sponge – For applying your colour after the texture dries.

Drop cloth or old sheet – To protect your workspace.

Optional:

  • Metallic paint for highlights 
  • Sandpaper for a smoother finish 
  • Stencils or combs for patterned textures 

Step-by-Step: How to Make Textured Wall Art

1. Prepare Your Workspace

Spread out your drop cloth and set your canvas on a flat surface. This can get a little messy, so old clothes are a must.

2. Apply the Texture

Scoop some joint compound or spackle onto your putty knife. Spread it over the canvas in sweeping motions, as if you’re frosting a cake.

  • For a smooth, modern look, keep your strokes even. 
  • For a rustic, organic feel, let the plaster peak and ripple naturally. 
  • For patterned textures, press in stencils, combs, or even bubble wrap for an imprint. 

3. Let It Dry Completely

Depending on how thick you applied the texture, this can take anywhere from 12–24 hours. Patience is key here—painting too soon can ruin the effect.

4. Paint Your Design

Once dry, use acrylic paint to cover the texture. Neutrals like beige, ivory, or warm grey work beautifully for a minimalist look.

  • Want a bold statement? Go for deep navy, charcoal, or even emerald green. 
  • For a luxe finish, lightly dry-brush metallic gold or bronze over the raised areas to make the texture pop. 

5. Hang and Admire

Once the paint is dry, your art is ready for its gallery debut—aka your living room wall.

Tips for Gorgeous Results

  • Mix Texture Heights: Add thicker plaster in some areas and thinner layers in others for depth. 
  • Use Two Tones: Layer a darker base coat, then brush a lighter shade over the raised texture for a dimensional effect. 
  • Practice First: Try a small canvas before committing to a large statement piece. 

Creating your own textured wall art is a satisfying, budget-friendly way to bring designer style into your home. The process is relaxing, the materials are affordable, and the result is a unique piece that looks far more expensive than it is.

So next time you’re tempted to scroll online for pricey wall décor, grab a canvas, some plaster, and your favourite paint colours—you might just surprise yourself with how chic your creation turns out.


Explore

Bedrooms Christmas Craft Ideas Easter Garden and Yard Halloween Holidays Home Decor Kitchens Living Areas Makeovers and Redos More DIY's Organizing Outdoor Decor Porches, Patios and Decks Recycled Crafts Seasonal Trash to Treasure Windows and Walls Wreaths

RSS More Articles

  • Super Cute Ghost Cross Stitch Patterns
  • Knit a Sweet Striped Vest for Kids
  • DMC American Football Embroidery Pattern – A Fun and Sporty Stitch for Game Day Fans
  • Disney Scrapbook Mini Album Project
  • Free Crochet Pattern One Hour Slippers – Quick, Cozy and Perfect for Gifting
  • Craft the Ultimate Multitasking Messenger Bag
  • Self-Love Spell Bath Bomb: Venus Ritual for Witchcraft and Beauty Spells
  • These Viral Whiskey Cocktails Are All You Need This Fall
  • Build a Paper City with Free Printables
  • Crochet Pattern Review: Pullover Crochet Pattern by Lion Brand

Copyright © 2025 · CraftGossip | Start Here | Contact Us | Link to Us | Your Editors | Privacy and affiliate policy