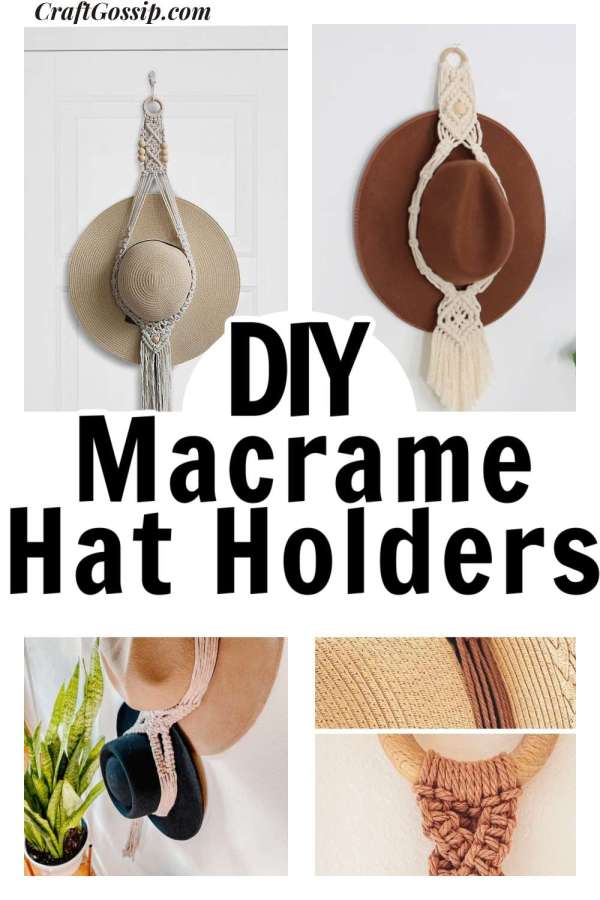
If you’re a hat enthusiast, you know the struggle of finding the perfect storage solution that keeps your collection organized and accessible while adding a touch of aesthetic charm to your space. Look no further than the art of macramé! With their intricate knots and versatile designs, macramé hat hangers offer a creative and stylish way to display your hats while also showcasing your crafting skills. In this roundup, we’ve gathered a selection of YouTube video tutorials, written guides, and paid patterns from Etsy to help you create your very own macramé hat hangers. But if you find it all a little overwhelming, then how about buying a ready-made Macrame Hat holder . We have hand selected this Amazon seller to make sure you get the best design. Here is another amazing style, which hangs on a rod
 .
.
Basic Macramé Knots
Before delving into the tutorials and patterns, it’s essential to familiarize yourself with some basic macramé knots that form the foundation of these intricate designs: You do require a lot of patience when it comes to macrame.
- Square Knot: This is the most fundamental macramé knot, consisting of four strands. It’s used to create the bulk of macramé patterns.
- Lark’s Head Knot: This simple knot is used to attach cords to a base ring or dowel. It’s a great starting point for many macramé projects.
- Half Hitch Knot: This knot creates a diagonal line and is used to add texture and depth to your macramé designs.
- Double Half Hitch Knot: Building on the half hitch knot, this knot is used to create more complex patterns and shapes.
Tips and Tricks for Macramé Stitches
- Practice, Practice, Practice: Macramé is a skill that improves with practice. Start with simple projects and gradually work your way up to more intricate designs. Like I mentioned above you need patience.
- Maintain Consistent Tension: Even tension is key to creating clean and polished macramé pieces. Avoid pulling the cords too tightly or leaving them too loose.
- Use a Work Surface: Secure your project to a clipboard or table to keep it steady and prevent excessive movement.
- Trim Cords as You Go: To keep your work area organized, trim excess cord length as you complete sections of your design.
- Experiment with Cord Types: Different cords, such as cotton, jute, or nylon, can create varying textures and aesthetics. Experiment to find the one that suits your project best.
Best Cord to Use
Choosing the right cord is crucial for the success of your macramé hat hangers. Here are a few options to consider:
- Cotton Cord:
 This is a popular choice due to its softness, durability, and ability to hold knots well.
 - Jute Cord: Jute offers a rustic and natural look, making it ideal for bohemian-style macramé projects.
- Nylon Cord: If you’re looking for a more modern touch, nylon cord is strong and comes in a variety of colors.


YouTube Video Tutorials
Written Tutorials
- Double Hat Holder – Scroll Down for Free pattern
- Triple Hat Holder – Scroll Down for Free Macrame pattern
- Easy DIY Macrame Hat Tutorial
- Macrame for Beginners Hat tutorial
- Macrame hat holder tutorial lots of detailed photos
Paid Patterns
With these resources at your fingertips, you’re ready to embark on a journey into the world of macramé hat hangers. Whether you’re a beginner seeking simple designs or an experienced crafter looking for a new challenge, these tutorials and patterns offer something for everyone. Knot by knot, you’ll create functional and visually stunning pieces that showcase your hats while adding an artistic touch to your living space. Get ready to knot, hang, and admire your handiwork!
Free Macrame Hat Holder for two Hats – Macrame Double Hat Holder
Creating a macramé double hat holder can be a fun and creative project. Here’s a simple pattern you can follow to make a macramé double hat holder:
Materials Needed:
6mm or 8mm cotton macramé cord (about 100-150 feet, depending on the desired length)
Wooden dowel or metal rod (about 24-36 inches in length)
Scissors
Measuring tape
S-hook or nail for hanging
Instructions:
Step 1: Prepare the Cord
Cut 16 strands of macramé cord, each measuring about 7-8 feet in length.
Fold each strand in half and attach them to the dowel using a Lark’s Head Knot (fold the cord in half, place the folded end under the dowel, pass the loose ends through the loop, and pull them tight).
Step 2: Create the Square Knot Base
Group the cords in sets of four. You should have four groups in total.
Create a Square Knot with each group of cords, about 2 inches below the dowel. To make a Square Knot: Take the two outer cords of a group and cross them over the middle cords. Then pass the ends under the middle cords and through the loop created by the outer cords. Pull the ends tight to create a knot. Repeat with the same cords, but reversing the direction (pass the outer cords behind the middle cords) to create a symmetrical knot. Repeat this process with each group of cords.
Step 3: Create the Hat Holding Loops
Once you’ve completed the Square Knot base, separate the cords into pairs (you’ll have eight pairs in total).
Measure about 10-12 inches down from the Square Knots and tie a simple Overhand Knot with each pair to create a loop for holding hats. These loops will hold the hats, so make sure they’re large enough to accommodate the hats you want to hang.
Step 4: Create the Upper Square Knot Section
Divide the pairs of cords again and create another set of Square Knots about 4-5 inches below the loops.
Repeat the same process as in Step 2 to create Square Knots with each pair of cords.
Step 5: Finishing Touches
Trim the loose cord ends below the lower Square Knots to your desired length.
Optionally, you can fray the cord ends for a decorative touch.
Step 6: Hanging
Attach an S-hook to the dowel or use a nail to hang the macramé double hat holder on the wall.
Remember that macramé is a versatile craft, so feel free to get creative with knot variations, cord colors, and additional embellishments to make the double hat holder uniquely yours. Always measure and adjust the pattern to fit your space and hat sizes. Enjoy your crafting!
Free Macrame Triple Hat Holder Pattern
Triple Delight Macrame Hat Holder Pattern
Experience the elegance of triple-tiered hat organization with our Triple Delight Macrame Hat Holder. This intricate yet rewarding project allows you to showcase three of your favorite hats in style. Prepare your materials and let’s embark on this creative journey:
Materials:
9 x 3.5 meters / 138 inches 3mm 3-ply cords
3 small wooden rings
Scissors
Instructions:
Step 1: Preparing the Cords
Cut the 9 cords into equal lengths, each measuring 3.5 meters (138 inches).
Fold each cord in half to create a loop at the midpoint.
Step 2: Attaching the Cords to Rings
Take one of the wooden rings and attach the loops of 3 cords to it using lark’s head knots. Repeat this for the remaining two rings.
Step 3: Creating the Upper Section
Divide the cords hanging from the first wooden ring into 3 sections, each containing 3 cords.
Begin by creating square knots within each section, leaving some space between each knot.
Craft 10 square knots in each section. Ensure that the knots align vertically.
Step 4: Building the Middle Section
Move to the second wooden ring. Separate the cords into 3 sections, mirroring the arrangement from the upper section.
Work 12 square knots in each section, positioning them beneath the knots in the upper section.
Step 5: Crafting the Lower Section
Proceed to the third wooden ring and distribute the cords into 3 sections, mimicking the previous sections.
Generate 14 square knots in each section, aligning them below the knots in the middle section.
Step 6: Combining the Sections
Gather the three sections from each ring and form a braid by intertwining them. This creates the iconic three-tiered look of the hat holder.
Braid for a length that is visually appealing and suits the hanging location.
Step 7: Knotting and Finishing Touches
Once the braid reaches the desired length, tie a gathering knot at the end to secure the braided sections together.
Trim any excess cord ends to achieve a neat and polished appearance.
Step 8: Hanging Your Hats
Find a suitable location to hang your Triple Delight Macrame Hat Holder.
Place your favorite hats on the wooden rings, allowing them to dangle in elegant fashion.
Step 9: Admire Your Creation
Stand back and revel in the visual masterpiece you’ve crafted – a harmonious blend of form and function that gracefully organizes your cherished hats.