• Home
  • Suggest A DIY
  • DIY Newsletter

Home and Garden

Ideas For DIY

  • About CraftGossip
  • Our Network
    • Bath & Body Crafts
    • Candle Making Ideas
    • Crochet Ideas
    • Cross Stitch
    • Edible Crafts
    • Felting Patterns
    • Glass Art
    • Home & Garden Ideas
    • Indie Crafts
    • Jewelry Making
    • Kids Crafts
    • Knitting Patterns
    • Lesson Plans
    • Needlework
    • Party Ideas
    • Polymer Clay
    • Quilting Ideas
    • Recycled Crafts
    • Scrapbooking
    • Sewing Patterns
    • Card Making
    • DIY Weddings
    • Not Craft Ideas
  • Giveaways
  • Roundups
  • Store
  • Search

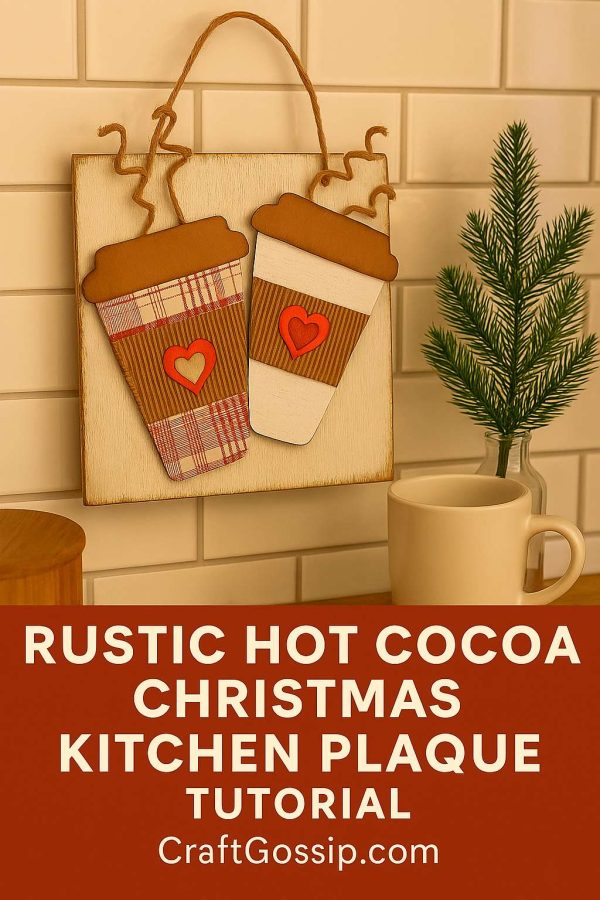
Rustic Hot Cocoa Christmas Kitchen Plaque Tutorial

November 24, 2025 by Shellie Wilson

Nothing says “cozy Christmas kitchen” quite like the smell of hot cocoa—and now, you can capture that warmth in a rustic holiday plaque that’s as charming as it is easy to make. This project uses cardstock, patterned scrapbook paper, and a few farmhouse-style details to create steaming cups of cocoa you can hang in your kitchen or gift to a cocoa-loving friend.

Supplies

  • Brown cardstock (for the cup lids) 
  • Patterned scrapbook paper in plaid prints (for the cup bodies) 
  • Corrugated cardboard or textured brown paper (for the cup sleeves) 
  • Red and cream cardstock (for the heart embellishments) 
  • Small piece of rustic wood or wooden plaque 
  • Brown ink pad or brown acrylic paint for dry brushing 
  • Jute twine (for steam swirls and hanger) 
  • Craft glue or hot glue gun 
  • Scissors 
  • Pencil 
  • Wire (optional, if you want your steam to hold a stiffer curl) 

Instructions

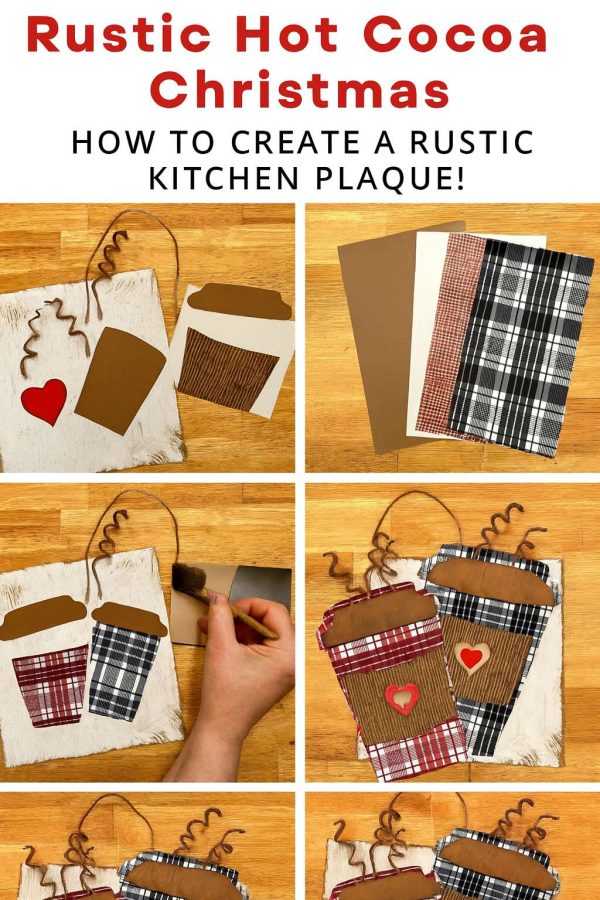
Step 1 – Prepare Your Base
If you’re using raw wood, give it a rustic finish by lightly dry brushing white paint across the surface. Don’t cover it completely—you want the wood grain to peek through.

Step 2 – Cut the Cup Pieces
From brown cardstock, cut out two cup lids.
From plaid scrapbook paper, cut two tapered rectangles for the cup bodies.
From corrugated cardboard or textured brown paper, cut rectangles for the cup sleeves.

Step 3 – Make the Hearts
Cut small cream hearts from cardstock. Cut slightly larger red hearts, then glue the cream hearts in the center for a layered effect.

Step 4 – Add Rustic Aging
Using a dry brush technique, lightly stroke brown ink or diluted brown paint along the edges of all your paper pieces. This gives them a worn, farmhouse feel.

Step 5 – Assemble the Cups
Glue the plaid cup body to the plaque. Add the lid on top, then glue the corrugated sleeve to the center. Attach the layered heart to the middle of the sleeve.

Step 6 – Create the Steam
Cut three pieces of jute twine for each cup. If you want them curly, wrap the twine around a pencil, spray lightly with water, and let dry—or use thin wire inside the twine for a permanent curl. Glue the steam pieces just above the lid.

Step 7 – Add the Hanger
Cut a length of jute twine and glue or staple it to the back of your plaque to hang.

Step 8 – Final Touches
Lightly dry brush the whole piece with brown ink or paint for that “been in the kitchen forever” look.

Display Tip: Hang it above your coffee bar or next to your stove during the holiday season for instant cozy vibes.

«
»

Have you read?

DIY Giant Eyeball Lanterns – Creepy Halloween Decoration

When it comes to Halloween, bigger is always better—and these giant eyeball lanterns prove it! With nothing more than plain white paper lanterns, a little paint, and some imagination, you can create huge, spooky eyes that look like they’ve popped right out of a monster movie.

They’re perfect for hanging from ceilings, displaying on porches, or grouping together in a corner for an eerie effect. Best of all, paper lanterns are super inexpensive (you can grab them on eBay, Amazon, or even your local dollar store), which makes this a great budget-friendly craft for big impact Halloween décor.

Supplies You’ll Need

  • Large round white paper lanterns (various sizes look best) 
  • Acrylic paints or craft paints in black, brown, green, red, orange, or blue (for irises) 
  • Wide paintbrush for background color 
  • Small paintbrush for details 
  • Black construction paper or cardstock (optional for spiky “lashes” or accents) 
  • Hot glue gun or strong craft glue 
  • String or fishing line (if you want to hang them) 

Step-by-Step Instructions

Step 1: Prep the Lanterns

  1. Assemble your white paper lanterns according to the package directions. 
  2. Make sure they’re fully open and the wire insert is in place so the surface is taut for painting. 

Step 2: Paint the Iris

  1. Using a wide brush, paint a large circle in the center of the lantern to create the iris. 
  2. Choose spooky colors—green, red, orange, or blue work wonderfully. 
  3. Don’t worry about making it perfectly smooth; streaks and uneven textures add to the eerie, organic look. 

Step 3: Add the Pupil

  1. Once the iris paint is dry, use black paint to fill in the pupil at the very center. 
  2. Make it large enough to stand out against the iris. 

Step 4: Detail the Eye

  • Use a smaller brush to add darker or lighter streaks in the iris for a more realistic effect. 
  • You can even add thin vein lines in red around the iris to give it that bloodshot look. 

Step 5: Optional Spiky Lashes

  1. Cut long triangles from black construction paper or cardstock. 
  2. Glue them around one side of the lantern so they stick out like sharp monster eyelashes. 
  3. This makes the eyeballs look even more monstrous and stylized. 

Step 6: Display Your Giant Eyeballs

  • Hanging: Use string or fishing line to suspend them from ceilings, trees, or porch rafters so they look like floating eyeballs. 
  • Stacked: Place them in corners, along stairs, or even grouped on your lawn for a spooky display. 
  • Tabletop: Use them as oversized Halloween party props. 

Tips & Variations

  • Glowing Eyes: Insert battery-powered LED lights into the lanterns so they glow from the inside. 
  • Rainbow Eyes: Mix up the colors and make a whole rainbow of creepy eyes. 
  • Monster Cluster: Group multiple eyeballs together in different sizes for a scarier effect. 

This DIY Giant Eyeball Lantern craft is quick, cheap, and gives you maximum Halloween spook factor with minimal effort. Whether you make one or a whole creepy collection, your haunted house setup will definitely be eye-catching!


Explore

Bedrooms Christmas Craft Ideas Easter Garden and Yard Halloween Holidays Home Decor Kitchens Living Areas Makeovers and Redos More DIY's Organizing Outdoor Decor Porches, Patios and Decks Recycled Crafts Seasonal Trash to Treasure Windows and Walls Wreaths

RSS More Articles

  • DIY Giant Eyeball Lanterns – Creepy Halloween Decoration
  • Designer Spotlight: Artmishka Cross Stitch
  • Freebie Friday – Grungy Pumpkins and Fall Tags Junk Journal Printables
  • Free Paisley Flowers Embroidery Design Review
  • Knit a Log Cabin Blanket with All Your Scraps
  • 16 Big Halloween Crochet Projects You Need to Start Now
  • How to Make Tropical Summer Mini Interactive Album
  • Book Review: Fine Whitework by Jenny Adin-Christie
  • Learning Numbers for Preschoolers
  • 6 Free Celestial Coloring Pages

Copyright © 2026 · CraftGossip | Start Here | Contact Us | Link to Us | Your Editors | Privacy and affiliate policy