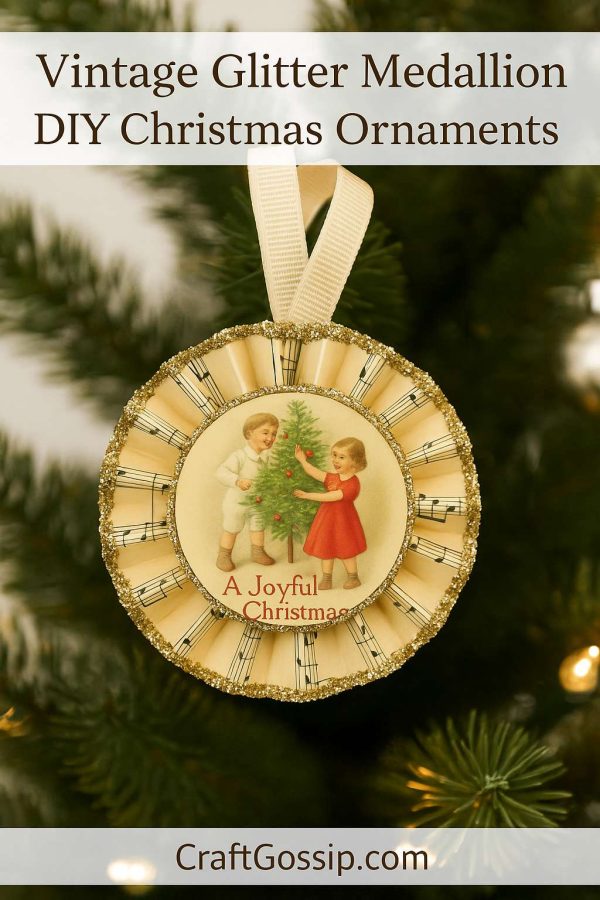
If your Christmas tree leans vintage—think mercury glass, striped ribbons, and sweet old postcards—these rosette-style medallion ornaments are about to steal your heart. Made from “antiqued” sheet music, edged with sparkling glitter, and finished with a charming vintage center, they’re lightweight, easy to make, and so beautiful they look like they’ve hung on the tree for generations.
These paper rosettes (also called medallions or pinwheels) work perfectly as tree ornaments, garland accents, or even as a stunning topper on a special gift. The best part? You can make a whole set in an afternoon with just a few supplies.
What You’ll Need
- Sheet music – Real vintage pages, book paper, or printed sheet music (print on cream cardstock for sturdiness)
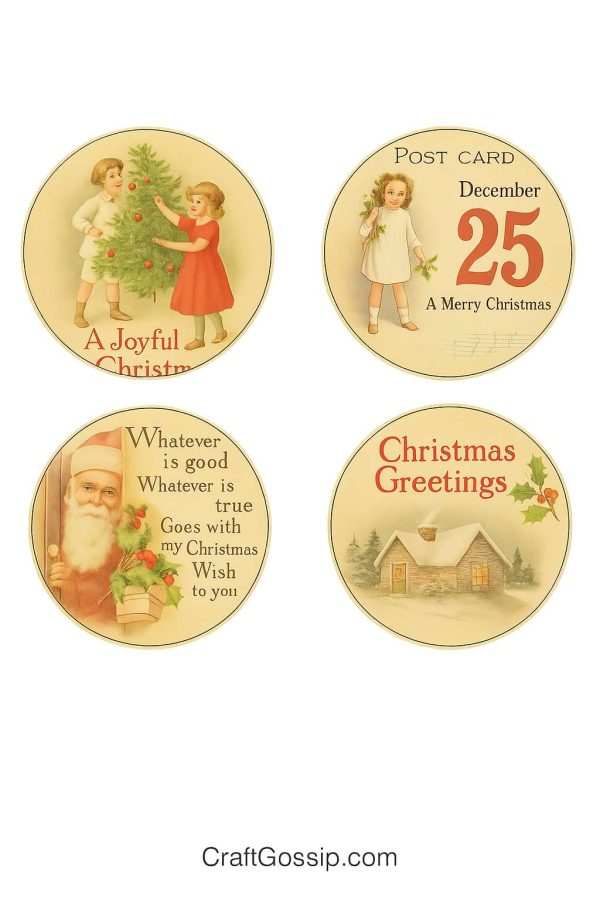
- Cardstock circles – 2.5″ for the front, 2″ for the back. Choose vintage postcard images, Santa faces, or holly designs
- Adhesive – Hot glue gun for assembly, tacky glue for glitter
- Glitter – Fine gold, champagne, or antique silver (glass glitter for extra sparkle)
- Ribbon or baker’s twine – For hanging
- Bone folder or ruler – For crisp folds
- Scoring tool or scoring board – Optional, but makes folding easier
- Circle punch – 2″–2.5″ or scissors
- Distress ink or tea – Optional, for aging the paper edges
- Matte sealer – Matte Mod Podge or spray sealant
Cut Sizes (Per Ornament)
- Three strips of music paper – Each 2.5″ × 10″ for a 4.5″–5″ medallion
- One 2.5″ printed circle for the front
- One 2″ plain circle for the back
- 10–12″ ribbon or twine for hanging
Step-by-Step Instructions
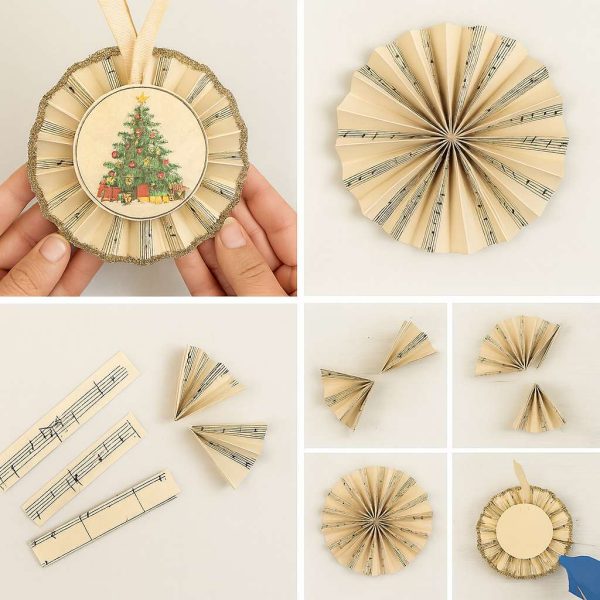
- Prepare and age the paper
If you’re starting with bright white paper, brush a light coat of diluted coffee or tea over it. Let dry completely, then press under a heavy book to flatten. Ink the edges with brown distress ink for an authentically aged look. - Score and fold
Score each strip every ½”. Accordion fold the strips along the score lines, pressing each fold firmly with a bone folder or ruler. - Join the strips
Glue the short ends together to form one long pleated strip. Then glue the two remaining ends together to create a full pleated ring. - Shape the medallion
Place the pleated ring flat on your table. Gently press the top edges inward so the folds fan out into a circle. Add hot glue to the center and press the 2″ back circle in place to secure. - Add the vintage center
Flip the medallion over and hot glue your printed 2.5″ circle to the front. Smooth it down so it sits flat. - Glitter the edges
Using tacky glue, lightly run a bead along the outer edges of the pleats. Sprinkle with glitter, shake off the excess, and let dry. - Seal and string
Seal the center and glitter edges with a light coat of matte Mod Podge or spray sealer. Glue the ends of your ribbon under the back circle or punch a hole to thread it through.
Design Variations
- Rustic Farmhouse – Swap glitter for torn muslin bows and rusty jingle bells.
- Glamorous – Add pearl cabochons or rhinestones to the center.
- Gift Toppers – Make smaller 3″ versions and attach to wrapped presents.
- Garland – String several together for a festive piano or mantel garland.
These vintage glitter medallion ornaments are the kind of Christmas craft you’ll find yourself making year after year. They’re quick, beautiful, and make thoughtful handmade gifts for anyone who loves old-fashioned holiday charm