• Home
  • Suggest A Craft
  • DIY Newsletter

Home and Garden

Ideas For DIY

  • About CraftGossip
  • Our Network
    • Bath & Body Crafts
    • Candle Making Ideas
    • Crochet Ideas
    • Cross Stitch
    • Edible Crafts
    • Felting Patterns
    • Glass Art
    • Home & Garden Ideas
    • Indie Crafts
    • Jewelry Making
    • Kids Crafts
    • Knitting Patterns
    • Lesson Plans
    • Needlework
    • Party Ideas
    • Polymer Clay
    • Quilting Ideas
    • Recycled Crafts
    • Scrapbooking
    • Sewing Patterns
    • Card Making
    • DIY Weddings
    • Not Craft Ideas
  • Giveaways
  • Roundups
  • Store
  • Search

Wooden spool Christmas tree ornaments

November 10, 2024 by arabella

Diy wooden spool Christmas ornaments are an easy and fun Christmas idea for crafters of all levels and ages.

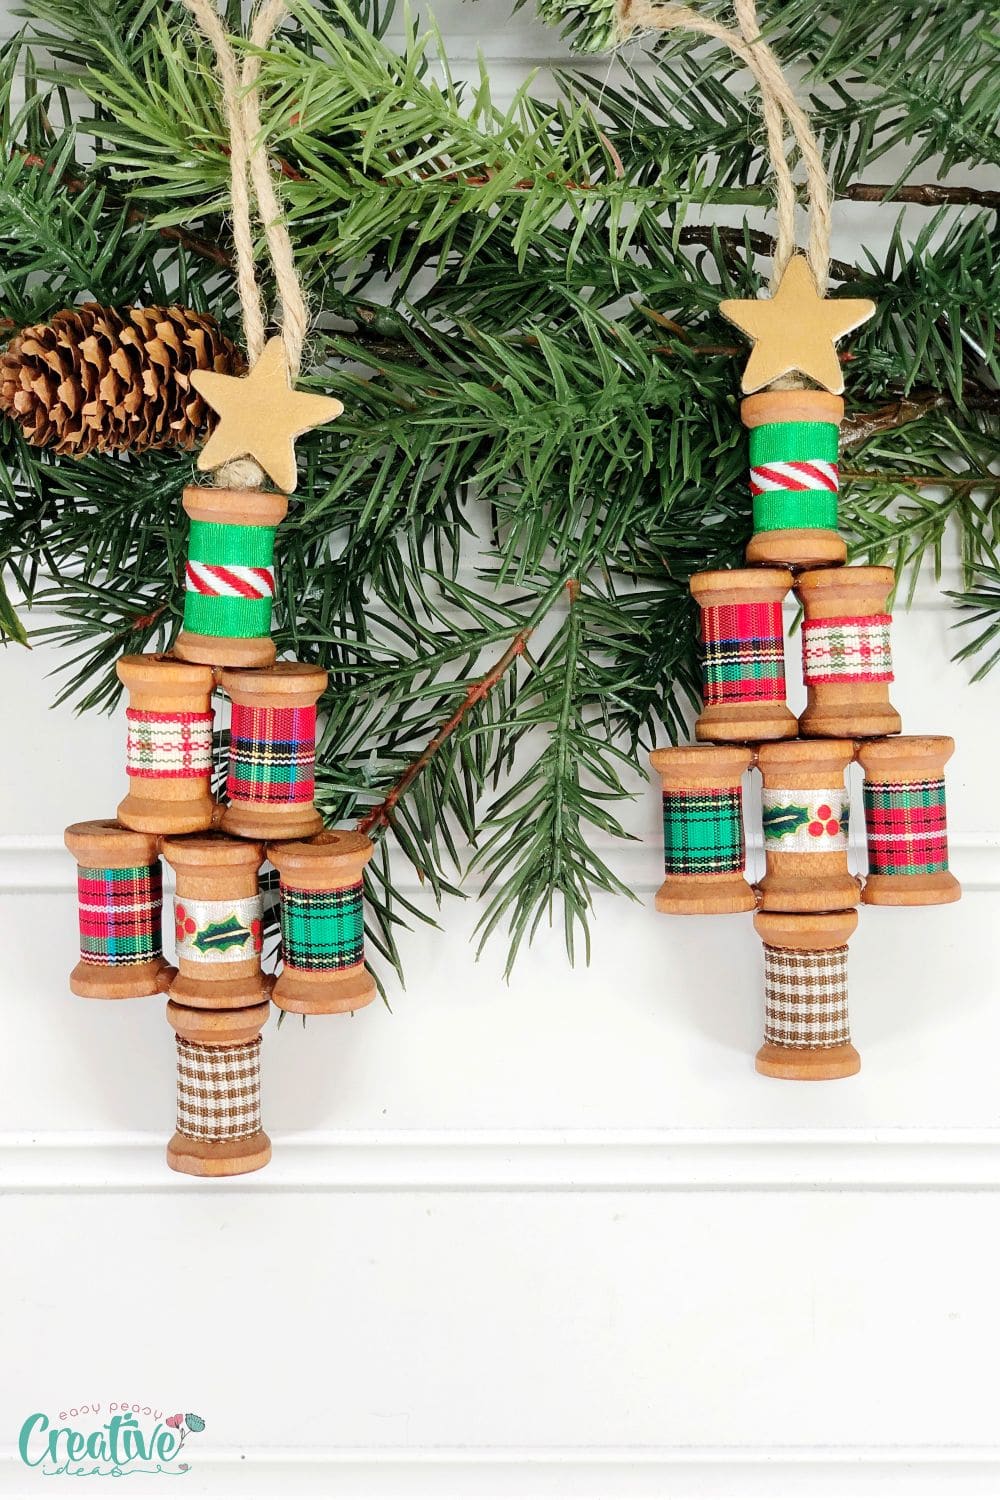
DIY wooden spool Christmas ornaments are a delightful and easy craft that brings festive cheer to your holiday decor. Perfect for crafters of all levels and ages, these ornaments are not only simple to make but also offer endless possibilities for customization. Whether you’re looking to create a rustic, vintage look or add a touch of whimsy to your Christmas tree, wooden spools are the perfect blank canvas.

You can decorate your wooden spools with festive ribbons, twine, and tiny holiday embellishments like mini bells, holly, or snowflakes. For a more personalized touch, try wrapping the spools with patterned washi tape, painting them in your favorite Christmas colors, or even adding hand-painted designs. These ornaments can also double as thoughtful handmade gifts—just add a personalized message or the recipient’s name for a special touch.

Best of all, this project is budget-friendly and kid-friendly, making it a great activity for a cozy crafting session with family or friends. Gather your supplies, turn on some holiday music, and let your creativity shine as you craft these charming wooden spool Christmas ornaments. They’ll add a unique, handmade charm to your tree and fill your home with the spirit of the season.


Related Posts:

  • 45 Christmas Tree Ornaments Made From Wood Slices
  • Clothespin Christmas star ornaments
«
»

Have you read?

How to Make Textured Wall Art: Easy DIY Canvas Art

There’s something magical about textured wall art. It’s got depth, personality, and that “I spent a fortune at a boutique gallery” vibe—without the boutique price tag. And the best part? You don’t need to be a trained artist to create it. If you can spread butter on toast, you can make this.

I made my first DIY textured canvas art on a rainy Saturday afternoon, with a cup of tea on the table and a curious dog sniffing my paint tray (Aloo was very unimpressed). A couple of hours later, I had a statement piece that looked like it belonged in a high-end décor magazine—except it cost me less than a takeaway dinner. Since then I have been obsessed and even made a Halloween Ghost one which you can see over here on our sister blog.

Whether you want a calming neutral piece for above the sofa or a bold modern texture for a gallery wall, this technique works for all styles.

Why You’ll Love Making Your Own Textured Canvas Art

  • Budget-Friendly: Store-bought textured art can cost hundreds—yours will cost a fraction. 
  • Custom Colours: Match your décor exactly (no more “almost” shades). 
  • Therapeutic Process: There’s something soothing about smoothing plaster and watching your art take shape. 
  • One-of-a-Kind: No one else will have the exact same piece hanging on their wall. 

Supplies You’ll Need

Canvas – Any size you like; larger canvases make a bigger impact.

Joint compound, spackle, or lightweight plaster – This is what creates the texture. You’ll find it in the hardware store’s paint aisle.

Putty knife or palette knife – For spreading and sculpting the texture.

Acrylic paint – Choose your main colour(s). Matte paints give a modern, designer look.

Paintbrush or sponge – For applying your colour after the texture dries.

Drop cloth or old sheet – To protect your workspace.

Optional:

  • Metallic paint for highlights 
  • Sandpaper for a smoother finish 
  • Stencils or combs for patterned textures 

Step-by-Step: How to Make Textured Wall Art

1. Prepare Your Workspace

Spread out your drop cloth and set your canvas on a flat surface. This can get a little messy, so old clothes are a must.

2. Apply the Texture

Scoop some joint compound or spackle onto your putty knife. Spread it over the canvas in sweeping motions, as if you’re frosting a cake.

  • For a smooth, modern look, keep your strokes even. 
  • For a rustic, organic feel, let the plaster peak and ripple naturally. 
  • For patterned textures, press in stencils, combs, or even bubble wrap for an imprint. 

3. Let It Dry Completely

Depending on how thick you applied the texture, this can take anywhere from 12–24 hours. Patience is key here—painting too soon can ruin the effect.

4. Paint Your Design

Once dry, use acrylic paint to cover the texture. Neutrals like beige, ivory, or warm grey work beautifully for a minimalist look.

  • Want a bold statement? Go for deep navy, charcoal, or even emerald green. 
  • For a luxe finish, lightly dry-brush metallic gold or bronze over the raised areas to make the texture pop. 

5. Hang and Admire

Once the paint is dry, your art is ready for its gallery debut—aka your living room wall.

Tips for Gorgeous Results

  • Mix Texture Heights: Add thicker plaster in some areas and thinner layers in others for depth. 
  • Use Two Tones: Layer a darker base coat, then brush a lighter shade over the raised texture for a dimensional effect. 
  • Practice First: Try a small canvas before committing to a large statement piece. 

Creating your own textured wall art is a satisfying, budget-friendly way to bring designer style into your home. The process is relaxing, the materials are affordable, and the result is a unique piece that looks far more expensive than it is.

So next time you’re tempted to scroll online for pricey wall décor, grab a canvas, some plaster, and your favourite paint colours—you might just surprise yourself with how chic your creation turns out.


Explore

Bedrooms Christmas Craft Ideas Easter Garden and Yard Halloween Holidays Home Decor Kitchens Living Areas Makeovers and Redos More DIY's Organizing Outdoor Decor Porches, Patios and Decks Recycled Crafts Seasonal Trash to Treasure Windows and Walls Wreaths

RSS More Articles

  • Knit a Sweet Striped Vest for Kids
  • DMC American Football Embroidery Pattern – A Fun and Sporty Stitch for Game Day Fans
  • Disney Scrapbook Mini Album Project
  • Free Crochet Pattern One Hour Slippers – Quick, Cozy and Perfect for Gifting
  • Craft the Ultimate Multitasking Messenger Bag
  • Self-Love Spell Bath Bomb: Venus Ritual for Witchcraft and Beauty Spells
  • These Viral Whiskey Cocktails Are All You Need This Fall
  • Build a Paper City with Free Printables
  • Crochet Pattern Review: Pullover Crochet Pattern by Lion Brand
  • How to Make Textured Wall Art: Easy DIY Canvas Art

Copyright © 2025 · CraftGossip | Start Here | Contact Us | Link to Us | Your Editors | Privacy and affiliate policy