• Home
  • Suggest A DIY
  • DIY Newsletter

Home and Garden

Ideas For DIY

  • About CraftGossip
  • Our Network
    • Bath & Body Crafts
    • Candle Making Ideas
    • Crochet Ideas
    • Cross Stitch
    • Edible Crafts
    • Felting Patterns
    • Glass Art
    • Home & Garden Ideas
    • Indie Crafts
    • Jewelry Making
    • Kids Crafts
    • Knitting Patterns
    • Lesson Plans
    • Needlework
    • Party Ideas
    • Polymer Clay
    • Quilting Ideas
    • Recycled Crafts
    • Scrapbooking
    • Sewing Patterns
    • Card Making
    • DIY Weddings
    • Not Craft Ideas
  • Giveaways
  • Roundups
  • Store
  • Search

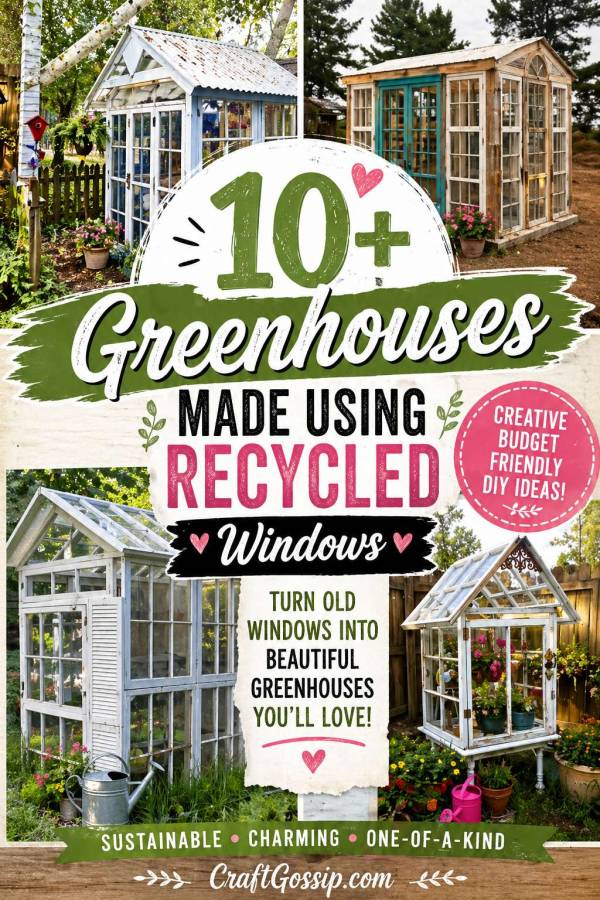
10 Ways to Make a Greenhouse from Old Windows

April 19, 2016 by Larissa Coleman

If you’re a fan of upcycling and DIY projects, using old windows to create your very own greenhouse is a must-try. Not only will you be repurposing an old item, but you’ll also be able to enjoy the benefits of having a greenhouse right in your backyard.

Greenhouses offer the perfect solution for those who love gardening but struggle with keeping their plants alive. With a greenhouse, you have complete control over the environment your plants grow in, ensuring they have everything they need to thrive. Plus, having a greenhouse allows you to extend your growing season and experiment with different types of plants that may not be suitable for your region.

If you’re not quite sure where to start, don’t worry – there are plenty of tutorials and inspiration available online. One great resource is the post “10 DIY Greenhouses Made from Old Windows“, which showcases a variety of greenhouse designs and styles made from repurposed windows. The post features a range of designs from simple and small to large and elaborate, so there’s sure to be a design that fits your needs and style.

Once you’ve decided on a design, it’s time to get started on your DIY project. You’ll need to gather the necessary materials, which typically include old windows, wood or metal framing materials, and various tools. The post “10 DIY Greenhouses Made from Old Windows” offers detailed instructions and helpful tips for each design, making the process easy to follow even for beginners.

But why stop at just building a greenhouse? You can also add some DIY styling ideas to your front porch to create a cohesive outdoor space that’s both functional and beautiful. For example, you can repurpose old wooden crates or pallets to create plant stands or seating areas. Adding a colorful outdoor rug and some outdoor pillows can also help to create a cozy and inviting atmosphere.

Another idea is to incorporate a vertical garden onto your porch. You can use old window frames as the base and attach small pots or planters to create a stunning display of greenery. This is not only a great way to add some greenery to your porch, but it’s also a space-saving solution for those with limited outdoor space.

In conclusion, repurposing old windows to create a DIY greenhouse is a fun and rewarding project that offers a multitude of benefits. Not only will you be reducing waste and saving money, but you’ll also have a functional and beautiful addition to your backyard. And with some easy DIY styling ideas for your front porch, you can create a cohesive outdoor space that’s both practical and stylish. So, start collecting those old windows and get ready to embark on your next DIY adventure!

Looking for ideas on what plants go in greenhouses? Check out these Greenhouse gardening books.


«
»

Have you read?

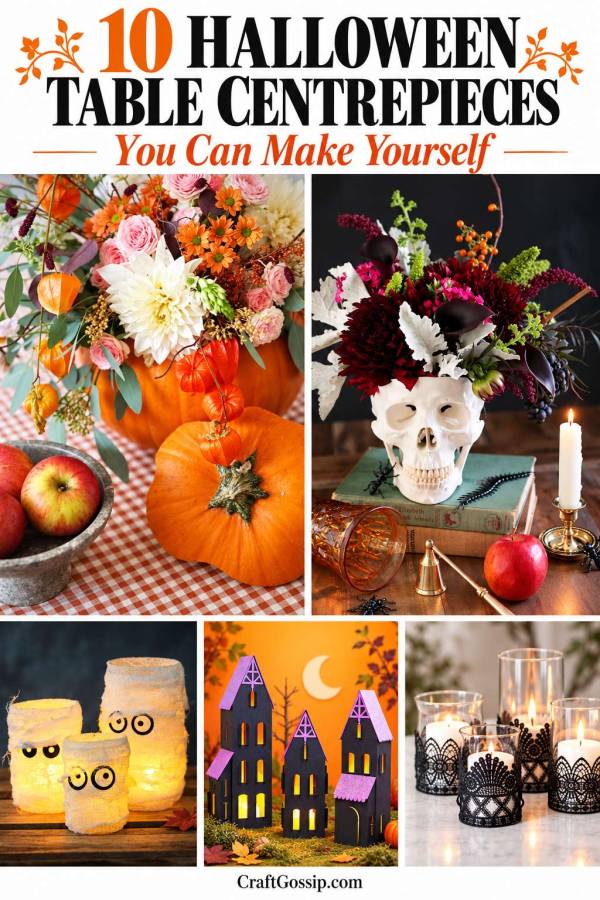
10 Halloween Table Centrepieces You Can Make Yourself

A Halloween table doesn’t need to disappear beneath a mountain of plastic spiders to feel festive. Sometimes a little haunted house, a pumpkin filled with flowers or a few softly glowing lanterns are enough to make an ordinary dinner feel like an occasion.

I love a handmade centrepiece because you can make it suit your home. Go cheerful with friendly ghosts and orange pumpkins, create a vintage witch’s table with dark bottles and lace, or add something wonderfully peculiar that gets everyone talking before dinner even arrives.

These DIY Halloween table centrepieces include paper crafts, upcycled jars, floral arrangements and decorative displays. Some use supplies you may already have, while others need a little planning or drying time. Each links to an individual project so you can follow the maker’s tutorial.

You don’t need to make all ten. Choose one main decoration, leave room for the serving dishes, and let a few smaller pieces finish the table.

1. A Mini Haunted House Village

These paper haunted house lanterns from Jennifer Maker make a lovely starting point for a Halloween table. The project includes a basic house design, with additional building variations available through the tutorial’s resource-library process.

Make one house for a small table or arrange several along the middle of a longer one. Battery-operated tealights inside give the windows a welcoming, slightly spooky glow.

Table styling idea: Place the houses on a shallow tray with a few miniature pumpkins. Keeping everything together makes the display easier to move when dinner is ready.

2. A Pumpkin Filled With Fresh Flowers

If your Halloween style is more pretty than frightening, try this floral pumpkin display from Melanie Lissack Interiors.

The arrangement uses a carved pumpkin with a water-holding floral container inside. The container supports the stems and keeps the flowers supplied with water.

Table styling idea: Choose orange, burgundy or cream flowers and keep the arrangement low enough for guests to see over it. Set the pumpkin on a plate or tray to protect the table, and make it close to your gathering for the freshest display.

3. A Floral Skull Centrepiece

For something a little more dramatic, this floral skull centrepiece from HonestlyYUM combines fresh flowers with a model skull that has a removable top.

The contrast between the skull and the flowers is what makes this arrangement so striking. It feels theatrical without needing an entire haunted-house setup.

Table styling idea: Give the skull centrepiece space to stand out. A dark runner and simple place settings would let the flowers become the main source of colour. Check that your decorative skull has the right construction before buying it for this project.

4. Mummy Jar Lanterns

These mummy mason jar luminaries from Mod Podge Rocks turn glass jars into little glowing characters using cheesecloth, decoupage medium and black cardstock.

They’re a cheerful option for a family Halloween dinner, especially if you prefer friendly faces to anything too gruesome. Allow the glued layers to dry before adding the LED lights.

Table styling idea: Group three jars on a tray, or space them along a rectangular table. Change their expressions slightly so each mummy has its own personality.

5. Black Lace Candle Holders

These black lace candle holders from The Sweetest Occasion give clear glass a gothic touch with decorative lace trim.

This is a lovely project for anyone who enjoys Halloween decor with a vintage feel. Different lace patterns add interest while the repeated black colour keeps the display coordinated.

Table styling idea: Arrange a small cluster on a mirrored or metallic tray with LED candles inside. A few miniature pumpkins beside them will make the display feel seasonal without crowding it.

6. Etched Ghost Glass Holders

Stacy Risenmay’s etched ghost candle holders feature ghost shapes on glass, with two different approaches: frosted ghosts or clear ghosts against a frosted background.

They’re especially nice if you want homemade Halloween decorations that still feel light and uncluttered. The tutorial also suggests using the finished glass as a vase.

Table styling idea: Use an LED light inside one holder and a few decorative branches in another. Follow the etching product’s handling instructions when making the project.

7. A Witch’s Potion Bottle Display

These upcycled Halloween potion bottles from Rustic Passion give empty bottles a wonderfully mysterious makeover.

Different bottle shapes help the collection look like it has been gathered over time. This is a good choice if you enjoy decorating with recycled materials and already have a few interesting bottles waiting for a purpose.

Table styling idea: Group the bottles on a tray for a buffet or drinks table. For a seated dinner, choose shorter bottles so they don’t block the conversation.

Our Halloween spell book feature offers a companion project for completing the witch’s-table look.

8. A Spooky Halloween Terrarium

This Halloween terrarium from DIY in PDX combines a glass container, a moss-wrapped plant and miniature Halloween decorations.

The original uses a dark-leaved begonia alongside little creepy additions. It’s a lovely way to bring plants into your seasonal decorating, particularly if you already have a suitable glass vessel.

Table styling idea: Keep the decorations within the container so the scene stays compact. Turn it around before displaying it to check that guests seated on both sides have something interesting to see.

9. A Decorative Bubbling Cauldron

This DIY bubbling cauldron from Crafty Penguin Family uses clear plastic ornaments to create the appearance of bubbles rising from a witch’s brew. Optional string lights add another layer of interest.

It’s a decorative illusion, so you get the bubbling effect without needing liquid or a working fog setup.

Table styling idea: Choose a small cauldron for a dining table and a larger one for a buffet. If adding lights, use battery-operated LEDs and keep the battery pack accessible. Leave the finished cauldron as a decoration rather than using it to serve food.

10. Spiderweb Jar Candle Holders

These spiderweb candle holders from Alpha Mom use clean glass jars, black permanent marker and white paint to create a glowing Halloween display.

The hand-drawn webs are part of the charm. They don’t need to be perfectly symmetrical, which makes this a forgiving project for anyone who doesn’t consider themselves particularly artistic.

Table styling idea: Draw different webs on a few jars and arrange them down the centre of the table with battery-operated candles inside. Smooth-sided jars make the designs easier to draw and see.

How to Make Your Halloween Table Look Coordinated

Choose a small colour palette before gathering your decorations. Black, cream and orange work well together, while burgundy flowers and antique gold can give the table a darker, more romantic feel.

For a round table, one compact arrangement is usually enough. On a rectangular table, repeat smaller decorations along the middle, leaving gaps for food and drinks.

Keep centrepieces below your guests’ seated eye level, or save taller displays for a buffet. Battery-operated lights are a practical choice around paper houses, lace, cheesecloth and other craft materials.

The nicest handmade Halloween tables don’t have to be elaborate. A pumpkin full of flowers, three slightly wonky mummy jars or a miniature house with glowing windows can make the evening feel special.

Choose the project that makes you smile, use what you already have where possible, and leave enough room on the table for the people—and the food—you’re bringing together.

Explore

Bedrooms Christmas Craft Ideas Easter Garden and Yard Halloween Holidays Home Decor Kitchens Living Areas Makeovers and Redos More DIY's Organizing Outdoor Decor Porches, Patios and Decks Recycled Crafts Seasonal Trash to Treasure Windows and Walls Wreaths

RSS feed: More Articles More Articles

  • How to Price Handmade Christmas Items (Without Underselling During the Holidays)
  • 10 DIY Elegant Halloween Jewellery Ideas For Adults
  • Book Review: Knit an Heirloom Blanket
  • Fall Sensory Ideas for Kids
  • DIY Halloween Sock Candy Favours: A Sweet Gift With Cosy Socks
  • How To Stamp Your Nails – Nail Stamping Review
  • DIY Hanging Witch Hat Lights With a Magical Waterfall Glow
  • 15 Easy DIY Halloween Treat Bag Ideas for Candy and Non-Candy Gifts
  • 10 Handmade Cards with Autumn Leaves
  • Easy Fonts to Add to Your Cross Stitch

Copyright © 2026 · CraftGossip | Start Here | Contact Us | Link to Us | Your Editors | Privacy and affiliate policy