• Home
  • Suggest A DIY
  • DIY Newsletter

Home and Garden

Ideas For DIY


CraftGossip.com may earn a commission when you buy through links on our site.
  • About CraftGossip
  • Our Network
    • Bath & Body Crafts
    • Candle Making Ideas
    • Crochet Ideas
    • Cross Stitch
    • Edible Crafts
    • Felting Patterns
    • Glass Art
    • Home & Garden Ideas
    • Indie Crafts
    • Jewelry Making
    • Kids Crafts
    • Knitting Patterns
    • Lesson Plans
    • Needlework
    • Party Ideas
    • Polymer Clay
    • Quilting Ideas
    • Recycled Crafts
    • Scrapbooking
    • Sewing Patterns
    • Stamping
    • DIY Weddings
    • Not Craft Ideas
  • Giveaways
  • Popular Halloween Crafts
  • Roundups
  • Christmas
  • Search

Christmas Reindeer Wreath

September 21, by Shellie Wilson. 1 Comment

Gather some leftover fabrics and try making this super cute Reindeer wreath for this Christmas!

Materials:

Burlap fabric

Scissors

Template

Felt

Hot glue

Needle and thread

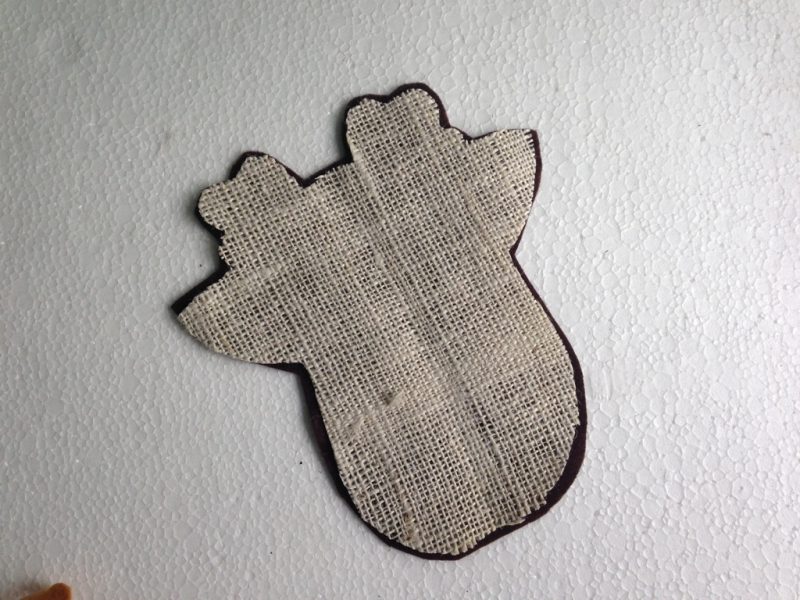
Step-1: You can use 2 fabrics to create the base (Reindeer’s head) of the wreath but I’m using 3 to create a 3 layered pattern. Each base fabric will be half an inch larger than the other, the large ones will be placed at the bottom. In this picture you can see the 2 bottom layers of the wreath I’ll create.


Step-2: Place the largest base fabric at the bottom and then place the second largest on the top of it. You can either stitch or glue the sides to join both pieces together.


Step-3: Use different colored felt fabrics and patterned fabrics to cut out patterns for creating the face of the reindeer. You’ll need to cut out the following patterns- eyes, horns, nose and ears. Glue the last base piece on the top of the second base. Keep a small opening to stuff the wreath. Attach the face patterns on the top base fabric using hotglue gun.


Step-4: Stuff the wreath through the small opening and once you’re doe stuffing close the opening using hotglue or needle and hook to secure the stuffing.

Finally attach a hanging mechanism and done!

Have fun making one!

Related Posts:

  • DIY Spring Daffodil Wreath
  • DIY Garden Gazing Ball
«
»

Comments

  1. Lora Cotton says

    September 22, 2017 at 9:52 am

    Is there a template WITH this??? I noted it in the supplies list, but didn’t find a link or instruction for one.

    Reply

Leave a Reply Cancel reply

Have you read?

DIY heart-shaped frame

Valentine’s Day Burlap Wreath Tutorial

21+ Farmhouse Styled Valentine’s Day Projects You Can Make

40 Mason Jar Crafts For Valentine’s Day

The Best Farmhouse Valentine’s Day Decorations You Can Buy Online

Support Us


Trending popular ideas

8 Front Porch Valentine Decor Ideas
21+ Farmhouse Styled Valentine's Day Projects You Can Make
50+ Things to Make With Cement
DIY Woodworking Projects Made From a 2x4
Tips to Make Washing Walls a Little Bit Easier
8 Stunning Container Gardening Ideas
10 Ways to Make a Greenhouse from Old Windows
10 Ways to Use Cardboard in Your Decor
40 Mason Jar Crafts For Valentine's Day
DIY Giant Christmas Bells - Bowl Hack

RSS From The Network

  • Simply Chic Buffalo Plaid Fingerless Gloves
  • DIY heart-shaped frame
  • Women’s Cowl Neck Sweatshirt Tunic – Free Sewing Pattern
  • More Bernie Mittens Knitting Patterns
  • A Bitch in Time Offers Salty Cross-Stitch Patterns
  • How to Decorate an Embroidery Hoop with Bias Tape
  • Printable Ox Headband to Celebrate the Year of the Ox
  • How to make a bee Valentine out of hearts
  • DIY Wrist Support for Computer Users – Sewing Tutorial
  • How to Repair a Damaged Quilt

Copyright © 2021 · CraftGossip | Start Here | Contact Us | Link to Us | Your Editors | Privacy and affiliate policy

Copyright © 2021 · Sprinkle Theme on Genesis Framework · WordPress · Log in