• Home
  • Suggest A DIY
  • DIY Newsletter

Home and Garden

Ideas For DIY

  • About CraftGossip
  • Our Network
    • Bath & Body Crafts
    • Candle Making Ideas
    • Crochet Ideas
    • Cross Stitch
    • Edible Crafts
    • Felting Patterns
    • Glass Art
    • Home & Garden Ideas
    • Indie Crafts
    • Jewelry Making
    • Kids Crafts
    • Knitting Patterns
    • Lesson Plans
    • Needlework
    • Party Ideas
    • Polymer Clay
    • Quilting Ideas
    • Recycled Crafts
    • Scrapbooking
    • Sewing Patterns
    • Card Making
    • DIY Weddings
    • Not Craft Ideas
  • Giveaways
  • Roundups
  • Store
  • Search

Cricut Craft – Alcohol Ink Mugs

August 28, 2018 by Shellie Wilson


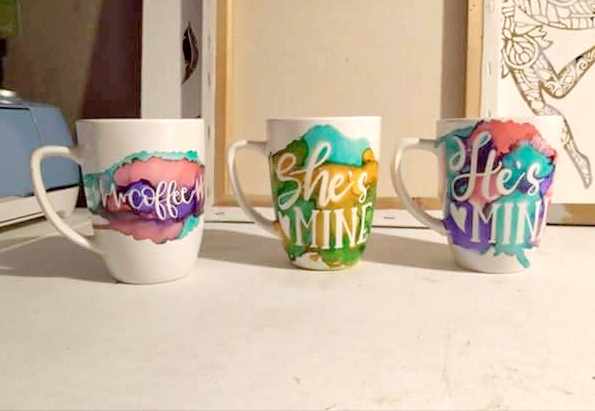
This Cricut or Silhoutte project uses simply typography and Alcohol Inks to create this quick personalized mugs. Perfect for gift giving and using up vinyl scraps.

Clean surface with alcohol, and apply the vinyl (I used 651)
Ink method varied.
On some I used a qtip, dipped in alcohol. Dripped 2-3 drops of ink on qtip and dabbed on, dabbing over edges to try to blend. Sometimes I’d press the qtip harder to squeeze out extra liquid then I’d blow on the liquid to spread it around.

On the she’s mine, I dabbed alcohol over the vinyl and then dripped the ink directly into the mug.
I just tried different combinations of alcohol and ink to see what would happen.

You can easily erase it all with alcohol if it messes up!
Dry until ink doesn’t look wet anymore (10-15 min) and remove the vinyl.

Some tutorials suggest triple thick to seal.

This tutorial and photo was used with permission from by Amy Smith


«
»

Comments

  1. Kelly Sims says

    August 29, 2018 at 8:32 am

    How do you seal it so it doesn’t come off? I know how we did it on ceramic tiles, but that would not work with mugs

Have you read?

Garage Door Halloween Decorations

This Garage Door Halloween Decoration project is such a fun way to make a big Halloween statement without needing to decorate the whole yard. Instead of a small wreath or porch sign, this idea turns the entire garage door into a spooky silhouette scene, complete with witches, pumpkins, trees, cats, and creepy Halloween shapes.

I really like this one because it has huge visual impact from the street. The black silhouettes against the pale garage door make the design easy to see, even from a distance, and it gives the whole house that haunted Halloween feel without being too gory or scary. It is perfect for families who want something dramatic but still fun for trick-or-treaters.

This is also a great project if you enjoy cutting your own shapes from cardboard, poster board, foam board, or lightweight plastic sheets. You could keep the design simple with just bats and pumpkins, or go all out with witches, trees, ghosts, black cats, and cauldrons. Add a few outdoor spotlights or battery lights nearby and it would look amazing at night.

What makes this project especially clever is that the garage door becomes the backdrop, so you do not need a lot of expensive supplies to fill a large space. It is bold, budget-friendly, and very customizable.

Explore

Bedrooms Christmas Craft Ideas Easter Garden and Yard Halloween Holidays Home Decor Kitchens Living Areas Makeovers and Redos More DIY's Organizing Outdoor Decor Porches, Patios and Decks Recycled Crafts Seasonal Trash to Treasure Windows and Walls Wreaths

RSS feed: More Articles More Articles

  • Fine Motor Task Cards for Kids
  • How to Make a Light Up Halloween Card
  • Designer Spotlight: Cross Stitch with Art
  • Free Foliage Embroidery Pattern Review
  • Easy Knit Baskets to Use All Your Stash
  • How to Make a Simple Fall Accordion Mini Album
  • Pumpkin Spice Hand Balm for Dry, Overwashed Hands
  • Learning about Ghana for Kids
  • Thrifted Quilt Ghost Decorations for Halloween
  • Garage Door Halloween Decorations

Copyright © 2026 · CraftGossip | Start Here | Contact Us | Link to Us | Your Editors | Privacy and affiliate policy