• Home
  • Suggest A DIY
  • DIY Newsletter

Home and Garden

Ideas For DIY

  • About CraftGossip
  • Our Network
    • Bath & Body Crafts
    • Candle Making Ideas
    • Crochet Ideas
    • Cross Stitch
    • Edible Crafts
    • Felting Patterns
    • Glass Art
    • Home & Garden Ideas
    • Indie Crafts
    • Jewelry Making
    • Kids Crafts
    • Knitting Patterns
    • Lesson Plans
    • Needlework
    • Party Ideas
    • Polymer Clay
    • Quilting Ideas
    • Recycled Crafts
    • Scrapbooking
    • Sewing Patterns
    • Card Making
    • DIY Weddings
    • Not Craft Ideas
  • Giveaways
  • Roundups
  • Store
  • Search

DIY Farmhouse Christmas Angel

September 26, 2018 by Shellie Wilson

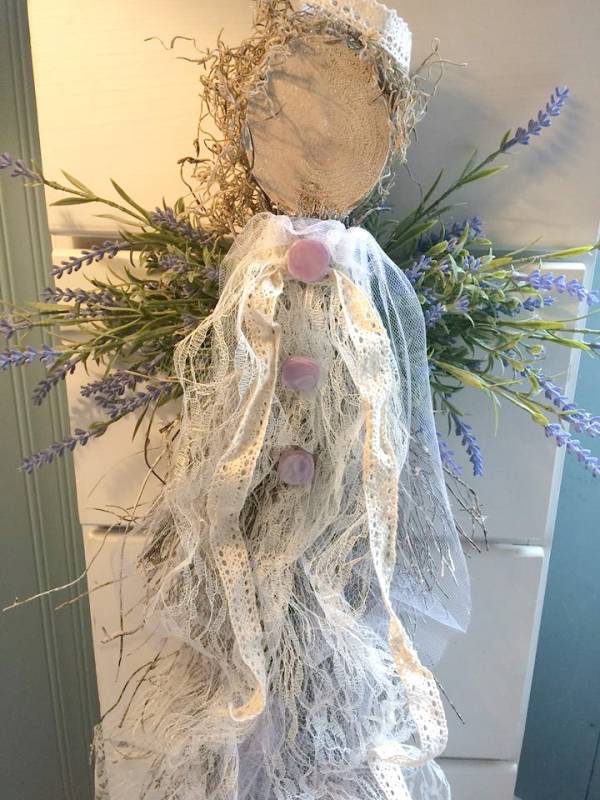
This DIY Christmas Angel has a rustic farmhouse feel to it. This Christmas ASngel can be used as a wreath on your front door or just a Christmas hangup for an inside decoration. This tutorial is easy to follow and as it is rustic farmhouse style you can add your own rustic style to it by using what you have available.

You will need:

1 x 10cm piece of wood slice for the face around 1/2 inch thick

2-3 metres of lace

1/2 metre piece of soft tulle

bunch of plastic or dried lavender sprigs (as shown)

50g of craft moss for the hair

large buttons or wood slices for the dress

10x x40 cm twigs for the body.

Start by creating your body. Lay the twigs down and secure in a wide bunch with glue or florist wire.

Glue the lavender sprigs like wings going out from the body (twigs) leaving space for the head. Glue the head (wood circle) in to place.

Add the tulle to create the dress. Glue the buttons and lace into place to finish off the dress. You can use some lave to create a Halo or use small contrasting flower sprigs such as daisies or baby’s breath. Hand a cord at the back for hanging, try and secure the cord to the twigs as they will be the most stable.   Then glue the moss hair into place.

This Angel was contributed by Lorraine P.

Looking for more Angel crafts? Check out these Angel craft tutorials I made over on my DIY Craft tutorial site Craftbits.com

Clay Pot Christmas Angel 

Christmas Bell Angels

Coat Hanger Christmas Angel 

Wooden Rustic Angels 

Beaded Angel 

Recycled China Junk Angels


Related Posts:

  • DIY Farmhouse Christmas Candy Cane Wreath
  • Better Homes & Gardens Farmhouse Christmas Projects
«
»

Have you read?

Easy Patriotic Mason Jar Cricut Craft for Summer Decorating

Mason jars really do earn their keep in the craft room, don’t they? One minute they’re holding buttons, the next they’re filled with flowers, fairy lights, paintbrushes, or the random collection of pens that somehow migrates from every drawer in the house.

This Stars & Stripes 4th of July Mason Jar Cricut Craft from CraftBits is a simple red, white, and blue project that turns plain pint-size mason jars into festive patriotic decorations. It uses paint, white vinyl, a Cricut machine, and a stars-and-stripes SVG file to create a clean, bold design that works beautifully for 4th of July table decor, patriotic porch styling, summer BBQs, Memorial Day, Labor Day, and Veterans Day displays.

You can find the full tutorial here: Stars & Stripes 4th Of July Mason Jar – Cricut Craft.

What I like about this project is that it looks polished without being overly complicated. The jars are painted red and blue, then finished with white vinyl decals cut using a Cricut. The tutorial uses a Cricut machine with a fine point blade, standard grip mat, premium white vinyl, transfer tape, weeding tool, paint, clear glaze, and two pint-size mason jars with at least one smooth side.

The instructions walk you through painting the jars with 2–3 coats, sealing them with clear glaze, uploading the SVG into Cricut Design Space, resizing the design, cutting and weeding the vinyl, applying it with transfer tape, and sealing again before filling the jars with flowers, flags, or other embellishments.

These jars would be adorable lined up down the centre of a picnic table, tucked into a porch display, or grouped on a mantel with mini flags and battery candles. I especially like the idea of using faux white flowers so they can be packed away and reused next year — because let’s be honest, holiday decorating is much easier when half the job is already sitting in a labelled storage tub.

If you are already planning a front porch refresh, this project pairs nicely with our 15 DIY 4th of July porch decor ideas, which includes mason jar accents, patriotic wreaths, painted rocks, custom doormats, and budget-friendly red, white, and blue styling ideas. CraftGossip also notes that mason jars work beautifully for porch tables, windowsills, drinks stations, battery candles, fairy lights, flags, and wrapped cutlery.

A few handy tips before you start: make sure your jars are clean and dry before painting, let every coat cure properly, and use the smoothest side of the jar for your vinyl. Raised lettering on mason jars can make vinyl placement a bit fiddly, and nobody needs to be arguing with transfer tape the night before guests arrive.

For supplies, this is a natural place to mention a Cricut machine, white permanent vinyl, transfer tape, weeding tools, mason jars, clear spray glaze, and red and blue craft paint. Amazon works well for general Cricut supplies and mason jars, while Cricut-branded materials or vinyl bundles are a helpful affiliate fit if you’re turning this into a shopping-supported post. A small Cricut scraper or spatula is also worth having nearby because it helps the vinyl transfer cleanly without bubbles.

You could also change the look depending on your decorating style. Use navy and burgundy paint for a more vintage Americana look, bright red and royal blue for a party table, or chalk paint if you like a softer farmhouse finish. Add twine around the rim, tuck in mini flags, fill them with sparklers for display only, or use them as utensil holders for a backyard BBQ.

This is a lovely beginner Cricut project because it uses a simple vinyl application on a small surface. It gives you a finished project that looks impressive, but it doesn’t require a huge material list or complicated layering. And if you’ve been saving jars because “they might be useful one day,” congratulations — one day has officially arrived.

Explore

Bedrooms Christmas Craft Ideas Easter Garden and Yard Halloween Holidays Home Decor Kitchens Living Areas Makeovers and Redos More DIY's Organizing Outdoor Decor Porches, Patios and Decks Recycled Crafts Seasonal Trash to Treasure Windows and Walls Wreaths

RSS More Articles

  • How to Bind a Junk Journal (5 Easy Methods for Beginners)
  • Sewing Pattern Saturday Review: DIY Reusable Period Pad Sewing Pattern
  • Using Pizza and Pretend Play to Learn about Fractions
  • 12 Matcha-Flavoured Recipes To Try At Home
  • Free Crochet Summer Tops, Tees And Beachwear Patterns To Make This Season
  • Vintage Knitted Lace Stole Pattern PDF – A Romantic 1950s Bridal Shawl
  • How to Make Cute Shaped Insect Cards (with bonus shakers)
  • Designer Spotlight: Non Stop Stitch
  • Free Felting Tutorial Friday: Wool Needle Felted Acorns
  • Knit a Little Scarf Full of Luxury

Copyright © 2026 · CraftGossip | Start Here | Contact Us | Link to Us | Your Editors | Privacy and affiliate policy