• Home
  • Suggest A DIY
  • DIY Newsletter

Home and Garden

Ideas For DIY

  • About CraftGossip
  • Our Network
    • Bath & Body Crafts
    • Candle Making Ideas
    • Crochet Ideas
    • Cross Stitch
    • Edible Crafts
    • Felting Patterns
    • Glass Art
    • Home & Garden Ideas
    • Indie Crafts
    • Jewelry Making
    • Kids Crafts
    • Knitting Patterns
    • Lesson Plans
    • Needlework
    • Party Ideas
    • Polymer Clay
    • Quilting Ideas
    • Recycled Crafts
    • Scrapbooking
    • Sewing Patterns
    • Card Making
    • DIY Weddings
    • Not Craft Ideas
  • Giveaways
  • Roundups
  • Store
  • Search

DIY Zombie Dolls

September 27, 2018 by Shellie Wilson

This Zombie dolls are totally horrifying and are of course PERFECT for Halloween. Pop them on your porch or line your front foot path with these freaky dolls. I can’t do zombies that scare the life out of me but I know there are so many of you crafters out there who love a good DIY zombie. This tutorial shows you how to take an upcycled doll and well, make it bloody awful. You can see the zombie tutorial here. 
«
»

Have you read?

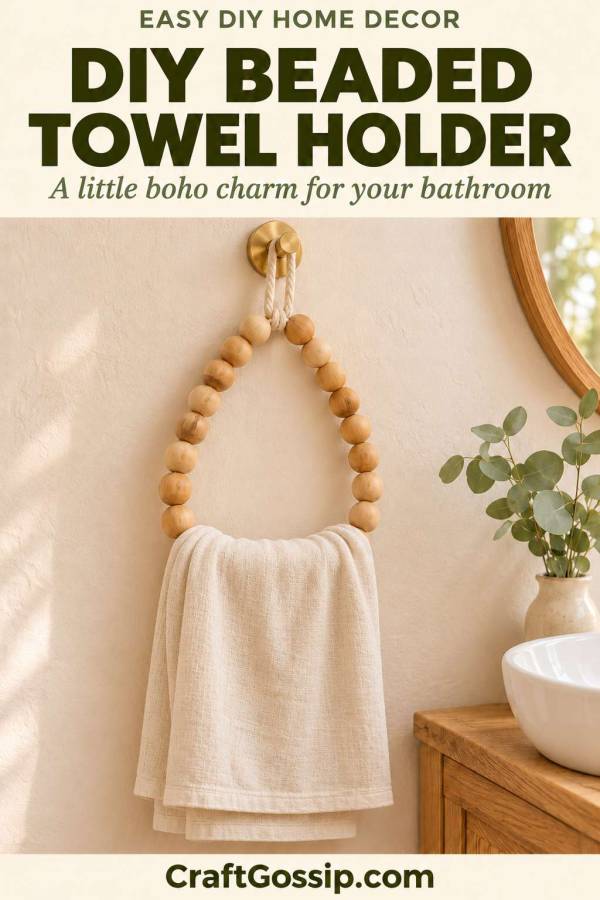
DIY Beaded Towel Holder: An Easy Boho Bathroom Update

A DIY beaded towel holder is a lovely way to add a little warmth to a bathroom without replacing the vanity, repainting the walls or convincing yourself that new tiles are a perfectly reasonable weekend project.

With wooden beads, strong cord and an existing wall hook, you can make a simple hanging loop for a lightweight hand towel. The natural wood works beautifully with boho bathroom décor, coastal colours and relaxed farmhouse styling.

My favourite thing about this project is that you can keep it wonderfully simple. A single colour, a neatly finished hanging loop and a pretty hand towel are plenty. Sometimes the craft stash needs a firm reminder that every project does not require a tassel.

This version uses flexible cord, so the finished holder will form a soft oval or teardrop when a towel is added. That relaxed shape is part of its handmade charm.

If you are updating a small space, our collection of DIY bathroom decorating ideas has more ways to bring in useful storage and handmade details.

What You Need

  • Approximately 26 smooth wooden beads, 20 mm in diameter, with holes large enough for your cord
  • Approximately 1 metre of strong, non-stretch braided polyester cord, around 2 mm thick, for the beaded loop
  • Another 40 cm of the same cord for the hanging loop
  • An existing, securely installed wall hook
  • Scissors
  • Measuring tape
  • Masking tape to help thread the cord
  • Fine sandpaper
  • Optional acrylic paint
  • Optional clear protective finish suitable for painted or bare wood in indoor humid conditions

Skill level: Beginner
Making time: Allow around 30 minutes for assembly, plus any painting and curing time
Best suited to: One lightweight hand towel or guest towel

Large-hole wooden beads are the supply worth checking carefully before buying. Bead diameter and hole diameter are different measurements, and a lovely bag of beads is rather less useful when the cord will not fit through them.

Choose smooth, sealed beads where possible. If you use unfinished wooden beads, apply a suitable protective finish before assembly.

How Big Should a Beaded Towel Holder Be?

For this design, approximately 26 beads measuring 20 mm across provide a useful starting point.

Placed in a straight line, those beads measure about 52 cm altogether. Once joined into a loop, they create an opening suitable for threading through a folded lightweight hand towel. The exact shape and opening will change as the flexible loop hangs.

Before tying anything permanently, arrange the threaded beads into a loop and test it with the towel you actually plan to use.

A thick, fluffy towel needs more room than a thin cotton guest towel. This is one of those little checks that saves untying a very determined knot later.

How to Make a DIY Beaded Towel Holder

1. Check and Prepare the Beads

Inspect each bead for splinters, cracks and rough edges around the holes.

Smooth any rough areas with fine sandpaper and wipe away the dust. Pay particular attention to the holes because sharp edges can gradually wear through the cord.

If you are painting or sealing the beads, do that now. Keep the holes clear and allow the finish to cure fully according to the product instructions before threading.

Dry to the touch does not always mean ready to sit against a damp towel.

2. Plan Your Bead Pattern

Lay out the beads on a tea towel so they stay put.

For a simple wooden bead towel holder, use beads of the same size and finish. This gives the loop a tidy appearance and makes sizing easier.

For a little colour, try a symmetrical arrangement with painted beads near the top and natural wood around the lower section.

Keep heavily textured embellishments away from the part that touches the towel. Smooth beads are easier to wipe clean and less likely to catch a thread.

3. Thread the Beads

Cut approximately 1 metre of cord.

Wrap a small piece of masking tape tightly around one end to make a temporary threading tip. Add the beads, leaving enough cord at both ends for joining.

Bring the ends together to form a loop.

Allow a little movement between the beads. Pulling everything tightly together can make the loop awkward to shape and leave too little space for the hanging attachment.

Test the opening with your folded hand towel before continuing.

4. Join the Cord Ends Securely

Join the two cord ends with a double fisherman’s knot.

To make this knot:

  1. Lay the cord ends alongside each other, pointing in opposite directions.
  2. Wrap one free end twice around the other cord, then pass that free end back through both wraps.
  3. Repeat with the second free end around the first cord.
  4. Tighten each knot, then pull the standing cords so the two knots slide together.

Leave tails at least 2 cm long, or longer if recommended for your chosen cord.

Pull firmly on both sides to check that the join holds. If your cord is unusually slippery or the knot slips, choose a more suitable cord before using the holder.

Position the join at the top of the beaded loop. Do not rely on hot glue or masking tape to hold the loop closed.

5. Add the Hanging Loop

Take the separate 40 cm length of cord and join its ends securely to make a small closed loop.

Attach this loop to the top of the beaded holder with a lark’s head hitch:

  1. Push a folded section of the hanging loop through the centre of the beaded holder at the top.
  2. Pass the rest of the hanging loop through that folded section.
  3. Pull gently until the hitch sits snugly around the beaded loop between

Explore

Bedrooms Christmas Craft Ideas Easter Garden and Yard Halloween Holidays Home Decor Kitchens Living Areas Makeovers and Redos More DIY's Organizing Outdoor Decor Porches, Patios and Decks Recycled Crafts Seasonal Trash to Treasure Windows and Walls Wreaths

RSS feed: More Articles More Articles

  • How To Make A Recycled Bottle Cap Tray With Resin
  • 9 Painted Mosaic Walkway DIY Ideas to Brighten a Plain Garden Path
  • DIY Beaded Towel Holder: An Easy Boho Bathroom Update
  • How to Cook Lamb Shanks: Tender Oven and Slow Cooker Methods
  • Crochet Christmas Hat and Mitten Ornament
  • Christmas Stick and Stitch Embroidery Pattern – Etsy Review
  • Quilt As You Go Tutorial (Beginner-Friendly Step-by-Step Guide)
  • Etsy Feature – Bread Pan Pottery Template
  • A Nostalgic Christmas Pudding Knitting Pattern for Your Handmade Decorations
  • 10 Bucket Hat Knitting Patterns for a Fun Handmade Wardrobe

Copyright © 2026 · CraftGossip | Start Here | Contact Us | Link to Us | Your Editors | Privacy and affiliate policy