• Home
  • Suggest A DIY
  • DIY Newsletter

Home and Garden

Ideas For DIY

  • About CraftGossip
  • Our Network
    • Bath & Body Crafts
    • Candle Making Ideas
    • Crochet Ideas
    • Cross Stitch
    • Edible Crafts
    • Felting Patterns
    • Glass Art
    • Home & Garden Ideas
    • Indie Crafts
    • Jewelry Making
    • Kids Crafts
    • Knitting Patterns
    • Lesson Plans
    • Needlework
    • Party Ideas
    • Polymer Clay
    • Quilting Ideas
    • Recycled Crafts
    • Scrapbooking
    • Sewing Patterns
    • Card Making
    • DIY Weddings
    • Not Craft Ideas
  • Giveaways
  • Roundups
  • Store
  • Search

DIY Recycled Flower Vase

August 20, 2020 by Shellie Wilson

Fresh flowers bring joy and add a pop of color. That’s why they are always a nice addition to any room in the house.
Having some cute vases to display your flowers in useful. They will enhance any bouquet and complete your decoration.
You probably like to use different vase sizes and shapes, so making some if definitely a great idea.
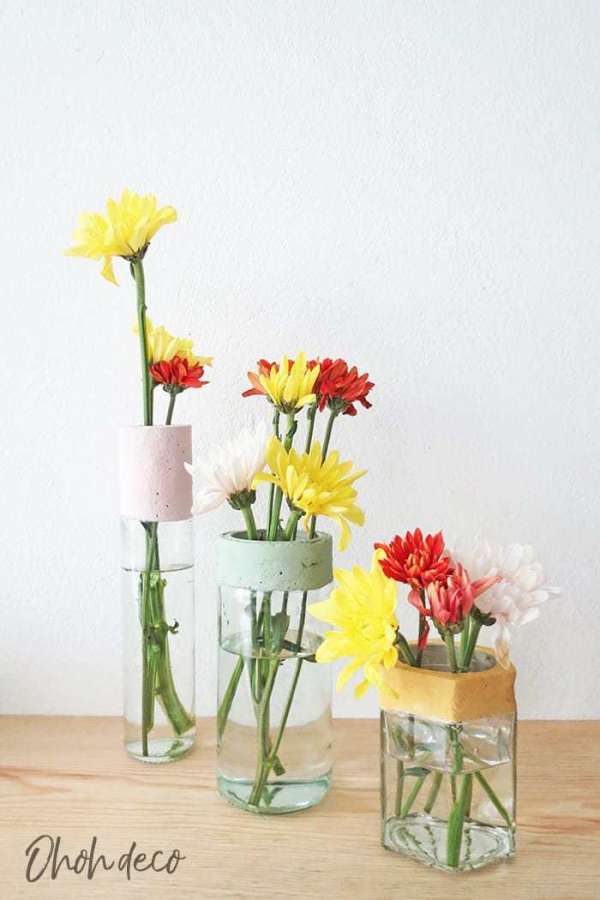
This tutorial shows you how to upcycle a glass bottle or a glass jar into a cute and colourful flower vase. It’s quite simple to make and you can paint them the color you like to match your decoration.
As this craft is very cost-friendly, It’s also a great option to create centerpieces for a party or a wedding.
«
»

Have you read?

How to Make a Home Décor Vision Board Before You Start Decorating

If you’ve ever bought a cushion because it was gorgeous, brought it home, put it on the sofa and immediately realised it belongs in an entirely different house, you already understand why a home décor vision board can be useful.

Home decorating is wonderfully distracting.

You start looking for a new lamp and somehow end up considering whether your entire living room should become English cottage, modern farmhouse, coastal grandmother or dark and moody library.

A home décor vision board gives all those ideas somewhere to live before they start costing you money.

It doesn’t need to look like something produced by an interior designer, either. Mine would probably have paint chips attached crookedly, a fabric sample held on with a pin and at least one picture torn out of a magazine because I couldn’t find the scissors.

That’s completely fine.

The purpose isn’t perfection.

It’s to help you work out what you actually want your home to look and feel like before you start buying, painting and DIYing.

What Is a Home Décor Vision Board?

A home décor vision board is a collection of colours, textures, furniture, DIY ideas and decorative details that represent the look you want to create in your home.

You might also hear it called a:

  • Home décor mood board
  • Interior design mood board
  • Decorating inspiration board
  • Room makeover board
  • Interior vision board
  • Home style board

Whatever you call it, the idea is the same.

Instead of keeping 400 completely unrelated decorating ideas saved on Pinterest, you narrow them down to the ones that actually work together.

Your board can include:

  • Paint colours
  • Wallpaper
  • Furniture styles
  • Flooring
  • Curtains
  • Cushions
  • Rugs
  • Lighting
  • Artwork
  • Storage ideas
  • Plants
  • DIY home décor projects
  • Fabric swatches
  • Wood tones
  • Metal finishes
  • Room photographs
  • Architectural details

You can create one board for your entire home or make a separate board for each room.

Personally, I think individual room boards are easier.

Otherwise the kitchen splashback starts competing with the bedroom curtains and before long you’ve convinced yourself the laundry needs a chandelier.

Start With How You Want the Room to Feel

Before choosing paint colours or furniture, choose a few words describing how you’d like the room to feel.

For example:

Living room: cosy, relaxed, welcoming.

Bedroom: calm, soft, uncluttered.

Kitchen: bright, practical, warm.

Craft room: colourful, organised, inspiring.

Entryway: welcoming, tidy, cheerful.

These words become a little filter for everything you add to your board.

That glamorous mirrored side table might be beautiful, but if you’re trying to create a relaxed rustic living room filled with old timber and natural linen, it might not belong there.

That doesn’t mean you can’t like it.

It just means it belongs in the enormous mental folder labelled Things I Love But Do Not Need to Buy.

We all need one of those.

What You’ll Need to Make a Physical Home Décor Vision Board

You can keep this incredibly simple.

Try:

  • Corkboard
  • Foam board
  • Large cardstock
  • Magnetic noticeboard
  • Magazine clippings
  • Printed photographs
  • Paint colour cards
  • Fabric scraps
  • Wallpaper samples
  • Ribbon
  • Flooring samples
  • Photos of your existing furniture
  • Scissors
  • Glue
  • Pins
  • Washi tape
  • Sticky notes
  • Marker pens

A basic corkboard from Amazon is particularly handy because you can move things around as your ideas change.

If you’re decorating over several months, pinning rather than permanently gluing everything also lets the board evolve with you.

Step 1: Photograph the Room You Already Have

This is surprisingly helpful.

Take a few photographs of the room from different directions.

Photographs can make you notice things you don’t really see when you walk through a room every day.

You might suddenly notice:

  • An awkward empty corner
  • Too many small decorative objects
  • Furniture clustered on one side
  • A rug that’s too small
  • A wall that needs height
  • Several competing wood tones
  • Not enough lighting
  • Nowhere sensible to store everyday items

Print one photograph and place it in the middle of your vision board.

This is your starting point.

You’re not designing an imaginary room.

You’re working with your actual home.

Step 2: Decide What You’re Keeping

This is one of the most useful home decorating steps and one that’s often skipped.

Before choosing new furniture and décor, work out what you’re definitely keeping.

Maybe it’s:

  • Your sofa
  • Dining table
  • Favourite armchair
  • Family artwork
  • Antique cabinet
  • Existing flooring
  • Curtains
  • A much-loved rug

Take photographs of those pieces and add them to your board.

Design around what you already have rather than accidentally creating a room where everything suddenly needs replacing.

It’s better for the budget and, quite frankly, much less exhausting.

Step 3: Choose Your Home Décor Style

You don’t have to rigidly fit into one decorating category, but identifying the styles you’re consistently attracted to is helpful.

Popular directions might include:

Cottage Style

Think warm timber, florals, vintage pieces, baskets, soft fabrics and furniture that looks as though it’s been collected rather than purchased all at once.

Modern Farmhouse

Natural timber, black accents, neutral colours, practical furniture and simple rustic elements.

Coastal

Soft blue, white, sandy neutrals, natural fibres and relaxed furniture.

Bohemian

Layered textiles, plants, collected treasures, colour, pattern and natural materials.

Vintage

Older furniture, artwork, decorative glass, brass, timber and second-hand finds.

Minimalist

Simple lines, fewer objects, practical storage and a restrained colour palette.

Maximalist

Pattern, colour, art, collections, books, textiles and personality everywhere.

And you absolutely don’t need to choose only one.

Maybe your style is cottage with vintage pieces and a slightly eccentric amount of colour.

Perfect.

That’s much more interesting than decorating your home like a furniture showroom anyway.

Step 4: Build Your Colour Palette

Choose approximately three to five main colours for your room.

A simple formula is:

One dominant neutral

This might be white, cream, beige, grey or another soft background colour.

One main colour

For example sage green, dusty blue, terracotta or navy.

One secondary colour

Something that works alongside the main colour.

One or two accent colours

These might appear in cushions, artwork, pottery or decorative pieces.

Collect:

  • Paint cards
  • Yarn samples
  • Fabric scraps
  • Ribbon
  • Magazine clippings
  • Printed colour swatches

Pin them together and see how they look.

This is much easier than discovering halfway through decorating that your “soft sage” curtain fabric looks surprisingly mint green beside your wall paint.

Step 5: Add Texture, Not Just Colour

Rooms need texture.

A board filled entirely with photographs doesn’t always communicate how you want a space to feel.

Add small samples where possible.

Think:

  • Linen
  • Velvet
  • Cotton
  • Wool
  • Cane
  • Rattan
  • Jute
  • Timber
  • Stone
  • Leather
  • Ceramic
  • Woven baskets

If you’re leaning toward an earthy or handmade decorating style, browse some of the DIY inspiration over in CraftGossip’s Home and Garden section and add projects that could become part of your room rather than automatically buying every decorative element.

There is something much more personal about a room containing pieces you’ve made, painted, restored or rescued yourself.

Step 6: Add Your Dream Room

Now comes the fun bit.

Choose one or two photographs of rooms you absolutely love.

Not 47.

We’re editing here.

Look closely at those rooms and ask yourself what you actually love about them.

Is it:

  • The wall colour?
  • Furniture placement?
  • Gallery wall?
  • Lighting?
  • Curtains?
  • Rug?
  • Built-in shelving?
  • Plants?
  • Vintage furniture?
  • Layered textiles?
  • Overall colour palette?

Often we think we want an entire room when we’re actually responding to one particular element.

Maybe you don’t need a complete kitchen renovation.

Maybe what you really love is open shelving, warm timber and pendant lights.

That’s considerably easier.

Step 7: Add DIY Home Décor Projects

This is where the CraftGossip version of a decorating vision board gets much more fun.

Leave a section of your board specifically for things you can make rather than buy.

Possibilities include:

  • Painted furniture
  • DIY wall art
  • Cushion covers
  • Refinished picture frames
  • Handmade wreaths
  • Upcycled storage
  • Painted pots
  • Macramé
  • Crochet cushions
  • Quilted throws
  • Refinished side tables
  • Handmade lampshades
  • Decorative trays
  • Recycled furniture
  • Seasonal decorations

You could even create your own personalised wall art. This DIY monogram wall art idea is a good example of how handmade décor can become part of the overall decorating plan rather than feeling like an unrelated craft project.

And if you enjoy decorating with upcycled pieces, don’t overlook the Recycled Crafts ideas on CraftGossip. A coat of paint and a little imagination can sometimes rescue exactly the sort of piece you were about to spend hundreds replacing.

Step 8: Create a Furniture Wish List

Add photographs of furniture you’d like eventually.

The key word here is eventually.

Your vision board doesn’t need to become a shopping list for Saturday afternoon.

Divide furniture into:

Need

The room genuinely isn’t functioning without it.

Would Improve the Room

Useful but not urgent.

Dream Purchase

Lovely if budget and space allow.

You might discover that you don’t need an entirely new living room suite.

Perhaps replacing one tired chair and adding a larger rug would make the whole room feel different.

Step 9: Add Storage Solutions to Your Vision Board

Storage is not quite as exciting as choosing wallpaper, but it can completely change whether you actually enjoy living in a room.

Add ideas for hiding or organising:

  • Toys
  • Shoes
  • Craft supplies
  • Remote controls
  • Blankets
  • Books
  • Chargers
  • Paperwork
  • Pet supplies
  • Everyday clutter

Attractive baskets and boxes can work particularly well because they become part of the décor.

Amazon is handy for comparing things like woven storage baskets, decorative boxes, shelving, drawer organisers and under-bed storage before deciding what size actually suits your space.

Measure first.

That sentence deserves its own paragraph because I have absolutely bought storage containers that were approximately 2cm too large for the cupboard they were supposed to revolutionise.

Step 10: Give Your Board a Budget Section

This may not be particularly glamorous, but it’s very useful.

Add an approximate budget for the room.

Then divide it into categories:

Paint: $___

Furniture: $___

Lighting: $___

Textiles: $___

DIY supplies: $___

Artwork/decor: $___

Storage: $___

This also helps you decide where DIY projects make the biggest difference.

Maybe you’d rather spend money on a good sofa and make your own cushions.

Perhaps you’re happy to thrift furniture but want beautiful curtains.

Your board should reflect your priorities, not someone else’s Instagram feed.

Step 11: Create a “Shop My Own House” Section

Before buying anything, walk around your home.

You might already own:

  • Frames
  • Lamps
  • Side tables
  • Baskets
  • Vases
  • Cushions
  • Artwork
  • Mirrors
  • Chairs
  • Throws
  • Decorative bowls

Try moving things between rooms.

That lamp you’ve stopped noticing in the bedroom might look perfect in the living room.

The chair buried under washing in the spare room might become the reading chair you’ve been looking for.

Home decorating doesn’t always require more things.

Sometimes it just requires moving the things you’ve already forgotten you own.

It’s basically stash-busting for decorators.

Step 12: Add a Seasonal Layer

You don’t have to completely redecorate every season.

Instead, leave a small area on your home vision board for seasonal changes.

For autumn:

  • Rust-coloured cushions
  • Warm throws
  • Pumpkins
  • Dried foliage
  • Candles
  • Darker textiles

For Christmas:

  • Greenery
  • Garlands
  • Wreaths
  • Fairy lights
  • Handmade ornaments

For spring:

  • Fresh flowers
  • Lighter textiles
  • Soft colour
  • Floral details

For summer:

  • Linen
  • Coastal colours
  • Lightweight throws
  • Natural textures

These small changes can refresh a room without constantly buying new furniture.

Make a Digital Home Décor Vision Board

If you’re happier working digitally, create your board with:

  • Pinterest
  • Canva
  • Google Slides
  • PowerPoint
  • A photo collage app

You can even keep a separate Pinterest board for each room.

Just be disciplined about editing.

The goal isn’t to save everything you like.

The goal is to identify the ideas that work together.

CraftGossip has previously featured the idea of using a mood board to help direct a home decorating vision, and I think that’s really where these boards become useful: they give you a visual reference when you’re standing in a shop wondering whether something actually belongs in your room.

Try This Simple Home Décor Vision Board Formula

If you’re staring at an empty board and wondering where to start, use this formula:

1 photograph of your existing room

Start with reality.

2 inspiration rooms

Choose spaces you genuinely love.

5 colour samples

Create a defined colour palette.

3 texture samples

Fabric, timber, cane, wallpaper or other materials.

3 furniture ideas

Focus on pieces that would genuinely improve the room.

3 DIY projects

Choose projects you could realistically make.

2 storage solutions

Because beautiful rooms still need somewhere for the remote controls.

1 dream element

Something you would love eventually — built-in bookshelves, French doors, a window seat, gorgeous wallpaper or the enormous craft cupboard of your dreams.

Before You Buy Anything, Look at the Board

This is where a home décor vision board saves you from random purchases.

Before buying something, ask:

Does it work with my colours?

Does it suit the feeling I’m trying to create?

Does it work with furniture I’m keeping?

Do I actually have somewhere to put it?

And possibly the most important question:

Am I buying this because I love it, or because it looked fabulous styled on a shelf in the shop?

There is a difference.

Your Home Doesn’t Have to Look Like Everyone Else’s

One thing I love about making a physical home décor vision board is that your personality starts becoming obvious.

You may discover you keep pinning floral fabrics.

Or old wooden cabinets.

Or pink.

Or ridiculously oversized lamps.

That’s the good stuff.

A beautiful home isn’t created by perfectly following a decorating trend. It’s created by collecting colours, furniture, handmade pieces and objects that make the people living there feel comfortable.

Use your home décor vision board as a guide, not a rule book.

Move things around.

Take things off.

Add new ideas.

Make some of the décor yourself.

And if your carefully planned neutral living room somehow develops a bright floral chair six months later because you fell completely in love with it?

I’d call that character.

Explore

Bedrooms Christmas Craft Ideas Easter Garden and Yard Halloween Holidays Home Decor Kitchens Living Areas Makeovers and Redos More DIY's Organizing Outdoor Decor Porches, Patios and Decks Recycled Crafts Seasonal Trash to Treasure Windows and Walls Wreaths

RSS More Articles

  • Sewing Pattern Saturday Review: Bookworm Tablet Sleeve Sewing Pattern
  • Designer Spotlight: Mango Charm Studio
  • 3 FREE Tablescape Coloring Pages
  • DIY Rose Water and Glycerin Facial Mist for Dry Skin Relief
  • A Single Skein Shawl to Knit for Summer
  • Book Review: Dear Math, We’re Not Friends
  • 7 Easy Ways to Upgrade Plain Tomato Sauce From a Squeezy Bottle
  • The Hattitude Beanie free crochet pattern
  • FREE Palm Leaf Font for Summer
  • 10 Quilted Bag Ideas to Make with Scrap Fabrics

Copyright © 2026 · CraftGossip | Start Here | Contact Us | Link to Us | Your Editors | Privacy and affiliate policy