• Home
  • Suggest A Craft
  • DIY Newsletter

Home and Garden

Ideas For DIY

  • About CraftGossip
  • Our Network
    • Bath & Body Crafts
    • Candle Making Ideas
    • Crochet Ideas
    • Cross Stitch
    • Edible Crafts
    • Felting Patterns
    • Glass Art
    • Home & Garden Ideas
    • Indie Crafts
    • Jewelry Making
    • Kids Crafts
    • Knitting Patterns
    • Lesson Plans
    • Needlework
    • Party Ideas
    • Polymer Clay
    • Quilting Ideas
    • Recycled Crafts
    • Scrapbooking
    • Sewing Patterns
    • Card Making
    • DIY Weddings
    • Not Craft Ideas
  • Giveaways
  • Roundups
  • Store
  • Search

DIY Sharpie Dotted Cup For Valentine’s Day

February 5, 2020 by Shellie Wilson

If you love giving loved ones a simple, sweet gift for Valentine’s Day, then these fit the bill perfectly. Pair with a favorite hot cocoa mix and you’re set. With just a few materials, you can make these for almost nothing at all! It would also be a great gift for a birthday, Mother’s Day, or any gift occasion, really. These little cups filled with chocolate will make a sweet (pun intended) little Valentine’s gift. After Valentine’s Day, you can use the cup to hold rings or jewelry.

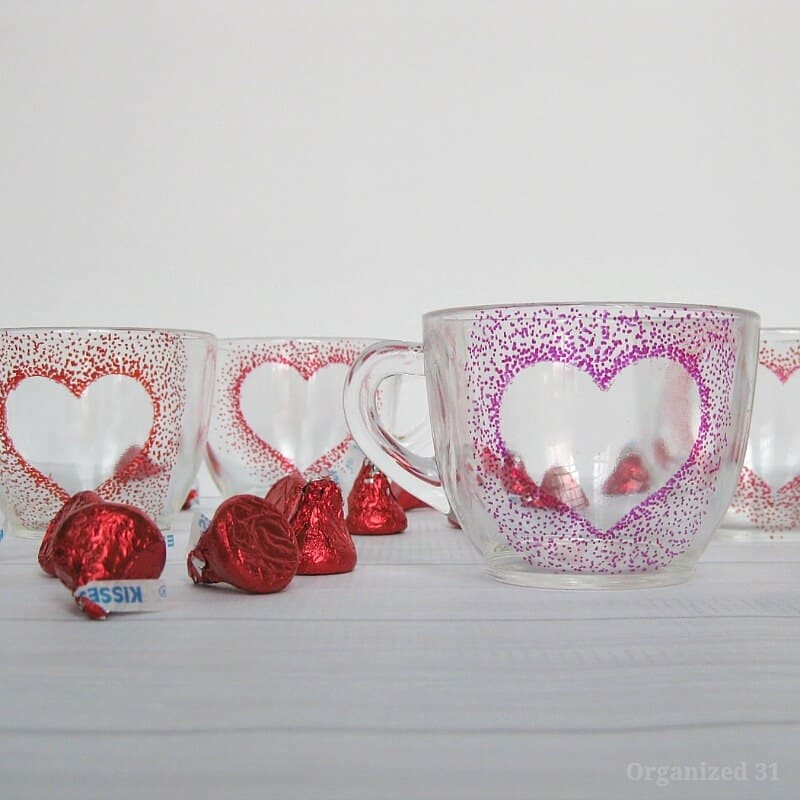
Here is our version of decorating a mug,

To use a Sharpie pen to make a Valentine’s gift on a mug or cup, you will need:

  1. A mug or cup (preferably one that is white or light-colored, as this will allow the Sharpie ink to show up more clearly)
  2. A Sharpie pen (choose a color that you think your recipient will enjoy)
  3. A pencil or a light-colored pen (optional, but recommended as a guide)

Here’s how to create your Valentine’s gift on a mug or cup:

  1. Wash and dry the mug or cup to remove any dirt or grease that may prevent the Sharpie ink from adhering properly.
  2. Use the pencil or light-colored pen to sketch out the design that you want to create on the mug or cup. This can help you plan out the composition and ensure that your final design looks the way you want it to.
  3. Once you have your design planned out, start outlining it with the Sharpie pen. Use steady, even strokes to create clean, clear lines.
  4. If you want to add color to your design, you can use different colored Sharpie pens to fill in the different areas of your design.
  5. Once you have finished your design, set the mug or cup aside and let the ink dry completely. This may take a few hours, depending on the complexity of your design and the thickness of the Sharpie ink.
  6. Once the ink has dried, your mug or cup is ready to use! Be sure to hand wash it to ensure that the Sharpie ink stays in place.

I hope this tutorial was helpful! Let me know if you have any questions.


Related Posts:

  • 10 DIY Sharpie Crafts For The Kitchen
  • Every Day with Babs: 101 Family-Friendly Dinners for…
«
»

Have you read?

How To Hide Ugly Outdoor Hose Pipes

garden-hose-how-to-hide-ugly-easy.png

Okay, let’s be real—nothing ruins a zen garden vibe faster than a neon-green hose sprawled across your patio like a drunk caterpillar. I learned this the hard way when my mother-in-law visited and politely asked, “Is your hose… part of the decor?” Cue my frantic Googling of “how to hide garden hose without looking like a weirdo.”

After testing a ridiculous number of solutions (including a failed attempt to disguise one as a “rustic clothesline”), here are the best tricks that actually work—no landscaping degree required.

1. The “Lazy Gardener’s Best Friend”: Hose Pots

Perfect if: You want something cute that takes 2 minutes to set up.

I grabbed this simple hose pot from Amazon last summer, and it’s been a game-changer. It looks like a giant planter but secretly swallows 100 feet of hose. Pro tip: Skip the cheap plastic ones—they crack faster than my resolve to “water the plants daily.”


2. The Ninja Move: Fake Rock Cover

Perfect if: You want your hose to pull a Mission: Impossible disappearing act.

I was skeptical, but this hollow fake rock from Amazon actually works. Just plop it over your coiled hose, and boom—instant “rock garden.” Warning: It’s lightweight, so toss a brick inside if you live somewhere windy (learned that after mine rolled into the neighbor’s yard).

3. The “Why Didn’t I Do This Sooner?” Wall Reel

Perfect if: You’re tired of tripping over hose loops.

I splurged on a  wall-mounted reel, and now my hose lives neatly coiled off the ground like a civilized garden tool. Key hack: Mount it at elbow height—unless you enjoy awkwardly squatting to reel it in.

4. Mother Nature’s Camouflage: Let Plants Do the Work

Perfect if: You’re cheap and patient (my spirit animal).

I trained creeping thyme to sprawl over my hose along the garden edge. Other great options:

  • Ornamental grasses (they’re basically nature’s curtain)
  • Hydrangeas (big, bushy, and great at hiding sins)

Avoid roses—hoses + thorns = a bad time.

5. The Sneaky Twofer: DIY Hose Bench

Perfect if: You need seating and storage.

I repurposed an old wooden storage bench by drilling a hole near the spigot. Now my hose lives inside, and I have a place to sit while pretending to weed.

What Not to Do (Trust Me)

 Burying a regular hose (it’ll kink and die a slow death).

 Using PVC pipes (they crack faster than my patience with squirrels).
 Letting it bake in the sun (UV rays turn hoses into brittle spaghetti).

So… Which One’s Right for You?

SolutionCostEffortBest For
Hose Pot$2/10Renters, small spaces
Fake Rock$$4/10Ninja-level hiding
Wall Reel$$6/10Frequent hose-users
Plant Cover$8/10Eco-warriors
DIY Bench$$5/10Overachievers

Your Turn!
Which hack are you trying? (Or do you have a better one? Spill your secrets—my hose is still judging me.)

Need more inspo? Check out:

  • Good Housekeeping’s reel roundup

P.S. If you spot my runaway fake rock in Ohio, let me know. 🌱


Explore

Bedrooms Christmas Craft Ideas Easter Garden and Yard Halloween Holidays Home Decor Kitchens Living Areas Makeovers and Redos More DIY's Organizing Outdoor Decor Porches, Patios and Decks Recycled Crafts Seasonal Trash to Treasure Windows and Walls Wreaths

RSS More Articles

  • Embroidery Patterns Stabilizers Wildflowers
  • Book Review: Off to the Nursery
  • Add a Little Lace to Your Knitting Patterns
  • How To Hide Ugly Outdoor Hose Pipes
  • Let’s Make the Lowink Beginners Blanket TOGETHER
  • The Secret to Perfect Topstitching (No More Frayed Thread!)
  • Etsy Spotlight – Girls A-Line Dress Sewing Pattern
  • Flower Cross Stitch Kits
  • 4 FREE Mother’s Day Scrapbook Titles
  • Duality Blanket Crochet Kit – Beginner Crochet Blanket kit

Copyright © 2025 · CraftGossip | Start Here | Contact Us | Link to Us | Your Editors | Privacy and affiliate policy

Copyright © 2025 · Sprinkle Theme on Genesis Framework · WordPress · Log in