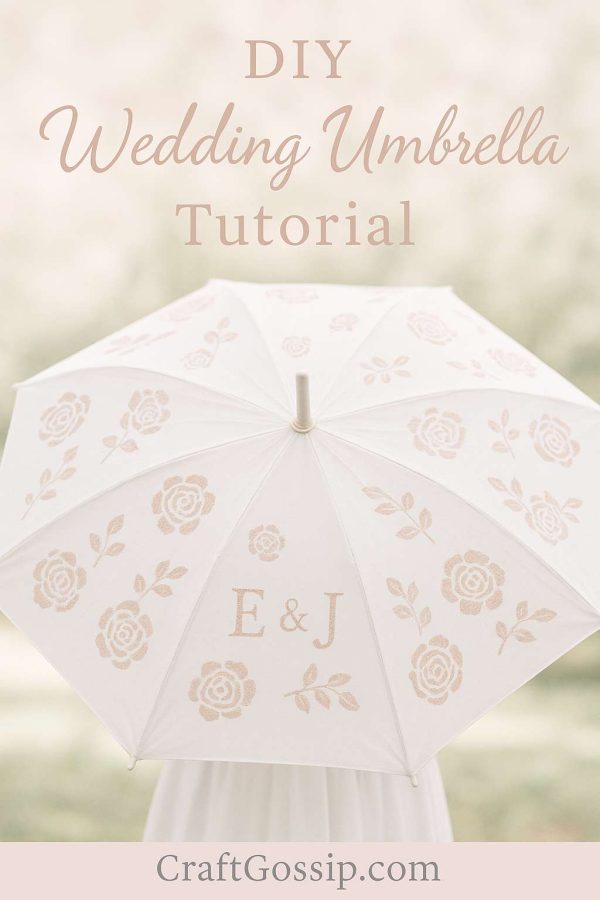
There’s something magical about a wedding day when even the smallest details feel personal and full of love. If you’re planning an outdoor ceremony or just want a memorable photo prop, a DIY stamped bridal umbrella is a beautiful way to add handmade charm. This project turns an ordinary umbrella into a keepsake, whether you stamp it with florals, lace patterns, initials, or even the wedding date.
Brides are loving this idea for engagement shoots, beach weddings, garden ceremonies, and of course, as a darling accessory for those “just married” photos. Plus, it doubles as a practical parasol if your big day brings sunshine (or even a light drizzle).
Why a Stamped Umbrella is Perfect for Weddings
- Unique bridal accessory – Instead of the usual bouquet-only photos, a hand-stamped umbrella adds whimsy and romance.
- Customizable design – Match your wedding theme with lace motifs, gold accents, or floral patterns.
- Budget-friendly DIY – Create a boutique-style parasol for a fraction of the cost.
- Heirloom keepsake – Store it after the wedding as a reminder of your day.
Materials You’ll Need
- 1 plain white umbrella (fabric canopy works best)
- Fabric paint in your chosen wedding colors (metallics and pastels look especially elegant)
- Rubber stamps or hand-carved block stamps (florals, lace, monogram letters)
- Small foam brush or roller
- Wax paper or cardboard (to protect surfaces)
- Optional: glitter paint, rhinestones, or pearls for extra bridal sparkle
Step-by-Step: How to Stamp Your Bridal Umbrella
Step 1: Prepare Your Surface
Open your umbrella and lay it across a large table covered with wax paper or cardboard. Make sure the fabric is taut and wrinkle-free.
Step 2: Choose Your Stamp Design
Select stamps that echo your wedding style—roses for romance, lace patterns for vintage weddings, or leafy vines for a rustic garden theme.
Step 3: Load the Stamp
Use a foam brush to apply fabric paint evenly across the stamp. Avoid drips by applying a thin, even layer.
Step 4: Stamp the Umbrella
Gently press your stamp onto the umbrella fabric. Hold steady for a few seconds, then lift carefully. Repeat the pattern across the panels.
Tip: For a bridal look, alternate metallic gold accents with soft pastel florals.
Step 5: Add Personal Touches
Use alphabet stamps to add your initials, wedding date, or even a romantic word like Love or Forever. This makes the parasol extra special for photos.
Step 6: Let it Dry
Allow the umbrella to dry completely before closing. Depending on your paint brand, this may take 24 hours.
Step 7 (Optional): Add Embellishments
For more sparkle, glue rhinestones or pearls along the stamped patterns. Keep it subtle for an elegant finish.
How to Style Your DIY Wedding Umbrella
- Bridal Portraits: Hold it above your shoulder for a dreamy, vintage vibe.
- Couple Photos: Share an umbrella kiss shot—timeless and romantic.
- Ceremony Decor: Display stamped parasols at your reception entrance or hang them upside down from trees for a whimsical effect.
- Bridesmaids Gifts: Make smaller matching versions for your bridal party.
A Handmade Memory Worth Keeping
This DIY bridal stamped umbrella isn’t just about protection from the weather—it’s a meaningful way to bring your creativity into the wedding. Every time you open it, you’ll remember the joyful hours spent making it and the special day it helped celebrate.
So grab some stamps, choose your colors, and turn a simple umbrella into a handmade wedding treasure.