• Home
  • Suggest A DIY
  • DIY Newsletter

Home and Garden

Ideas For DIY

  • About CraftGossip
  • Our Network
    • Bath & Body Crafts
    • Candle Making Ideas
    • Crochet Ideas
    • Cross Stitch
    • Edible Crafts
    • Felting Patterns
    • Glass Art
    • Home & Garden Ideas
    • Indie Crafts
    • Jewelry Making
    • Kids Crafts
    • Knitting Patterns
    • Lesson Plans
    • Needlework
    • Party Ideas
    • Polymer Clay
    • Quilting Ideas
    • Recycled Crafts
    • Scrapbooking
    • Sewing Patterns
    • Card Making
    • DIY Weddings
    • Not Craft Ideas
  • Giveaways
  • Roundups
  • Store
  • Search

Dollartree Hack – Farmhouse Porch Numbers

August 3, 2020 by Shellie Wilson

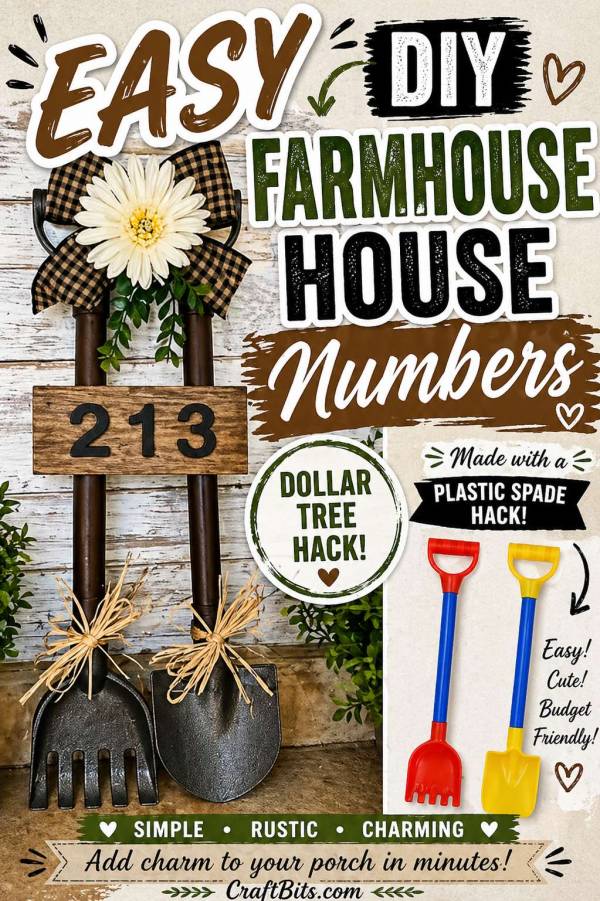
There is something so satisfying about a good Dollar Tree hack, especially when it takes something completely ordinary — like a plastic beach shovel — and turns it into something you would actually be happy to hang on your front porch. This DIY farmhouse porch numbers project is one of those wonderfully clever budget home décor ideas that makes you look twice and say, “Wait… that started as what?”

If your porch, patio, entryway, or garden gate could use a little farmhouse charm, this is such a fun and affordable way to add personality without spending a fortune on custom house numbers. Store-bought porch number signs can be surprisingly expensive, and let’s be honest, half the time they all look exactly the same. This project gives you that rustic farmhouse look using simple supplies, a little spray paint, and a bit of crafty imagination.

What I love most about this Dollar Tree farmhouse hack is that it has that upcycled, “I made this myself” feel without looking too homemade. The plastic toy shovel shape gives it a lovely elongated sign-style base, and once it is painted and decorated, it becomes a charming piece of farmhouse wall décor for your front entry. Add your house numbers, a touch of raffia, and maybe a little greenery if you want to dress it up, and suddenly your porch has a custom handmade feature for just a few dollars.

This is also a great DIY porch décor idea if you like seasonal decorating. You could keep it simple and neutral for everyday farmhouse style, or change the embellishments throughout the year — mini sunflowers for summer, faux eucalyptus for spring, buffalo check ribbon for fall, or a little Christmas greenery when the holidays roll around. It’s one of those projects that can be made to suit your home’s style, whether you lean rustic farmhouse, cottage garden, country porch, or budget-friendly Dollar Tree DIY.

And truly, this is the kind of craft that proves you don’t need a huge budget or fancy tools to make your home feel more welcoming. Sometimes all it takes is a plastic shovel, a can of spray paint, and the willingness to ignore the voice in your head saying, “Surely this won’t work.” Because sometimes, it absolutely does.

You can see the full tutorials for making these house numbers over on our sister site Craftbits.com 

What you will need:

Large Plastic Beach Shovels

Spray Paint

Craft Glue

Raffia


«
»

Have you read?

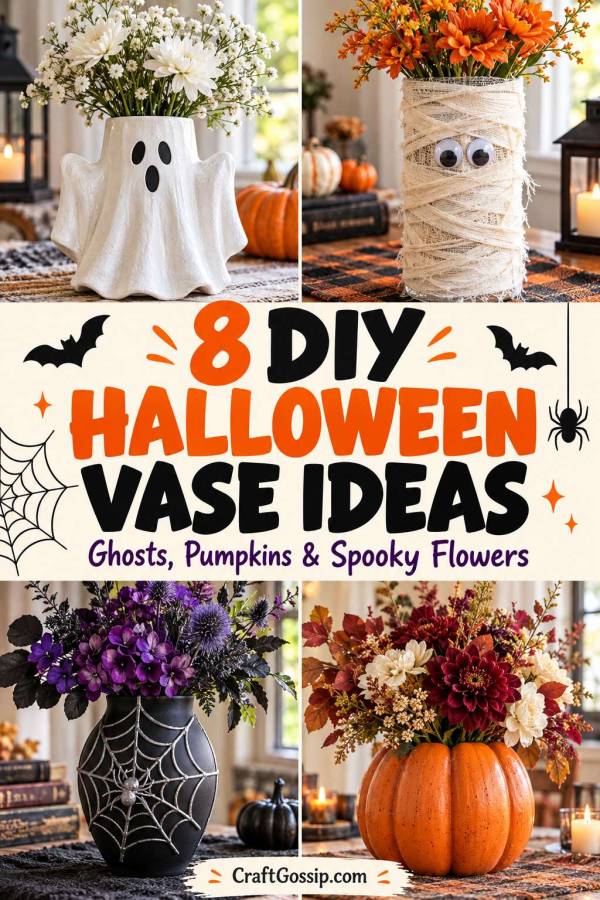
8 DIY Halloween Vase Ideas for Spooky Flowers and Easy Table Decorations

A bunch of flowers can look perfectly innocent until you pop it into a vase with a ghost face. Suddenly, those supermarket blooms are joining in with Halloween, and you haven’t had to turn your entire dining room into a haunted house.

I love this sort of seasonal crafting. You can start with a forgotten florist vase, an empty jar or a charity-shop find, then give it a little Halloween personality. There’s something very satisfying about making a decoration from a container that was previously gathering dust behind the good wine glasses.

If you’ve been searching for “vaso di Halloween,” the Italian phrase for Halloween vase, these ideas are a lovely place to start. There are friendly ghosts, fabric-wrapped mummies, spiderweb designs and pumpkin flower holders, with options for fresh flowers, dried stems and reusable faux arrangements.

This collection includes dedicated vase tutorials alongside decorated jars and candle holders you can adapt for flowers. I’ve noted those adaptations below, because a pretty container isn’t automatically ready to hold water.

Before You Make Your vaso di Halloween

Choose your flowers before deciding on the container. A little jam jar suits a few short stems, while a tall vase needs enough weight and width to support a larger arrangement.

For fresh flowers, use a watertight vessel. If your decorative container is painted inside, made from cardboard or designed for dry displays, place a separate watertight glass inside it. Keep water away from fabric wraps and paper decorations.

For painted glass, check that your paint is suitable for the surface and follow its drying and curing instructions. Paint that feels dry can still need more time before handling.

You don’t need an enormous supply haul. A few faux stems, glass-friendly paint, fabric scraps and a glue gun will cover several ideas here. Amazon can be useful for comparing basic supplies, but check your craft cupboard first. The Halloween budget deserves better than buying a third glue gun because the other two are hiding.

1. Fabric-Wrapped Mummy Vase

This mummy vase tutorial from Chicken Scratch NY transforms a plain vase with torn muslin strips and googly eyes.

The slightly ragged fabric is part of the charm, making this a forgiving project for anyone who would rather craft than measure every last millimetre. It’s also a useful way to give small fabric leftovers a job.

The tutorial uses orange faux flowers. My styling suggestion would be to try cream blooms and dark foliage for a softer display, or black stems for something a little more mysterious.

Best for: Fabric scraps, beginners and a cheerful Halloween centrepiece.

2. Recycled Container Ghost Vase

The floral ghost vase from Spooky Little Halloween starts with a white container, a simple drawn face and a spooky faux arrangement.

This is the sort of project that makes you look twice at the recycling bin. A plain container becomes a character with very little decorating, and the black branches and Halloween accents do the rest.

The original arrangement uses dry filler to support artificial stems. Keep that approach for faux flowers, or use a separate watertight insert if you want to display fresh blooms.

I’d keep the face simple. Two eyes and a mouth are enough to make the ghost recognisable without competing with everything happening above its head.

Best for: Recycled containers and cute Halloween shelf decorations.

3. Black Spiderweb Halloween Vase

For a more dramatic arrangement, try the spiderweb vase tutorial from The Frugal Navy Wife.

The project combines a black vase, a silver dimensional-paint web and a felt spider. Purple flowers complete the original display, giving it a lovely Halloween colour combination without needing a collection of novelty decorations.

Starting with an existing black vase lets you skip the spray-painting stage. That makes a charity-shop find particularly handy here.

My suggestion is to practise the web on scrap paper before drawing on the vase. Keep the design on the front so it remains easy to see once the flowers are arranged.

Best for: Purple-and-black decor and a striking Halloween table arrangement.

4. Reusable Craft Pumpkin Vase

This DIY pumpkin vase from The Merrythought uses a craft pumpkin to create a flower holder you can bring out again next year.

It’s a lovely choice if you want your Halloween decorations to carry through into autumn entertaining. Change the flowers and the same pumpkin can take on quite a different mood.

For a Halloween variation, I’d pair it with burgundy flowers, dark foliage and a few black decorative stems. Cream flowers would make a gentler arrangement for a dining table or entryway.

Choose a craft pumpkin suitable for cutting, and keep any fresh-flower water in a separate watertight insert. The pumpkin forms the decorative outside of the arrangement.

Best for: Reusable seasonal decorations and pumpkin centrepieces.

5. Skull Vase with Flowers

The DIY skull vase from The Merrythought turns a plastic skull into an unexpected floral display.

There’s something rather wonderful about the combination of a spooky container and pretty flowers. It gives the skull a decorative role without needing an entire horror-themed tablescape around it.

This project involves cutting tools, so it’s better suited to adults who are comfortable with that stage. Follow the creator’s tutorial and check that the skull is stable before adding your arrangement.

My styling pick would be pale flowers with a little trailing greenery. Let the skull be the main Halloween detail and give it some breathing room.

Best for: Gothic Halloween decor and a statement flower arrangement.

6. Glass Vase Ghost Display

We’ve previously shared this easy recycled glass vase ghost idea on CraftGossip, which points readers to Kelly Elko’s project.

The idea uses white filling inside a clear container and a ghost face to create a seasonal decoration. It’s especially useful when you want to decorate a vase temporarily.

As a vase variation, use faux stems with the dry white filling. For fresh flowers, you would need a separate watertight inner vessel that keeps the filling dry.

I like this option for a last-minute display because the container can return to everyday use once Halloween is over. A removable face makes that even easier.

Best for: Temporary decorating and making use of a vase you already own.

7. Candy Corn Painted Vase

Our Halloween candy corn candle holder feature shares a painted glass project using the familiar white, orange and yellow colour combination.

The linked idea is a candle holder, but the colour treatment also gives you inspiration for a Halloween flower vase. Choose an appropriately shaped watertight vase and decorate its exterior with suitable paint.

For my flower-display variation, I’d use white blooms or simple dark branches. The colourful container already does plenty of work, so the arrangement doesn’t need to be elaborate.

This is a good option for anyone who enjoys Halloween colours but would happily leave the spiders to somebody else.

Best for: Bright Halloween decor and an alternative to character faces.

8. Halloween Napkin-Decoupage Jar Vase

Our Halloween napkin luminaries tutorial on CraftBits uses printed paper napkins to decorate recycled jars.

Although the original project makes lanterns, the exterior decorating technique is also useful for a small jar vase. Choose pumpkin, skeleton or haunted-house napkins, then let the printed design supply the detail.

For this flower-vase adaptation, keep the paper decoration away from the rim and use a separate watertight insert where practical. Ordinary craft glue and decoupage finishes should not be assumed waterproof.

Short faux flowers are the simplest option. A few decorated jars arranged along the table would make a coordinated display without requiring one enormous centrepiece.

Best for: Patterned Halloween decorations and recycled jar crafts.

What Flowers Look Good in a Halloween Vase?

You can create the mood with colour, shape and a few decorative accents. There’s no need to find a special Halloween bouquet.

Try one of these combinations:

  • Friendly ghost: White flowers with soft green foliage.
  • Classic Halloween: Orange blooms with black faux leaves.
  • Gothic display: Burgundy flowers, purple accents and dark foliage.
  • Rustic pumpkin: Dried grasses, seed heads and muted autumn colours.
  • Spooky branches: Bare stems decorated with a few lightweight paper bats.

For a dining-table arrangement, keep the flowers low enough that guests can see one another. Tall branches work better on an entry table or sideboard, where they can be dramatic without interrupting dinner.

Easy Ways to Make Your Halloween Vase Look Finished

Choose one main feature for each container. A ghost face, spiderweb or fabric wrap usually provides enough detail. Adding all three can leave a small vase looking rather busy.

Repeat a colour from the container in the flowers or surrounding decorations. A little orange in the bouquet helps a mummy vase feel connected to the rest of a Halloween table, while pale flowers can soften a dark skull or spiderweb design.

Before buying supplies, decide whether you want a temporary makeover or a decoration to keep. Removable embellishments suit everyday vases, while painted thrift-store containers are good candidates for a permanent seasonal transformation.

Start with whichever vase, jar or container is already waiting in your cupboard. Add a little Halloween character, tuck in a few stems and enjoy a decoration that gives those ordinary flowers a wonderfully spooky place to sit.

Explore

Bedrooms Christmas Craft Ideas Easter Garden and Yard Halloween Holidays Home Decor Kitchens Living Areas Makeovers and Redos More DIY's Organizing Outdoor Decor Porches, Patios and Decks Recycled Crafts Seasonal Trash to Treasure Windows and Walls Wreaths

RSS feed: More Articles More Articles

  • Learning Activities with Snap Cubes
  • Mini Mending Mondays: Save a Favorite Cardigan with a Small Darned Repair
  • Easy and Quick Yorkshire Puddings: How to Make Yorkshire Pudding From Scratch
  • Easy Egg Bites Recipe With Cottage Cheese: Make-Ahead Breakfast in a Muffin Tin
  • Crochet Pretty Scallop Pattern Necklace – A Delicate DIY You Can Make With Thread, Wire and Beads
  • Knits for the Table for Thanksgiving and Beyond
  • 10 Ways to Upcycle Old Wool Scarves with Felting
  • BOO Halloween Mini Scrapbook Album
  • Ghost S’mores Favour Bags: Easy Halloween Treat Gifts
  • 10 Halloween Wreaths You Can Make in an Hour

Copyright © 2026 · CraftGossip | Start Here | Contact Us | Link to Us | Your Editors | Privacy and affiliate policy