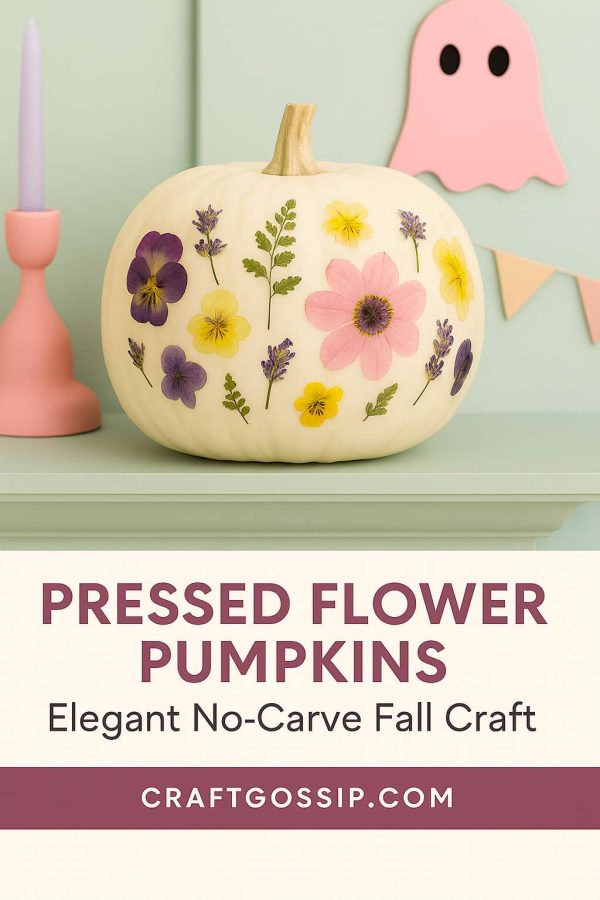
Every October, I start out with big pumpkin-carving dreams… and end up knee-deep in seeds, pulp, and regret. This year, I’ve gone for something softer — and much prettier — with these Pressed Flower Pumpkins.
They’re the perfect no-carve alternative for anyone who loves handmade beauty but not the mess. Each one looks like a little piece of cottage-core art — elegant, eco-friendly, and surprisingly easy to make.
(Keywords: pressed flower pumpkins, no carve pumpkin ideas, fall crafts, sustainable Halloween décor, botanical pumpkins)
What You’ll Need
- Small white pumpkins (real or faux)
- Pressed flowers or leaves — you can buy pre-pressed florals here on Amazon or make your own
- Mod Podge or decoupage glue
- Soft brush or foam brush
- Tweezers for delicate placement
- Paper towel or soft cloth for smoothing
- Optional: Clear acrylic spray sealer for extra shine
Step-by-Step Tutorial
Step 1: Clean & Prep
Wipe your pumpkin clean and let it dry. Real pumpkins should be free from dirt and moisture — faux pumpkins can just be dusted.
White or cream pumpkins show off flower colors beautifully, but you can experiment with pale pink or even sage green for a modern look.
Step 2: Plan Your Layout
Arrange your pressed flowers on the pumpkin before gluing. Cluster 3–5 small blooms together, mix in greenery, and vary your placement around the curves for a balanced, natural feel.
Think of your pumpkin as a canvas — every side deserves a bit of love.
Step 3: Apply the Flowers
Brush a thin layer of Mod Podge where you want your first flower.
Use tweezers to gently lift the flower into place.
Carefully brush another light coat over the top, smoothing outward from the center.
If any bubbles appear, dab gently with your fingertip or a soft cloth. Avoid dragging — those petals are delicate!
Step 4: Seal & Shine
Let the pumpkin dry for about 30 minutes. Apply one more coat of Mod Podge over the entire pumpkin to seal your work.
If you want a more durable or glossy finish, add a mist of clear acrylic spray after it’s fully dry.
Step 5: Style Your Display
Display your finished pumpkins on the mantel, entryway table, or as a dining centerpiece. Add a few dried leaves, fairy lights, or mini gourds to complete the cozy autumn vibe.
These also make beautiful hostess or teacher gifts — tie a small kraft tag around the stem with a bit of twine.
How to Press Your Own Flowers
If you’d like to create your own pressed flowers, here’s the quick method:
- Select small, flat blooms like pansies, daisies, ferns, or violas.
- Lay them between two sheets of parchment paper inside a heavy book.
- Stack additional books (or a brick) on top.
- Wait 7–10 days for them to fully dry.
- Store between wax paper sheets until ready to use.
Why You’ll Love This Craft
- No knives or mess — it’s completely no-carve.
- Safe and easy for kids, seniors, or anyone with limited mobility.
- Perfect for eco-conscious crafters.
- Doubles as both Halloween and Thanksgiving décor.
CraftGossip Tip
Try this craft with faux pumpkins if you want to keep your design year after year. They store beautifully and make a charming addition to a pastel Halloween mantle or autumn centerpiece.