• Home
  • Suggest A Craft
  • DIY Newsletter

Home and Garden

Ideas For DIY

  • About CraftGossip
  • Our Network
    • Bath & Body Crafts
    • Candle Making Ideas
    • Crochet Ideas
    • Cross Stitch
    • Edible Crafts
    • Felting Patterns
    • Glass Art
    • Home & Garden Ideas
    • Indie Crafts
    • Jewelry Making
    • Kids Crafts
    • Knitting Patterns
    • Lesson Plans
    • Needlework
    • Party Ideas
    • Polymer Clay
    • Quilting Ideas
    • Recycled Crafts
    • Scrapbooking
    • Sewing Patterns
    • Card Making
    • DIY Weddings
    • Not Craft Ideas
  • Giveaways
  • Roundups
  • Store
  • Search

Easter “Crown Of Thorns”

March 19, 2014 by Vikram Goyal

easter-crown-of-thorns

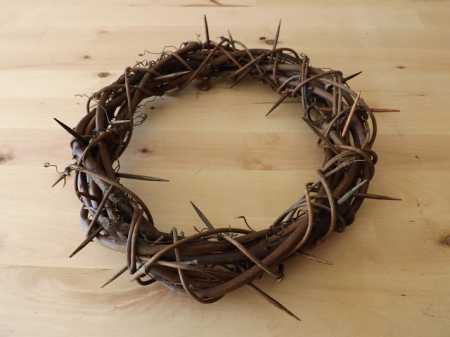
Here is a very realistic, crown of thorns,  for your Easter dress up or decorations this year.

Find the details on how to make this at SewForSoul: Easter Crown of Thorns.

Related Posts:

  • Create Adorable Easter Projects with This Easter…
  • Hop Into Easter Crafting with This Free Easter SVG Bundle!
«
»

Comments

  1. Linda C. says

    March 19, 2014 at 11:00 am

    The crown is very well done, and thanks for the link, but “fun” is, well, a bit inappropriate, given the origin and meaning of the crown.

  2. Diana says

    March 19, 2014 at 8:27 pm

    Quote:
    A very realistic, crown of thorns, could add some fun to your Easter dress up or decorations this year.

    Add fun???? As a Christian, I am offended at your words “add fun” to use of a crown of thorns.

    Maybe — should be reworded.

    • Vikram Goyal says

      March 21, 2014 at 3:55 am

      I am sorry for the offence caused. It was not intended. I have now reworded the post.

  3. OHSue says

    March 20, 2014 at 12:51 am

    I’m sorry, but crown of thorns and add some fun do not go together in the same sentence.

  4. Linda Lanese says

    March 25, 2014 at 8:33 pm

    I think it makes us stop and think about the true meaning of Easter.

  5. billstallings says

    April 10, 2015 at 7:35 pm

    really?

  6. Charity says

    March 18, 2021 at 10:53 pm

    Thank you for the well done tutorial, and thank you even more for rewording your post. I needed a crown of thorns for our passover events and an educational tool for the children. This was perfact thank you again. And I agree with you, in order for children to have an informed decision, they need to be exposed to both sides. Amen.

Have you read?

DIY Eyeball Plant – Creepy Halloween Craft with Ping Pong Balls

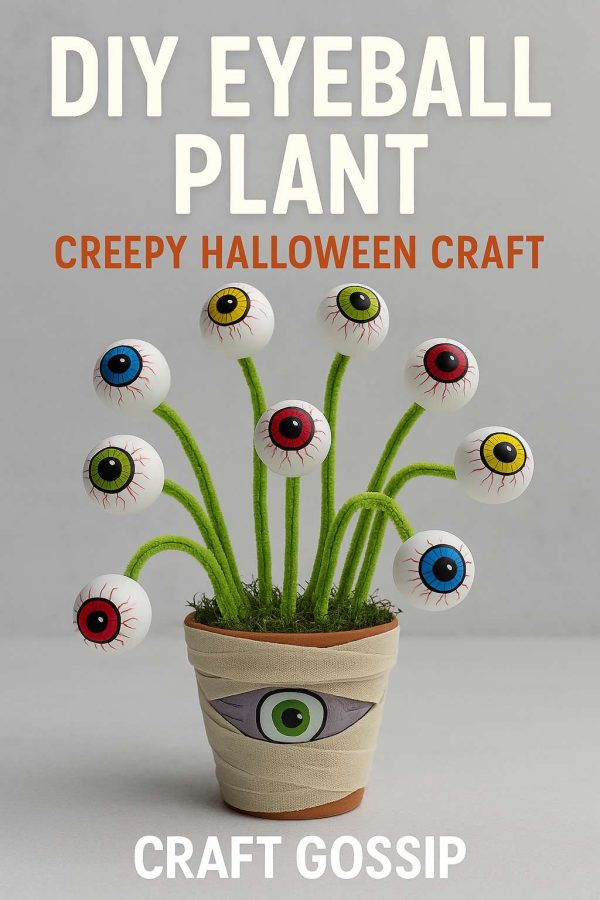
Halloween crafts are the most fun when they’re a little bit spooky and a little bit silly. This DIY Eyeball Plant ticks both boxes—it’s quirky, creepy, and surprisingly easy to make. With nothing more than ping pong balls, pipe cleaners, and a flower pot, you can whip up a planter that looks like it came straight out of a mad scientist’s greenhouse.

It’s budget-friendly, kid-friendly (with a bit of hot glue supervision), and the kind of decoration you’ll want to bring out year after year. Let’s get crafting!

Supplies You’ll Need

  • 12–20 white ping pong balls 
  • Permanent markers or acrylic paints (black, blue, green, yellow, red) 
  • Fine red marker or paint pen (for veins) 
  • Green chenille stems (pipe cleaners) 
  • Small pot, tin bucket, or Halloween-themed planter 
  • Floral foam or foam block 
  • Hot glue gun and glue sticks 
  • Optional: fake moss, shredded paper, or Halloween spider webbing to cover the foam 
  • Optional: gauze or bandages to wrap the pot for a “mummy look” 

Step-by-Step Instructions

Step 1: Make Your Eyeballs

  1. Start with plain white ping pong balls. 
  2. Use a black marker or paint to draw the pupil. 
  3. Add a ring of color around the pupil for the iris—blue, green, yellow, and red all look fantastic. 
  4. With a fine red marker, draw little squiggly lines radiating out from the iris to make veins. 
  5. Set aside to dry. 

Crafty Tip: Add a coat of glossy Mod Podge or clear nail polish to give your eyeballs a wet, realistic shine.

Step 2: Attach to Stems

  1. Use a thumbtack or skewer to poke a small hole in the back of each ping pong ball. 
  2. Add a dab of hot glue into the hole. 
  3. Insert one end of a green chenille stem into the hole and hold it until the glue sets. 
  4. Bend the stems at different angles so your eyeballs “grow” like wild plants. 

Step 3: Plant Your Eyeball Stems

  1. Place a block of floral foam inside your flower pot. 
  2. Stick the eyeball stems into the foam, varying the heights and angles for a natural, chaotic look. 
  3. Cover the foam with moss, shredded paper, or fabric scraps to finish it off neatly. 

Step 4: Style and Decorate

  • Mummy Wrap: Wrap gauze or white fabric strips around the pot and add a painted eye for a fun, spooky twist. 
  • Extra Creepy: Add small plastic spiders, snakes, or bugs crawling among the stems. 
  • Glow Factor: Use glow-in-the-dark paint for pupils so the eyeballs glow at night. 
  • Party Favors: Make mini versions in paper cups for table centerpieces or party giveaways. 

Where to Display Your Eyeball Plant

  • On your Halloween buffet table as a quirky centerpiece. 
  • By the front door to greet trick-or-treaters. 
  • In your living room with pumpkins and cobwebs for a full spooky effect. 
  • At the office desk or classroom for a non-messy, attention-grabbing decoration. 

Variations to Try

  • Bouquet Style: Tie stems together with black ribbon instead of planting them in foam. 
  • LED Glow Eyes: Use clear ping pong balls with mini LED lights inside. 
  • Rainbow Eyes: Paint each iris a different bright color for a fun twist. 

This DIY Eyeball Plant is the kind of project that proves Halloween decorating doesn’t need to be complicated or expensive. With just a handful of supplies, you can make something wonderfully creepy that gets people talking.

So, what do you think—will you stop at one eyeball plant, or make a whole garden of them?

10 Halloween Crafts Made From Scrap Wood [Home and Garden]

12+ Halloween Spider Crafts For Kids [Kids Crafts]

13 Awesome Halloween Cape Free Sewing Patterns [Sewing]

Explore

Bedrooms Christmas Craft Ideas Easter Garden and Yard Halloween Holidays Home Decor Kitchens Living Areas Makeovers and Redos More DIY's Organizing Outdoor Decor Porches, Patios and Decks Recycled Crafts Seasonal Trash to Treasure Windows and Walls Wreaths

RSS More Articles

  • Learn about Costa Rica for Kids
  • DIY Eyeball Plant – Creepy Halloween Craft with Ping Pong Balls
  • Trick or Treat in Style with the Free Happy Jack Treat Bag Pattern
  • DIY Milk Jug Halloween Skeleton Faces – Day of the Dead Inspired
  • 13 Witchy Halloween Card Ideas using Stamps and Dies
  • Create Personalized Dish Towels with DIY Infusible Ink: A Simple Craft Idea
  • DIY Clay Egg Tray – Handmade Farmhouse Charm for Your Kitchen
  • Textured Hat Knitting Patterns
  • Free Crochet Skull and Bones Granny Square Pattern
  • Easy Fall Crafts To Decorate Your Home

Copyright © 2025 · CraftGossip | Start Here | Contact Us | Link to Us | Your Editors | Privacy and affiliate policy