• Home
  • Suggest A DIY
  • DIY Newsletter

Home and Garden

Ideas For DIY

  • About CraftGossip
  • Our Network
    • Bath & Body Crafts
    • Candle Making Ideas
    • Crochet Ideas
    • Cross Stitch
    • Edible Crafts
    • Felting Patterns
    • Glass Art
    • Home & Garden Ideas
    • Indie Crafts
    • Jewelry Making
    • Kids Crafts
    • Knitting Patterns
    • Lesson Plans
    • Needlework
    • Party Ideas
    • Polymer Clay
    • Quilting Ideas
    • Recycled Crafts
    • Scrapbooking
    • Sewing Patterns
    • Card Making
    • DIY Weddings
    • Not Craft Ideas
  • Giveaways
  • Roundups
  • Store
  • Search

Giveaway: Craft Corps

March 16, 2011 by Amanda Formaro

We are halfway through our month’s worth of giveaways for National Craft Month. Lark Crafts generously offered several book titles to our readers with a new book giveaway each week.

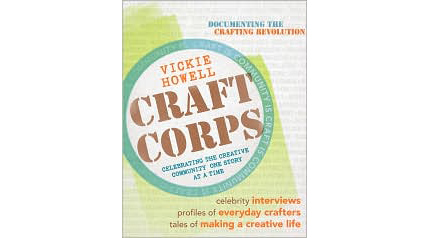
This week Lark brings us Craft Corps: Celebrating the Creative Community One Story at a Time by Vickie Howell. In this book, Vickie not only interviews 30 professional crafters, but also speaks with several amateur craftspeople. This book documents how social networking sites, groups like Stitch ’n’ Bitch, and alternative sales outlets such as Etsy have helped create a close community of crafters passionate about their work and each other.

HOW TO ENTER
Simply leave a comment on this post and tell us how you network with other crafters and how it has helped you!  Tell us all about it before March 23rd at midnight CST!

ELIGIBILITY
As much as we would love to include our Canadian and international friends I’m afraid this giveaway is restricted to those with a U.S. mailing address. If you live outside of the U.S. but have an address within the U.S. that we can ship to then you’re in! Otherwise, we truly apologize. You must be 18 or older to enter. Winner will be randomly selected on March 30th and notified via email. Winner will have 72 hours to respond with their shipping address, otherwise an alternate winner will be drawn. Good luck!

Please note, all prizes will be shipped at the conclusion of our National Craft Month celebration. Winners should allow 4-6 weeks for delivery after April 1, 2011.

Keep your eyes peeled for more fun to celebrate National Craft Month!
«
»

Comments

  1. Sara Garland says

    March 16, 2011 at 10:39 pm

    I love craft gossip.com!

  2. heather says

    March 17, 2011 at 12:12 am

    Most of my networking is done online, via blogs and sites like Ravelry.

  3. Christina says

    March 17, 2011 at 1:20 am

    I network with other crafters mostly through blogging. but also with a few other sahms in my area.

  4. Lindsay says

    March 17, 2011 at 2:44 am

    This is so right up my alley! My craft community exists both online and in the real world, and the inspiration I get from both is invaluable.

  5. Michelle Murphy says

    March 17, 2011 at 2:50 am

    I network through facebook and blogs, it gives me inspiration for new projects

  6. Sylvia says

    March 17, 2011 at 3:15 am

    I started a blog, so am hoping to do more that way!

  7. Kelly says

    March 17, 2011 at 5:33 am

    I use facebook to network and taking classes with other artists helps out too 🙂

  8. Trisha says

    March 17, 2011 at 11:36 am

    Mostly through blogs or a few local crafters. It’d be great to get some new ideas!

  9. LisaT says

    March 17, 2011 at 12:01 pm

    I network through blogs and I’m also lucky enough to work with some hard-core crafters who keep me in the loop on bunches of craft stuff.

  10. Julie Ann Witt says

    March 17, 2011 at 12:07 pm

    I network through Twitter. I have met so many other crafters that I never would have had the opportunity to meet before, people from my own community and people from other countries! I get ideas for projects every day by looking at what other people are doing or what they are recommending. Twitter has opened up a huge world for crafters and I am honored to be a part of it!

  11. Caroline Goddard says

    March 17, 2011 at 12:07 pm

    I net work thought IC3 Ipswich craft chocolate and chat . we get together once a month and share our inspirations.

  12. sue says

    March 17, 2011 at 12:08 pm

    I go to my church for quilting and to the senior center for knitting and crochet and the library for knitting. I guess I am the old fashion network crafter, except for this blog!

  13. Lisa says

    March 17, 2011 at 1:19 pm

    I belong to several local groups that knit, crochet, craft, etc. Plus, I love blogging and reading about different ideas. Ravelry is also my friend!

  14. lixa says

    March 17, 2011 at 1:36 pm

    i read lots of blogs. it’s how i learned most of the sewing

  15. Mary Williams says

    March 17, 2011 at 1:37 pm

    I network through blogs. I love looking through the various craft linkies and posting my own! It has helped me come up with a million new ideas!
    maryw1981 at yahoo dot com

  16. Jaan says

    March 17, 2011 at 1:39 pm

    If I didn’t have other crafters to turn to then I would have a huge pile of unfinished projects. They have saved me many of times.

  17. Kelly W says

    March 17, 2011 at 2:00 pm

    I love to learn from other crafters. I take small, inexpensive craft classes at my local Jerry’s Artarama and always come away learning a ton of new stuff and enjoying my time with like-minded people.

  18. Sarah Fitzgerald says

    March 17, 2011 at 2:23 pm

    Ooh sounds like a good read. I constantly read craft websites. I am going to my first craft corner this morning, can’t wait.

  19. Karol B. says

    March 17, 2011 at 2:39 pm

    I belong to yahoo groups of people who do the same crafts I do . These groups help each other to learn the crafts do exchanges and swaps. They have groups for new commers to the crafts and groups for people who have done the crafts for a long time. I have l;earned a lot from them and made many friends.

  20. Jessica says

    March 17, 2011 at 3:38 pm

    I network on FB and craftster.org. KNITTY GRITTY and Vickie are the reason that I taught myself to knit.

  21. Kimberly R. says

    March 17, 2011 at 4:43 pm

    I network through the blogging world and yahoo groups, very easy to keep up with everything new!!
    Thanks 🙂

  22. Teresa says

    March 17, 2011 at 6:51 pm

    I network with knitters and tatters through ravelry and my blog. I do really love Craftgossip and craftbits for ideas and help tho!

  23. Charlene Anderson says

    March 17, 2011 at 7:42 pm

    I network via Facebook, Twitter, my own newsletter and blog, and well as posting on others.

  24. Katherine says

    March 17, 2011 at 2:54 pm

    I network on Facebook, Ning groups, and blogs. Facebook is a great way to reach a lot of people quickly – while joining (and participating!) in a Ning group means a closer atmosphere. Sometimes FB can feel like you have to shout to be heard – Nings are more like being at a quiet gathering.

    Thank you – and Vickie does GREAT work!!

  25. Tracy Nixon says

    March 17, 2011 at 9:13 pm

    This comp is right up my street! I seek advice and ideas both online and at the various local art groups and classes I attend, for example, currently I attend a pottery class, water colour class, a general art class (where we share ideas and try new things, and a knit and knatter group! I also follow several art and craft blogs, like this one! I also teach myself from online resources and library books and I also subscribe to several craft magazines! I spend a fortune on my hobby but it is worth it!

  26. K80 Haze says

    March 17, 2011 at 4:26 pm

    This book sounds fantastic! I have been following various craft blogs and keeping in touch with many crafters via Craftser, Facebook, Twitter, Etsy, and Swap Bot. Being active in a craft community has helped me grow as a crafter and given me constant inspiration.

  27. Deborah says

    March 17, 2011 at 7:19 pm

    I network both online and off with other crafters and glass artists. My husband and I even spent our honeymoon at a getaway for mosaic artists we had met online in Canada!

  28. Brigitta says

    March 17, 2011 at 10:19 pm

    I’m much better at networking with other crafters online than I am online–with the exception of FaceBook fan pages that is. I’m a member of The Soundry in Northern Virginia, which includes an open shared studio space in addition to a cafe, gift shop, and gallery. I go to the Soundry to work on projects because it enables me to interact with artists who work in different mediums than I do, and I find it inspiring.

  29. Dennis says

    March 18, 2011 at 4:39 am

    I network through blogs, forums, and places like this craft gossip. Facebook, twitter, and e-mails.

  30. Ruth Hill says

    March 18, 2011 at 3:58 am

    I basically network through blogs, e-mail, and facebook. I love crafts!

  31. Cathy Shore says

    March 18, 2011 at 9:51 am

    I read as many blogs in a day as my time will allow, also joined crafts groups on Flickr

  32. Kimberlee says

    March 19, 2011 at 7:35 pm

    This sounds very interesting! I have to admit, in my short time in the crafting blogosphere, people have been overwhelmingly kind and supportive, as well as helpful.

  33. Carol Douglass says

    March 20, 2011 at 10:33 am

    I use the power of technology most of the time, but I do have several friends that get together several times of year to craft, network and have fun.

  34. Lynn says

    March 20, 2011 at 4:49 pm

    great waiting to have more fun

  35. Bunnyfreak says

    March 20, 2011 at 5:51 pm

    I network with other crafters through blogs and forums.

  36. Emily Carter says

    March 21, 2011 at 5:03 pm

    My networking is mostly done through facebook and blogs. There are so many crafty people out there – I love to share my work with others and get great ideas from them!

  37. Sunni says

    March 22, 2011 at 2:42 am

    My blog, Etsy forums, FB and twitter. It seems like you don’t even need to look for it. I just stuble onto many forums searching on a topic I have a question about!

  38. Emily says

    March 23, 2011 at 4:33 am

    Online, through Facebook, blogs and yahoo groups.

  39. Courtney says

    March 25, 2011 at 12:30 am

    blogging and Junk Revolution!

  40. Pat says

    March 25, 2011 at 11:45 am

    I sometimes get CBFB (crafters brain freeze block) and then turn to a blog or a magazine for inspiration or spring board,

  41. Tilly A says

    March 30, 2011 at 5:01 pm

    Vickie is my Home Girl! I love her projects and have watche dher brilliance my whole life. I hope I win. <3

Have you read?

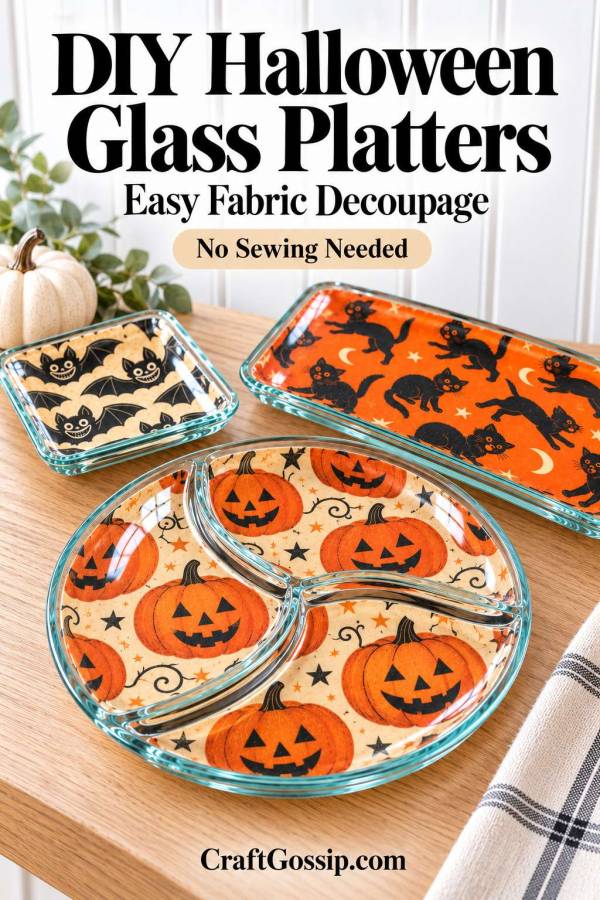
DIY Halloween Glass Platters With Fabric: An Easy Reverse Decoupage Tutorial

If you’ve ever spotted a plain glass platter at a thrift store and thought it needed a little personality, this is a lovely way to give it a seasonal makeover. A piece of Halloween fabric attached to the underside turns an ordinary glass dish into a colourful platter, with the design showing through the glass.

For this version, we’re using vintage-style Halloween prints from the fabric bundle pictured with this tutorial. The orange fabric with black cats, moons and stars makes a striking larger platter, while the smiling bat print suits a smaller square dish. Add a flat glass tray and you have a coordinated set without needing to sew a stitch.

I particularly like how the glass changes the appearance of the fabric. The cotton texture remains visible underneath, but the upper surface stays smooth and glossy. Those clear glass edges also give the finished pieces a more polished look.

The technique is called reverse decoupage. You work on the back of the platter, placing the printed side of the fabric against the glass so the pattern faces upwards when you turn it over.

A flat tray is the easiest place to start. Once you’re comfortable smoothing the fabric, you can try a shallow platter with gently curved sides.

Skill level: Beginner
Hands-on time: Approximately 45–60 minutes per platter, plus drying and curing
Suitable surfaces: Clear glass plates, shallow platters and flat glass trays

What You’ll Need

  • A clear glass platter or flat glass tray
  • Lightweight woven Halloween fabric large enough to cover the underside
  • Clear-drying decoupage medium suitable for glass and fabric
  • A soft flat brush
  • Sharp fabric scissors
  • A washable fabric marker or pencil
  • A clean cloth
  • Dishwashing liquid
  • Rubbing alcohol, if recommended by your decoupage product
  • A soft towel to support the upside-down platter
  • Protective covering for your work surface

Choose a medium appropriate to how you intend to clean the finished piece. A dishwasher-safe decoupage formula is an option for glass projects, but follow its application and curing instructions. For this tutorial, gentle cleaning is the preferred approach.

Keep the top and rim clear: Mod Podge is not food safe. Its manufacturer permits decoration on the back of plates, provided the medium stays away from food-contact surfaces and the rim. All fabric, glue and sealing coats in this project belong on the underside.

Choosing Your Glass and Fabric

Look for glass with a smooth underside and minimal moulded detail. A heavily textured base makes it harder to achieve a close bond between the fabric and glass.

Check secondhand pieces carefully for chips, cracks and sharp edges. Choose sound glassware originally intended for serving if you plan to use the uncovered upper surface for food.

Lightweight cotton is a practical choice because it follows gentle curves more easily than thick upholstery fabric. Avoid stretchy fabrics, bulky seams and prints that shed glitter.

The pictured Halloween bundle offers several combinations:

  • Orange black cats: A bold choice for a rectangular platter or flat tray.
  • Vintage bats: A coordinating print for a smaller square dish.
  • Jack-o’-lanterns: A cheerful option for a Halloween party platter.
  • Witch hats or harlequin diamonds: Good alternatives for a more understated display.

Check that each fabric piece is large enough for your chosen glassware before cutting.

1. Wash and Dry the Glass

Wash the platter thoroughly with dishwashing liquid. Remove labels and any sticky residue, then rinse and dry.

If your decoupage medium recommends cleaning with rubbing alcohol, wipe the underside as directed and let it evaporate completely.

Once clean, avoid touching the area you’ll decorate. Place the platter upside down on a folded towel so it sits securely without rocking.

2. Prepare the Fabric

Prewash washable fabric without fabric softener, then dry and press it flat. Check a small scrap for colour bleeding before using it.

Cut a piece slightly larger than the underside of the platter, allowing approximately 2–3 cm extra around the edges for positioning and trimming.

For a directional print, decide which way you want the cats, bats or lettering to face when the platter is right side up.

Lay the fabric over the underside for a dry fit, with its printed side facing the glass. Look through the front to check the arrangement.

3. Apply the Decoupage Medium

Lift away the fabric.

Brush a thin, even coat of decoupage medium onto the underside of the glass, covering the area where the fabric will sit.

Avoid puddles, which can make smoothing difficult. Keep the outermost rim and all upper surfaces free of medium.

Work within the application time recommended for your product.

4. Place the Fabric Printed Side Down

Position the fabric over the wet medium with the printed right side against the glass. The plain reverse side should be facing you while you work.

Lower it into place gradually, starting near the centre.

Gently smooth outwards with clean fingers, helping the cloth make contact with the glass. Avoid stretching the fabric, which can distort the print.

Carefully lift the platter to inspect it from the front. Look for bubbles, pale gaps or folds before the medium starts to set. Support the piece securely while checking.

5. Smooth the Curves and Corners

On a flat tray, smoothing from the centre towards the perimeter may be all you need.

For a shallow platter, work gradually around the sloping sides. Ease the fabric into place rather than forcing it all down at once.

If excess cloth gathers near a corner, make small relief cuts in the surplus fabric, stopping short of the area already bonded to the glass. Fit the sections carefully, keeping any overlap minimal and towards the outer edge.

Deep dishes and steep corners may require visible joins. For your first project, choose a flatter shape that allows the print to remain continuous.

6. Let the Fabric Dry

Leave the platter upside down and supported so the wet fabric does not touch the table or towel.

Allow the adhesive layer to dry according to the product instructions. Avoid moving or trimming the fabric while it is still loose.

The medium may look cloudy while wet. Judge the result once it has dried.

7. Trim the Excess Fabric

Once the fabric is firmly attached, use sharp scissors to trim the excess close to the underside’s perimeter.

Keep the fabric slightly back from the outermost glass edge. It should not wrap onto the rim or upper surface.

Cut carefully without pulling on the bonded cloth. Remove loose threads for a tidy finish.

If a small section lifts, brush a little medium underneath, press it back into place and allow it to dry.

8. Seal the Back

Brush a thin sealing coat over the exposed reverse side of the fabric, paying attention to the trimmed edges.

Allow it to dry before adding further coats as directed by your chosen product. Keep every coat on the underside.

Set the platter on supports that do not touch the wet coating. Avoid placing it flat on a surface where it could stick.

9. Allow the Finish to Cure

Drying and curing are different stages. Even when the coating feels dry, it may need considerably longer before washing or regular use.

Follow the curing time on your bottle. Mod Podge Dishwasher-Safe, for example, requires a 28-day cure before gentle top-rack dishwashing. That guidance does not make the medium food safe or apply automatically to other formulas.

For these fabric-backed platters, gentle hand cleaning will help protect the handmade finish.

Cleaning and Using Your Finished Platter

Once fully cured, use the platter within the limits of the original glassware and your chosen finish.

Keep food on the uncovered upper glass surface, away from any decorated edges. Alternatively, use the pieces for wrapped treats, jewellery or seasonal display.

Clean the upper glass gently with a damp cloth and mild detergent, keeping the decorated underside as dry as practical. Do not soak, scrub the fabric backing or use the piece in an oven or microwave.

Check the backing occasionally. If it begins lifting or flaking, set the platter aside for repair.

A Few Tips for a Neater Finish

Test a scrap first. A small trial on spare glass helps you check colour bleeding, adhesion and how the fabric looks through the dried medium.

Choose a flatter platter. Gentle curves are much easier to cover neatly than deep corners.

Keep the print facing the glass. This is the detail that makes reverse decoupage work.

Use thin coats. Heavy layers can take longer to dry and make it harder to achieve a clear finish.

Check from the front as you work. A bubble is easier to correct before the fabric has set.

What I enjoy about this project is how much variety you can get from a small bundle of fabric. The same technique works with Christmas prints, spring florals or a favourite piece left over from another project.

For Halloween, I’d pair the orange cat platter with the vintage bat dish and a matching flat tray. Styled beside a cream pumpkin and a simple linen cloth, they make a cheerful little collection that lets the fabric do most of the decorating.

Explore

Bedrooms Christmas Craft Ideas Easter Garden and Yard Halloween Holidays Home Decor Kitchens Living Areas Makeovers and Redos More DIY's Organizing Outdoor Decor Porches, Patios and Decks Recycled Crafts Seasonal Trash to Treasure Windows and Walls Wreaths

RSS feed: More Articles More Articles

  • Book Review: Stitch Alphabets & Numbers
  • Knit a Leopard Print Shawl and Learn about Yarn Substitution
  • DIY Mini Cotton Bag Ghosts: Easy No-Sew Halloween Decorations
  • 3 Free DMC Nutcracker Embroidery Patterns for a Beautiful Christmas Table
  • 23 FREE Peeking Dog SVG Cut Files
  • Easy Aperol Spritz Recipe: A Classic Cocktail With Just 3 Ingredients
  • Cat-O-Lantern Quilt Pattern Review: A Cute Halloween Quilt for Cat Lovers
  • Shock Wave Free Crochet Lap Blanket Pattern
  • DIY Halloween Glass Platters With Fabric: An Easy Reverse Decoupage Tutorial
  • 14 Lazy Keto Meals for Busy Nights: Easy Low-Carb Dinners Without the Fuss

Copyright © 2026 · CraftGossip | Start Here | Contact Us | Link to Us | Your Editors | Privacy and affiliate policy