• Home
  • Suggest A DIY
  • DIY Newsletter

Home and Garden

Ideas For DIY

  • About CraftGossip
  • Our Network
    • Bath & Body Crafts
    • Candle Making Ideas
    • Crochet Ideas
    • Cross Stitch
    • Edible Crafts
    • Felting Patterns
    • Glass Art
    • Home & Garden Ideas
    • Indie Crafts
    • Jewelry Making
    • Kids Crafts
    • Knitting Patterns
    • Lesson Plans
    • Needlework
    • Party Ideas
    • Polymer Clay
    • Quilting Ideas
    • Recycled Crafts
    • Scrapbooking
    • Sewing Patterns
    • Card Making
    • DIY Weddings
    • Not Craft Ideas
  • Giveaways
  • Roundups
  • Store
  • Search

Guest Post: 12 Days of Christmas Pillow

November 18, 2011 by Amanda Formaro

Guest Post: 12 Days of Christmas PillowHow exciting, it’s time again for another guest post tutorial! Each guest has been amazing so far, and today’s blogger is no exception. Today Desiree from The 36th Avenue will share with you how to make this absolutely fabulous Christmas pillow! I won’t delay things with my chatter any longer, take it away Desiree!

Hi “Gossipers”!

Guest Post: 12 Days of Christmas PillowI am Desirée the heart behind The 36th Avenue and I AM SO EXCITED { I am yelling here} to be at Craft Gossip today!

With Thanksgiving around the corner and Christmas almost knocking on our doors I wanted to share with you a little Holiday Cheer through this easy and fun project.

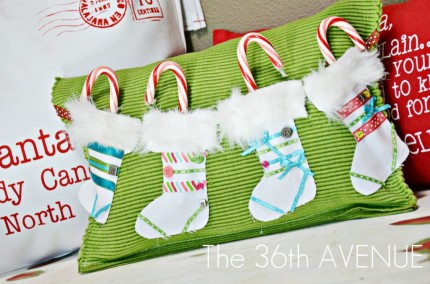
My 12 Days of Christmas Pillow…

Guest Post: 12 Days of Christmas Pillow

To make it all you’ll need is the fabric for your stockings and for the pillow I used a place mat that I found at Target.

If you have some fabric scraps put them to use… I think the stockings would look great in different colors as well.

TUTORIAL

The reason I used a place mat is because the sewing is minimal.

After folding it in half and sewing the bottom part of it I was ready to make the stockings…

FIRST

Guest Post: 12 Days of Christmas Pillow
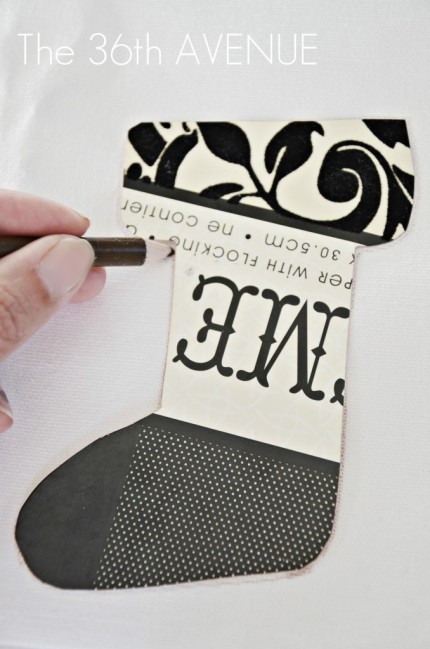
Make a template of your stocking and trace as many as you need on the fabric of your choice.


SECOND

Guest Post: 12 Days of Christmas Pillow
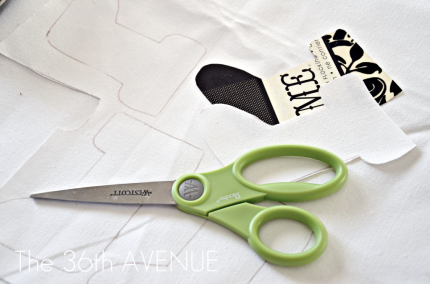
After tracing start cutting your stockings. When I was done I sewed the edge of the stockings to prevent fraying.

I like to work with canvas it is easy to cut and had a lot of body. Besides this pillow is one of a set of three…

You’ll see them all later 😉


THIRD

Guest Post: 12 Days of Christmas Pillow
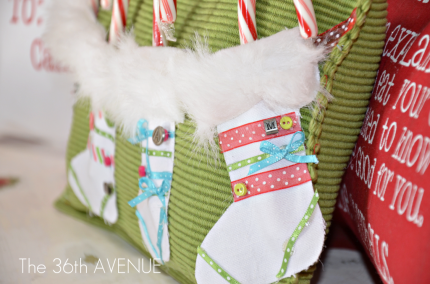
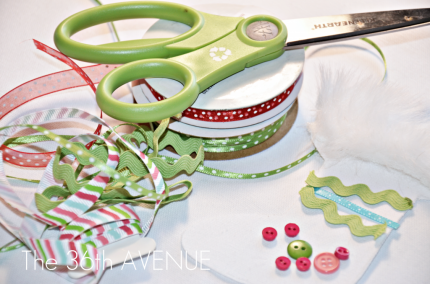
With the help of a glue gun decorate your stockings… use things you have around, buttons, ribbon, scrapbooking embellishments…

Make them beYOUtiful, YOUnique and personal…


After you are done decorating them hot glue them to your pillow…


Guest Post: 12 Days of Christmas Pillow
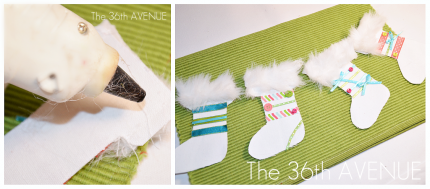
Then touch them up… and you are done!

All you have left to do is wait and fill up the stocking during the 12 days of Christmas!


Guest Post: 12 Days of Christmas PillowI think they would make a great little gift also!

I got an “awww” from my girls and a “that’s cool” from my boy…
I believe they love it 😉


Guest Post: 12 Days of Christmas Pillow
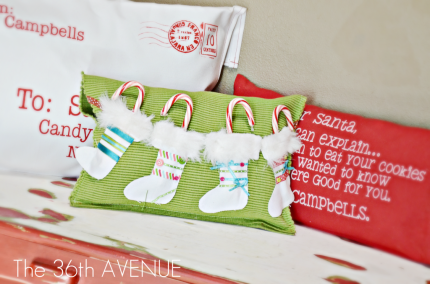
Now, do you remember how I said that this little guy was one of three?

Here are the other two.


Guest Post: 12 Days of Christmas PillowI would love for you to stop by The 36th Avenue and check the TUTORIAL out.


Guest Post: 12 Days of Christmas PillowAmanda, thank you so much for having me today…

I LOVE IT HERE!

Have a Super Friday Everyone…

Besos!

Desirée

Guest Post: 12 Days of Christmas Pillow

You can follow along with Desiree’s blog on Facebook, Twitter, and Pinterest

Related Posts:

  • Special Occasion Theme Days for Seniors and Group…
  • Create Your Own Cozy Hygge Mini Christmas Tree for…
«
»

Comments

  1. jen says

    November 18, 2011 at 9:07 am

    super fun!

  2. Esmeralda Carter says

    November 18, 2011 at 9:17 am

    LOVE these pillows!!! Never enough time to create everything I want to, but I am going to try 🙂

  3. Desiree says

    November 18, 2011 at 9:20 am

    Thank you for having me!

    • Amanda Formaro says

      November 18, 2011 at 11:21 am

      Thank YOU for sharing with us Desiree!

  4. tonya says

    November 18, 2011 at 9:41 am

    I love these pillows such a great insperation to make for christmas time. I love your blog and just wanted to say hi = )

  5. katie from Sew Woodsy says

    November 18, 2011 at 10:24 am

    Super cute pillow!

  6. Stephanie says

    November 18, 2011 at 12:28 pm

    These are absolutely adorable! LOVE LOVE LOVE!

  7. Trish@MomOnTimeout says

    November 18, 2011 at 3:01 pm

    These are just TOO cute!

  8. Kim says

    November 18, 2011 at 3:17 pm

    You always seems to top the last project you do. I love these.

  9. Sharon says

    November 18, 2011 at 3:19 pm

    Looks like a fun and happy project ..

  10. marilyn says

    November 18, 2011 at 6:08 pm

    Love the pillows you have done on 36th ave.

  11. Clairssa says

    November 18, 2011 at 7:08 pm

    very cute!! love it! 🙂

  12. Evelene Sterling says

    November 18, 2011 at 9:22 pm

    Those pillows are simply adorable and so creative.

  13. Sandi says

    November 18, 2011 at 10:16 pm

    Love those pillows! Thanks for sharing!

  14. charlene says

    November 18, 2011 at 11:00 pm

    I love this ideal…they are so cute…and I love your blog as well….hopefully one day I will be as popular as you are…thanks so much for the inspiring info you provide…

    charlene
    cclrly

  15. Lina says

    November 19, 2011 at 11:26 am

    I love these very much! Thanks for sharing these awesome pillows! gets me so excited for Xmas! 🙂
    xo
    Lina
    Fancy Frugal Life

  16. Barbara Miller says

    November 19, 2011 at 6:51 pm

    Just stopped by to say “hi” and these pillows are great.

  17. Christa says

    November 20, 2011 at 2:08 pm

    So cute! And I love your blog!

  18. Judy says

    November 20, 2011 at 4:01 pm

    Love, Love, Love these pillows. Very good tutorial.

Trackbacks

  1. Envelope and Letter to Santa Pillows | The 36th AVENUE says:
    November 18, 2011 at 8:41 am

    […] am sharing today my 12 Days of Christmas Pillow and TUTORIAL  at… { give me a second here I am really enjoying the dream} […]

Have you read?

Make This Rustic Patriotic Flag Wreath for Your Front Door

There are plenty of shiny red, white, and blue decorations out there, but every now and then a patriotic project comes along that feels a little more heartfelt. This 4th of July Patriotic Flag Wreath from CraftBits is one of those projects.

Instead of being overly fussy or store-bought looking, this wreath has that lovely rustic Americana feel — a grapevine wreath base, a flag draped diagonally, and a large star layered over the top. It is simple, bold, and just handmade enough to feel special without turning into an all-weekend project.

You can find the full tutorial here: 4th Of July Patriotic Flag Wreath on CraftBits.

What I really like about this wreath is the story behind it. The original CraftBits tutorial explains that the project was made using a damaged flag brought home by a veteran, and his wife, Marsha, turned it into this beautiful wreath for her family to enjoy. That gives the project a little more meaning than a standard seasonal door decoration.

The supplies are very simple: a grapevine wreath, an American flag, a large metal star, and glue. The flag is folded lengthwise to create a sash, then secured diagonally across the wreath. The star is layered on the side to cover the gathered section and give the whole piece a finished focal point.

This would look beautiful on a covered front porch, garden gate, entryway wall, mantel, or even as part of a Memorial Day or Veterans Day display. It is not just for the 4th of July either — with the right styling, this is the kind of patriotic wreath you could bring out for several red, white, and blue occasions throughout the year.

If you’re planning more handmade patriotic decorating, you might also like our 10 DIY 4th of July wreaths to dress up your front door roundup, where this CraftBits wreath is already included as a classic front-door option. For a bigger porch refresh, pair it with our 15 DIY 4th of July porch decor ideas and add planters, lanterns, bunting, or painted rocks for a full summer entryway look.

One helpful note from the tutorial is that you can glue the flag in place, or stitch it to the back of the wreath if you want the option of removing it later. That is especially worth considering if you are using a sentimental flag, a vintage flag, or one with family meaning. Stitching gives you a bit more flexibility and avoids permanently attaching something you may want to preserve.

You could also soften the look with a few extra details. Add raffia for a farmhouse feel, tuck in cream or red faux roses, use denim ribbon, or add smaller stars around the grapevine base. I’d keep the extras fairly restrained though, because the flag and star are already doing the heavy lifting. This is one of those projects where too much “more” can tip it from rustic to crowded very quickly.

For supplies, Amazon is a handy option for grapevine wreath forms, metal star accents, glue, and mini flags. Etsy can also be useful if you want a handmade metal star, rustic Americana embellishments, or vintage-style patriotic trim, but I’d keep it simple so the wreath still feels meaningful rather than overly decorated.

This is a lovely beginner-friendly patriotic craft because there is no complicated measuring, no sewing machine required, and no special tools beyond basic craft supplies. It is also a good project for using a flag that may not be suitable to fly outdoors anymore but still holds meaning. As always, if you’re using an actual American flag with sentimental or ceremonial value, take care with how it is handled and displayed.

The finished wreath has that warm front-porch welcome feel — festive enough for the 4th of July, but classic enough to suit a farmhouse, cottage, or rustic summer decorating style.


Explore

Bedrooms Christmas Craft Ideas Easter Garden and Yard Halloween Holidays Home Decor Kitchens Living Areas Makeovers and Redos More DIY's Organizing Outdoor Decor Porches, Patios and Decks Recycled Crafts Seasonal Trash to Treasure Windows and Walls Wreaths

RSS More Articles

  • 3 FREE Dark Romantasy Coloring Pages
  • Needle Felted Tropical Hibiscus Flower Tutorial
  • 12 Masculine Scrapbook Layouts for Men
  • Book Review: The No-Brainer Brain Explainer
  • Knit and Felt Some Tabi Style Slippers
  • Make This Rustic Patriotic Flag Wreath for Your Front Door
  • 14 Large And Giant Crochet Patterns For Big, Cosy Makes
  • FIFA Soccer Crafts For Kids, Crochet Fans And Game-Day Makers
  • Cross Stitch Ice Cream and Frozen Treats
  • Sunflower Ribbon Embroidery Tutorials and Kits to Brighten Your Hoop

Copyright © 2026 · CraftGossip | Start Here | Contact Us | Link to Us | Your Editors | Privacy and affiliate policy