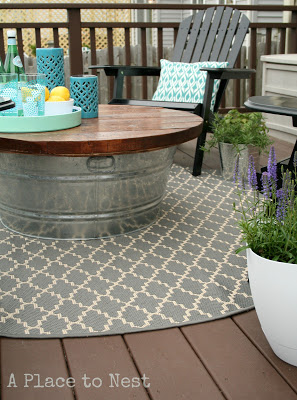
We all love to spend time outside. A little fresh air now in then is good for the soul. It’s also good for the soul to have some time to relax and recharge after a busy day and what better way to do that but in your own beautiful, peaceful backyard? Help your space feel a little more relaxing but adding a few extra special touches, and you’ll want to spend every possible second there.
The wonderful blog A Place to Nest has shared a post on how to make this beautiful Metal Bucket Outdoor Coffee Table. It will be a perfect touch for your outdoor space.
Click the link here to learn how to make one for yourself: Metal Bucket Outdoor Coffee Table – This website is no longer available, but we decided to help you out with this tutorial.
You can grab the buckets here.
First things first, I had to deal with the handles. I grabbed my trusty metal cutting device (a hacksaw worked just fine for this job) and carefully removed the handles from the tub. It was a bit noisy, but I made sure to wear my safety goggles to avoid any flying metal scraps. Once the handles were off, I gave the tub a good wipe-down to get rid of any dust and debris.
Now, onto the fun part: creating the tabletop! I measured the diameter of the top of the tub and cut a piece of wood accordingly. I went with a rounded top for a sleek, modern look. I used a jigsaw to cut the wood into a perfect circle, and then I sanded the edges to make sure it would fit snugly on the tub.
With the top cut and sanded, it was time to make it look gorgeous. I decided to stain the wood to give it a rich, warm tone. I picked a stain color that would complement my room’s decor, and applied it with a brush. I made sure to apply it evenly and wipe off any excess with a clean cloth to avoid streaks. After letting the stain dry completely, I gave the wood a few coats of varnish for a durable, shiny finish. The varnish not only protects the wood but also makes it easier to clean.
Once the varnish was dry, I attached the wooden top to the galvanized tub. I used strong adhesive glue to secure it in place, and I made sure it was centered and level before letting it set. After it dried, I had a sturdy, stylish coffee table that was perfect for holding drinks, snacks, or just adding a touch of rustic charm to my space.
Overall, it was a pretty straightforward project with a big impact. The combination of the rustic tin tub and the sleek wooden top turned out to be a unique piece of furniture that definitely gets a lot of compliments. Plus, it was a great way to repurpose something that would otherwise have just sat around collecting dust. If you’ve got an old tub or bucket lying around, I highly recommend giving this DIY coffee table a try!


What a great idea for a backyard renovation. Clicking the link now. Thanks!