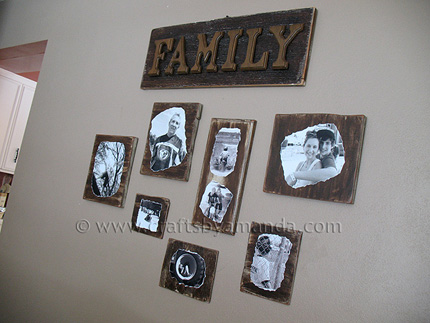
 This is a project I’ve been meaning to complete for quite some time. I finally finished them and am really happy with how they came out! I left room on the wall to add more photos and plan to make some with color photos for other areas of the house as well. If you would like to see the tutorial, head over to my craft blog –>> Decoupage Family Photo Plaques. I just posted some other cool photo display projects here, so be sure and check those out too.
Comments
Have you read?
Meet Mr. Boo – The Ultimate Halloween Decoration That Will Steal the Show

If you’re looking to add some fun and spooky charm to your Halloween decor, you won’t want to miss out on Mr. Boo! This quirky, creative project brings a playful yet eerie vibe to your home, making it the perfect addition to your Halloween festivities. Whether you’re decorating inside or outside, Mr. Boo will definitely grab the attention of anyone who steps foot into your haunted space.
With simple materials and an easy step-by-step guide, you can create your very own spooky decoration to bring some fun Halloween magic to life. This DIY project is not only perfect for all ages but also offers a great opportunity to get crafty and make something unique for your Halloween party or home.
Ready to meet Mr. Boo and start crafting your own spooky friend? href=”https://pinkfortitude.com/mr-boo/” target=”_new” rel=”noopener” data-start=”869″ data-end=”939″>Check out the full tutorial here! and bring some Halloween fun to your home today!
Hello. I would like to mod podge 2 black and white wedding photos on 2 nightstands in our bedroom. The nightstands are just pressed board/particle board and are already white. Questions: Is this even possible since I am using a smooth surface that is “painted”? Do I use ACTUAL photos bought at Target that are glossy? OR do I use copies of the photos printed on my home paper using regular typing paper? ALSO……once I mod podge the picture to the top of the dresser, is it waterproof? Can I put a bottle of water or can on it without messing up the finish and the picture? Thanks! Hope to hear from you soon!