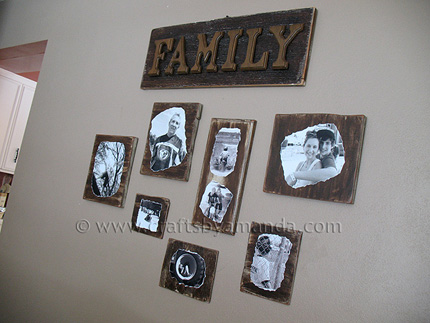
 This is a project I’ve been meaning to complete for quite some time. I finally finished them and am really happy with how they came out! I left room on the wall to add more photos and plan to make some with color photos for other areas of the house as well. If you would like to see the tutorial, head over to my craft blog –>> Decoupage Family Photo Plaques. I just posted some other cool photo display projects here, so be sure and check those out too.
Comments
Have you read?
Handmade Pretend Play Food Ideas For Kids’ Kitchens, Classrooms And Crafty Grandparents
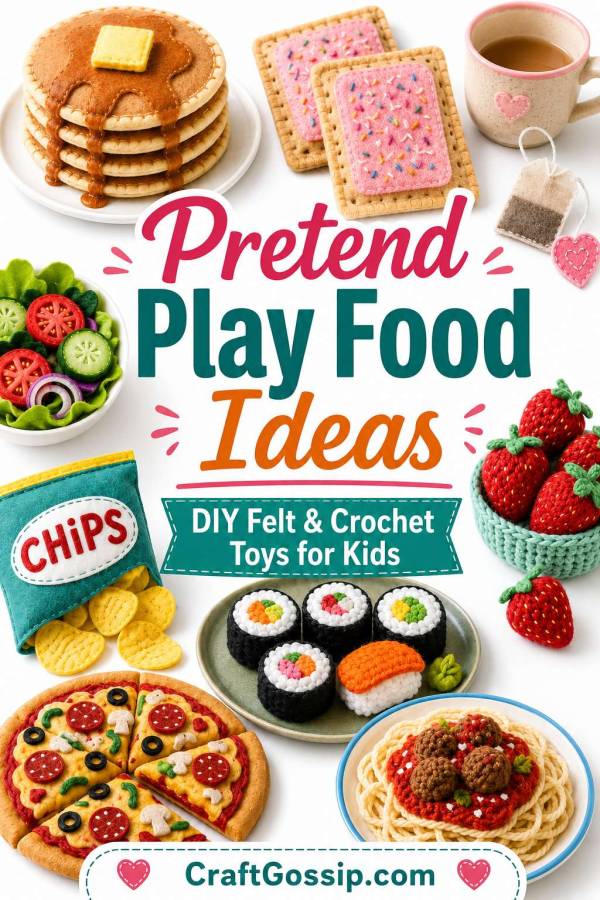
There is something ridiculously sweet about handmade pretend play food. Maybe it is the tiny felt pancakes with pretend syrup, or the little crochet strawberries that somehow make a toy kitchen feel like a five-star café. Whatever it is, pretend play food has that lovely mix of nostalgia, creativity, and practical play value that makes it a winner for parents, teachers, grandparents, and anyone who has ever looked at a pile of felt scraps and thought, “I could make something cute with that.”
I have always loved crafts that do more than just sit on a shelf looking pretty. Felt food, crochet play food, and DIY toy kitchen pieces are the sort of projects that get used again and again. They become part of café games, teddy bear picnics, classroom market stalls, homeschool lessons, pretend restaurants, and rainy-day play corners. And unlike plastic play food, handmade pretend food can be made in exactly the colours, sizes, and styles you want. You can stitch up a healthy salad, a plate of pancakes, a bag of chips, or even a sushi platter without having to explain to anyone why your craft room now looks like a miniature supermarket exploded.
These pretend play food ideas are especially lovely for preschool dramatic play, classroom role-play areas, therapy craft sessions, and handmade gifts for younger children. Many of them are simple enough for confident beginners, and several are perfect stash-busting projects if you have felt sheets, odd yarn balls, embroidery thread, buttons, beads, or batting tucked away in one of those “I’ll use it one day” containers. No judgement here. I have several.
Below you will find a mix of CraftBits pretend food tutorials, CraftGossip play food inspiration, and a few extra handmade food projects from around the web. Think felt food patterns, crochet play food, toy kitchen accessories, pretend café props, and soft handmade pieces that little hands can use over and over again.
Felt And Crochet Pretend Play Food Projects To Make
Felt Food Pretend Play Pancakes – CraftBits
These felt pancakes are such a classic pretend breakfast idea, complete with butter and syrup details. They are perfect for a play kitchen, classroom breakfast station, or a handmade gift basket for a child who loves cooking games. I especially like that they are soft, simple, and easy to stack, because children do love piling things dramatically onto tiny plates.
Felt Food Pop Tarts – CraftBits
These felt Pop Tarts are a sweet little project for pretend bakeries, café play, and classroom dramatic play corners. You can make them in pink strawberry, chocolate, blueberry, or birthday cake colours, then add stitched sprinkles for a safer finish with younger children. They are also a great beginner sewing project because the shapes are nice and simple.
Pretend Play Felt Salad – CraftBits
This felt salad idea is wonderfully open-ended, which makes it perfect for classrooms and homeschool activities. Children can mix lettuce, tomatoes, capsicum, mushrooms, cheese, croutons, and all sorts of pretend toppings while learning about food groups and colours. It is also a clever way to use up small felt scraps that are too good to throw away but too tiny for bigger projects.
Felt Food Bag Of Chips – CraftBits
This one is a fun addition to a pretend picnic, play shop, or toy lunchbox setup. The little felt chips and Velcro-style bag make it feel interactive, which is always a bonus when you are crafting for children who like opening, closing, sorting, and serving. It is a cheeky little project and would be adorable alongside pretend sandwiches or burgers.
Tea Bag Made Of Felt – CraftBits
A felt tea bag is such a charming addition to a pretend café, afternoon tea tray, or doll tea party. This is a lovely low-cost project, and you could easily make a whole set with different coloured tags for pretend herbal teas. I can just imagine a child carefully serving tea to a row of dolls while taking the whole thing very seriously.
Strawberry Crochet Pattern – CraftBits
These crochet strawberries are perfect for pretend fruit baskets, market stall play, or adding to a handmade picnic set. They are small enough to use up leftover yarn and cute enough to become appliques, keychains, or decorations as well. Make a handful in different reds and pinks and suddenly you have a whole punnet of handmade play food.
Sushi Free Crochet Pattern – CraftBits
Crochet sushi is one of those pretend play food ideas that feels a little unexpected and very fun. It is a great project for children who enjoy restaurant play or pretend takeaway counters, and it adds a nice bit of variety beyond the usual cakes and sandwiches. This would make a brilliant handmade gift for a child with a toy kitchen that already has the basics.
Sew A Felt Food Picnic Set – CraftGossip
A felt picnic set is such a practical handmade play idea because it can be packed into a basket, taken to the lounge room, or used for pretend outdoor adventures. This CraftGossip feature is perfect for anyone wanting to make a full little set rather than just one food item. It would also be gorgeous as a birthday gift with a small gingham cloth and a few toy plates.
Pretend Play Spaghetti And Meatballs – CraftGossip
Pretend spaghetti is wonderfully silly in the best possible way. The felt noodles make this project quick, tactile, and very appealing for little chefs who like stirring and serving meals. It is also a great project for using up long strips of yellow felt that might otherwise end up in the scrap bin.
30+ Pizza Crafts And Activities – CraftGossip
Pizza is always a winner for pretend play because children can build, sort, count, and customise their own toppings. This CraftGossip roundup leans beautifully into pizza-themed crafts and activities, making it handy for classrooms, food units, Italy-themed lessons, or pizza party play. A felt pizza station is one of those projects that children keep coming back to.
16 Free Felt Vegetable Patterns And Sewing Tutorials – The Yellow Birdhouse
This is a lovely resource if you want to build out the healthy side of a pretend play food collection. Felt vegetables are great for market stalls, toy kitchens, and food sorting games, and they are also a good way to teach children the names and colours of different produce. A basket of handmade veggies always feels wholesome, doesn’t it?
DIY Felt Play Food Burger And Fries – VELCRO Brand
A felt burger and fries set is perfect for pretend cafés, BBQ play, and restaurant role-play. The separate burger pieces make it especially good for stacking and order-taking games, which children seem to love endlessly. This is a fun one if you want a project that feels playful and familiar.
DIY Felt Play Food – Crafting Cheerfully
This felt play food collection is full of everyday kitchen staples like fruit, vegetables, and bread. It is the sort of project that could grow slowly over time as you add one or two pieces each weekend. I like projects like this because they do not need to be made all at once; the collection can build as your felt stash allows.
Felt Play Food Tutorials – AppleGreen Cottage
This roundup-style resource includes several free felt play food ideas, especially fruit and vegetable pieces. It is a handy one for beginners who want approachable handmade toy food without getting too fiddly. These smaller felt food pieces would be lovely in a toy grocery basket or pretend lunchbox.
Play Food Knitting And Crochet Patterns – DROPS Design
For knitters and crocheters, this play food pattern collection is a treasure trove of soft toy food ideas. You will find fruits, vegetables, burgers, hot dogs, ice cream, sushi, and more, which makes it a good stop if you prefer yarn over felt. These projects are also lovely for using up little leftovers from bigger crochet and knitting projects.
Tips For Making Pretend Play Food Last Longer
When making handmade pretend play food for younger children, keep safety in mind. Avoid loose beads, tiny buttons, or glued-on decorations if the pieces will be used by toddlers or in a busy classroom. Stitched details are usually the safest and strongest choice.
Felt is lovely because it does not fray, cuts cleanly, and is forgiving if your stitching is not perfect. Crochet play food is wonderful because it is soft, washable when made carefully, and has that squishy handmade charm children love. Store finished pretend food in baskets, small fabric bags, toy crates, or thrifted trays so children can easily set up their own café, shop, picnic, or kitchen.
Handmade pretend play food is one of those crafts that quietly earns its keep. It encourages imaginative play, fine motor skills, sorting, counting, storytelling, and social play, all while giving us grown-ups a very good excuse to sit with a cup of tea and stitch tiny pancakes. Honestly, there are worse ways to spend an afternoon.
Hello. I would like to mod podge 2 black and white wedding photos on 2 nightstands in our bedroom. The nightstands are just pressed board/particle board and are already white. Questions: Is this even possible since I am using a smooth surface that is “painted”? Do I use ACTUAL photos bought at Target that are glossy? OR do I use copies of the photos printed on my home paper using regular typing paper? ALSO……once I mod podge the picture to the top of the dresser, is it waterproof? Can I put a bottle of water or can on it without messing up the finish and the picture? Thanks! Hope to hear from you soon!