• Home
  • Suggest A DIY
  • DIY Newsletter

Home and Garden

Ideas For DIY

  • About CraftGossip
  • Our Network
    • Bath & Body Crafts
    • Candle Making Ideas
    • Crochet Ideas
    • Cross Stitch
    • Edible Crafts
    • Felting Patterns
    • Glass Art
    • Home & Garden Ideas
    • Indie Crafts
    • Jewelry Making
    • Kids Crafts
    • Knitting Patterns
    • Lesson Plans
    • Needlework
    • Party Ideas
    • Polymer Clay
    • Quilting Ideas
    • Recycled Crafts
    • Scrapbooking
    • Sewing Patterns
    • Card Making
    • DIY Weddings
    • Not Craft Ideas
  • Giveaways
  • Roundups
  • Store
  • Search

No Sew Sock Christmas Snowman

October 9, 2018 by Shellie Wilson

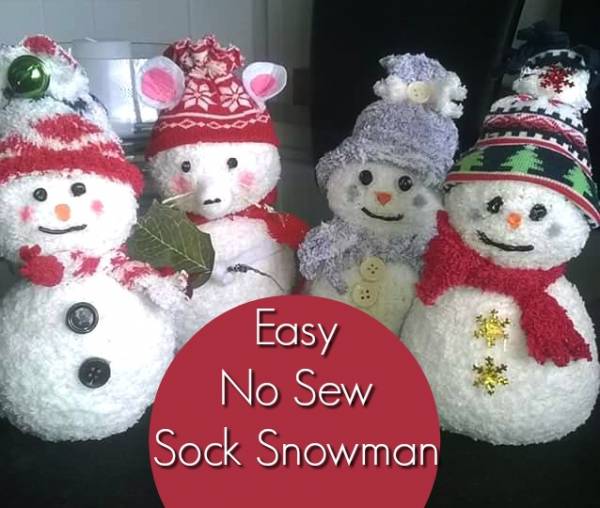
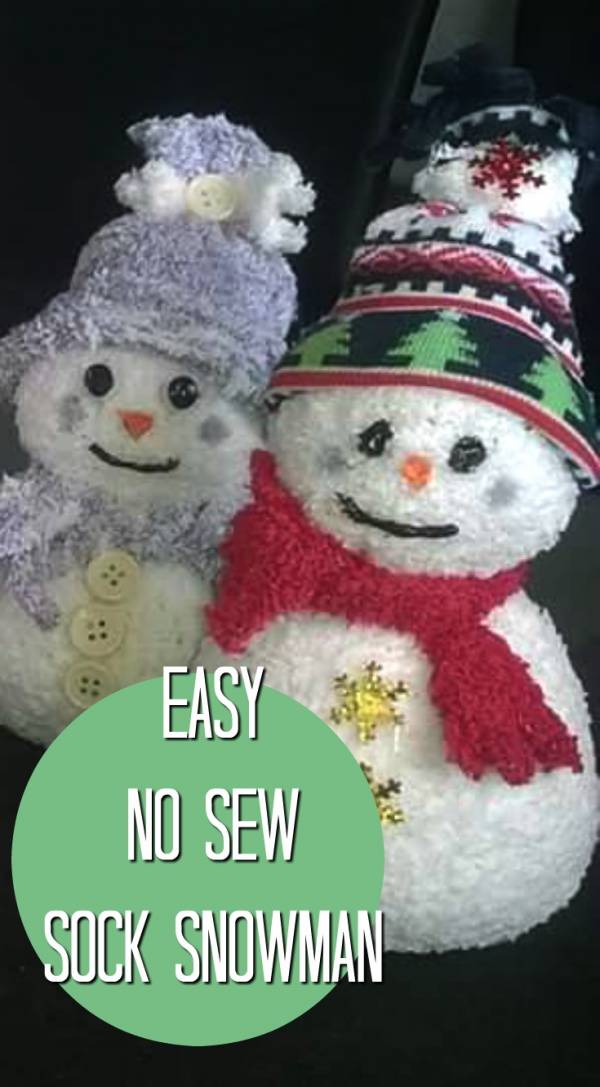
This DIY Christmas tutorial shows you how to make your own little Snowman craft using Dollar tree socks or even your odd socks at home.

To make this no-sew Christmas Snowman you will need the following items.

White Rice or plastic craft pellets
White Children’s Socks size 4+
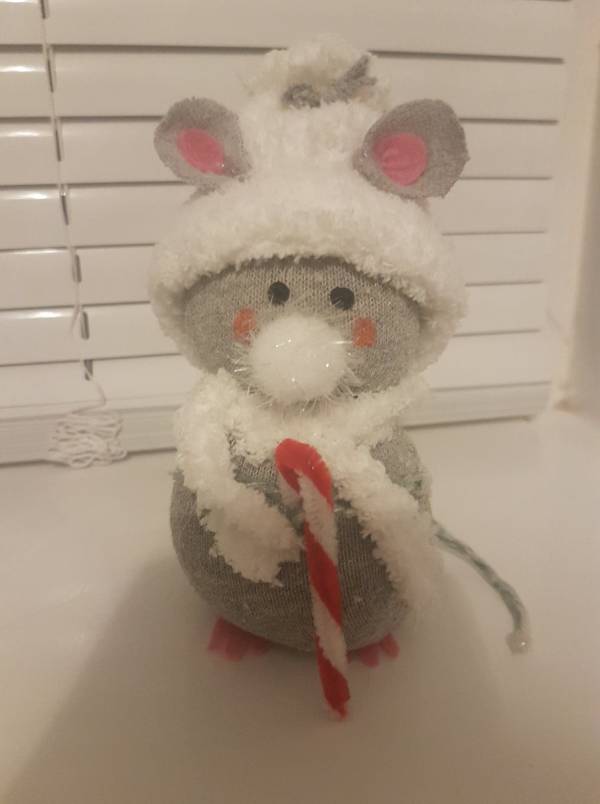
Christmas Socks in a smaller sock size.
Felt or scrap fabric for ears.
Chenille Pipe Cleaners-Red & White for optional candy cane
12mm White Pom-Pom
Small rubber bands, preferably clear or white.
Strong thread

Craft glue

Start by stuffing the sock with the rice or craft pellets, I prefer the pellets as they last longer and nothing is going to eat them. You need to fill the sock up until the heel. Remembering the body is going to be cut and half as half will become it’s head. The fill should be firm but not too firm as you will pull in the neckline.  Once you have filled it, secure with an elastic band and trim off the top of the sock. Now find the head height and place a rubber band around the neck to give the sock a head and body shape.

Next step is the beanie. For the beanie, you will be using the top of a Christmas sock (smaller). Place it on the snowman’s head to get the right size. Tie a rubber band at the top of the beanie and then cut off the excess sock. Glue an optional bow or a pom pom on top. Glue on to the snowman.

Using the beanie sock, cut a long strip for the matching scarf. If you are making a snowman mouse you will need to make some felt ears to attach to the beanie.

Finish off your Christmas sock snowman with buttons and face.

These handmade creations are by Denise Bird


Related Posts:

  • No-Sew Primitive Drop Cloth Gingerbread Men – Easy…
  • DIY Sunflower Sock Gnome
«
»

Comments

  1. Evans S says

    October 9, 2018 at 10:06 am

    i could make some of these with my daughter next month.

Have you read?

Make This Rustic Patriotic Flag Wreath for Your Front Door

There are plenty of shiny red, white, and blue decorations out there, but every now and then a patriotic project comes along that feels a little more heartfelt. This 4th of July Patriotic Flag Wreath from CraftBits is one of those projects.

Instead of being overly fussy or store-bought looking, this wreath has that lovely rustic Americana feel — a grapevine wreath base, a flag draped diagonally, and a large star layered over the top. It is simple, bold, and just handmade enough to feel special without turning into an all-weekend project.

You can find the full tutorial here: 4th Of July Patriotic Flag Wreath on CraftBits.

What I really like about this wreath is the story behind it. The original CraftBits tutorial explains that the project was made using a damaged flag brought home by a veteran, and his wife, Marsha, turned it into this beautiful wreath for her family to enjoy. That gives the project a little more meaning than a standard seasonal door decoration.

The supplies are very simple: a grapevine wreath, an American flag, a large metal star, and glue. The flag is folded lengthwise to create a sash, then secured diagonally across the wreath. The star is layered on the side to cover the gathered section and give the whole piece a finished focal point.

This would look beautiful on a covered front porch, garden gate, entryway wall, mantel, or even as part of a Memorial Day or Veterans Day display. It is not just for the 4th of July either — with the right styling, this is the kind of patriotic wreath you could bring out for several red, white, and blue occasions throughout the year.

If you’re planning more handmade patriotic decorating, you might also like our 10 DIY 4th of July wreaths to dress up your front door roundup, where this CraftBits wreath is already included as a classic front-door option. For a bigger porch refresh, pair it with our 15 DIY 4th of July porch decor ideas and add planters, lanterns, bunting, or painted rocks for a full summer entryway look.

One helpful note from the tutorial is that you can glue the flag in place, or stitch it to the back of the wreath if you want the option of removing it later. That is especially worth considering if you are using a sentimental flag, a vintage flag, or one with family meaning. Stitching gives you a bit more flexibility and avoids permanently attaching something you may want to preserve.

You could also soften the look with a few extra details. Add raffia for a farmhouse feel, tuck in cream or red faux roses, use denim ribbon, or add smaller stars around the grapevine base. I’d keep the extras fairly restrained though, because the flag and star are already doing the heavy lifting. This is one of those projects where too much “more” can tip it from rustic to crowded very quickly.

For supplies, Amazon is a handy option for grapevine wreath forms, metal star accents, glue, and mini flags. Etsy can also be useful if you want a handmade metal star, rustic Americana embellishments, or vintage-style patriotic trim, but I’d keep it simple so the wreath still feels meaningful rather than overly decorated.

This is a lovely beginner-friendly patriotic craft because there is no complicated measuring, no sewing machine required, and no special tools beyond basic craft supplies. It is also a good project for using a flag that may not be suitable to fly outdoors anymore but still holds meaning. As always, if you’re using an actual American flag with sentimental or ceremonial value, take care with how it is handled and displayed.

The finished wreath has that warm front-porch welcome feel — festive enough for the 4th of July, but classic enough to suit a farmhouse, cottage, or rustic summer decorating style.


Explore

Bedrooms Christmas Craft Ideas Easter Garden and Yard Halloween Holidays Home Decor Kitchens Living Areas Makeovers and Redos More DIY's Organizing Outdoor Decor Porches, Patios and Decks Recycled Crafts Seasonal Trash to Treasure Windows and Walls Wreaths

RSS More Articles

  • FIFA Soccer Crafts For Kids, Crochet Fans And Game-Day Makers
  • Cross Stitch Ice Cream and Frozen Treats
  • Sunflower Ribbon Embroidery Tutorials and Kits to Brighten Your Hoop
  • 15 Charity Sewing Projects That Let You Sew Something Useful For A Good Cause
  • Decorating Mistakes That Make Your Living Room Feel Cluttered
  • Remembering Jill Smokler, Founder Of Scary Mommy
  • In the Garden Layer Cake – A Bloom-Filled Fabric Collection for Spring Sewing
  • How To Do Kitchener Stitch: A Beginner-Friendly Guide To Grafting Knitting Seamlessly
  • Pattern Review: Georgie Granny Square Bucket Hat Crochet Pattern
  • Free Giant Squishy Octopus Crochet Pattern

Copyright © 2026 · CraftGossip | Start Here | Contact Us | Link to Us | Your Editors | Privacy and affiliate policy