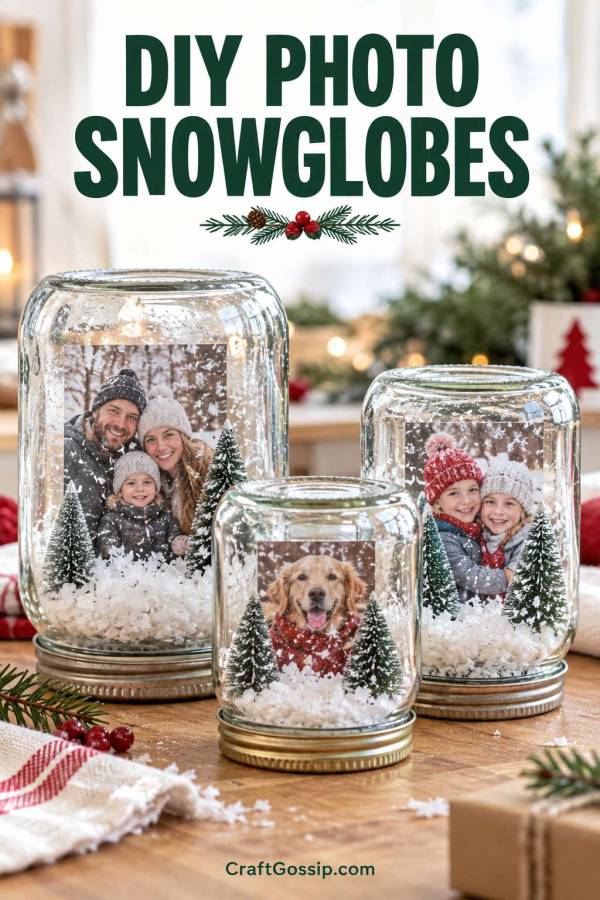
DIY Photo Snowglobes Made With Recycled Jars
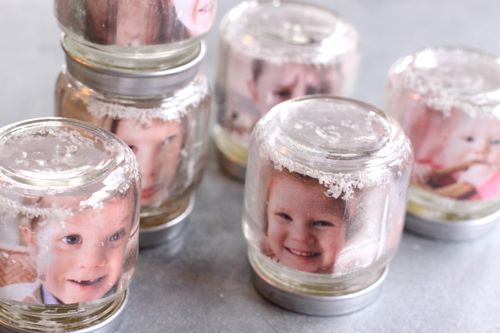
There is something wonderfully nostalgic about a snowglobe, but adding a family photograph makes it feel even more special. These DIY photo snowglobes turn recycled glass jars into personalised Christmas decorations that grandparents, parents and sentimental family members will genuinely want to keep.
This is also one of those clever handmade gift ideas that looks far more complicated than it really is. You do not need special snowglobe blanks or expensive supplies. A clean jar, a favourite photograph, artificial snow and a few miniature decorations are enough to create a lovely little winter scene.
If you have been saving jars because they are “too useful to throw away,” congratulations, your jar stash finally has a purpose.
Choosing a Jar and Photograph
Choose a clear glass jar with straight sides and a lid that closes securely. Small jam jars, condiment jars and mason jars all work well. Remove the label and any sticky residue, then wash and dry the jar thoroughly.
A photograph with a simple background is easiest to work with. Family portraits, pet photographs, wedding pictures and photos of the grandchildren are all lovely choices.
Print a copy rather than using an irreplaceable original. The photograph will need to be trimmed to fit inside the jar, and laminating or sealing it will help protect it from moisture and general handling.
For another inexpensive way to turn jars into festive decorations, take a look at these budget-friendly mason jar Christmas projects.
What You Will Need
- A clean glass jar with a secure lid
- A printed photograph
- Clear self-adhesive laminate or a laminating pouch
- Scissors
- Waterproof craft glue or a hot glue gun
- Artificial snow
- Miniature bottle-brush trees or small Christmas decorations
- Ribbon, twine or fabric for decorating the lid
- White paint, if you would like to paint the lid
How to Make a DIY Photo Snowglobe
Begin by trimming the photograph so it fits comfortably inside the jar. Leave a small tab along the bottom of the photograph so it can be folded back and attached to the inside of the lid.
Seal both sides of the photograph with clear self-adhesive laminate or laminate it properly before trimming it again. Pay particular attention to the edges, as exposed paper can absorb moisture.
Arrange the photograph and miniature decorations on the inside of the jar lid. Before gluing anything down, place the empty jar over the arrangement to make sure everything fits.
Glue the photograph and decorations securely to the lid and allow the adhesive to dry completely. Do not rush this stage. There is nothing more frustrating than carefully assembling your little winter scene only to have the tree fall over as soon as the jar is turned upright.
Sprinkle a small amount of artificial snow into the jar. It is tempting to add half the packet, but too much snow will hide the photograph. A light layer is usually enough.
Carefully screw the lid onto the jar, then turn the jar upside down so the lid becomes the base. Finish it with ribbon, twine, fabric or a painted lid.
If you love the snowy look but would rather skip the family photograph, these DIY snow globe terrariums are another charming idea.
Should You Add Water?
This version works best as a waterless photo snowglobe. Keeping the jar dry protects the photograph, makes the project easier and removes the risk of leaks.
Water-filled snowglobes require waterproof images, distilled water, glycerine, firmly sealed decorations and a completely watertight lid. For a family craft session or a handmade gift that needs to survive being wrapped, posted or stored, I would stick with the waterless version.
You can find more inspiration in these waterless snowglobes or try this traditional make-your-own snowglobe tutorial.
Photo Snowglobe Ideas
These personalised snowglobes can be adapted for all sorts of occasions:
- Use an old wedding photograph for an anniversary gift.
- Add a baby photograph and the year for a first Christmas keepsake.
- Make one for each grandchild to create a matching set.
- Include a photograph of a much-loved pet.
- Use a vintage family photograph for a nostalgic Christmas decoration.
- Add a child’s school photo for an easy grandparent gift.
- Make miniature versions with baby-food jars for place settings or party favours.
Children can help select the photographs, sprinkle the artificial snow and choose the decorations. Adults should handle hot glue, sharp scissors and glass jars. Plastic jars are a safer option when making this project with preschoolers or younger children.
For a smaller version that can hang on the Christmas tree, try this DIY snow globe ornament.
These DIY photo snowglobes are inexpensive, personal and delightfully sentimental. They are particularly lovely for grandparents because they combine a handmade Christmas decoration with a treasured family photograph. Make one as a gift, or create a new snowglobe each year and watch your collection of family memories grow.
See the original DIY photo snowglobe tutorial from Design Mom for additional inspiration.
These would just be great conversation pieces in your living room! Get detailed how to from Design Mom — DIY: Photo Snowglobes Use upcycled or recycled jars to create inexpensive gifts. Use plastic jars for a cheao preschool craft for parents or grandparents.