.JPG)
Free printable labels for making creepy Halloween potion bottles. These printable labels can be added to recycled jars, bottles and cans for a quick Halloween DIY decoration.
Ideas For DIY
Free printable labels for making creepy Halloween potion bottles. These printable labels can be added to recycled jars, bottles and cans for a quick Halloween DIY decoration.
There is something wonderfully unsettling about a Halloween decoration that takes a moment to register. A strange face in a mirror. A doll sitting quietly where nobody remembers leaving it. Something pale hanging at the end of the verandah. Give me those little “hang on, what was that?” moments and I’m much more impressed than I am by another smiling pumpkin.
If you’re looking for DIY scary Halloween decorations, this collection has plenty of ideas for giving your home that slightly abandoned, possibly haunted feeling. Think ghostly figures, spider infestations, creepy doll makeovers and a few skulls tucked among the everyday furnishings. Some are small craft-table projects; others need a little more patience and space.
I particularly like Halloween projects that give old things another outing. That odd doll from the thrift shop suddenly has a purpose, and the fabric scraps you couldn’t bring yourself to throw away might be exactly what your ghost needs. It’s a very satisfying excuse to rummage through the stash.
Choose a couple of projects that work together, then build your display around them. A haunted reading corner or spider-covered doorway can have far more atmosphere than decorations scattered across every available surface.
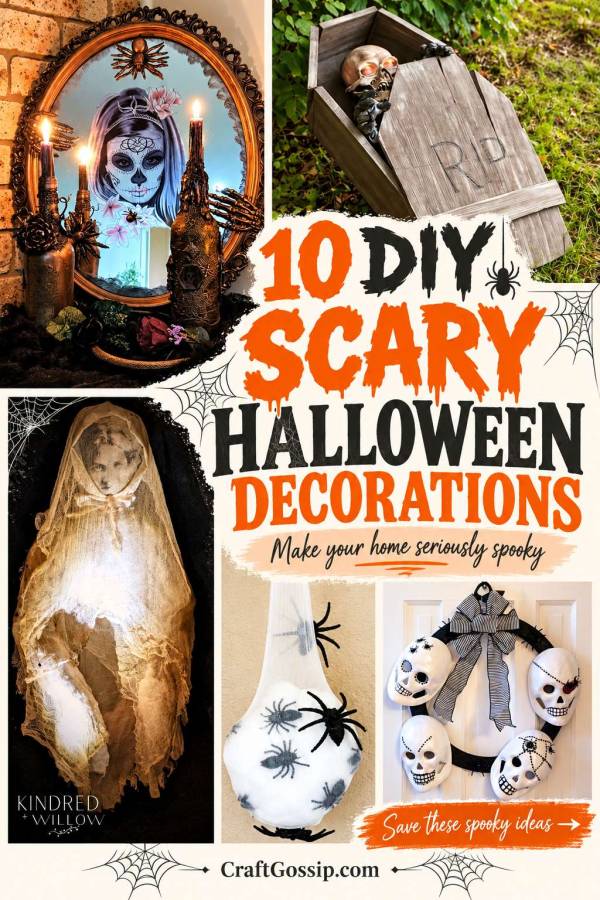
A mirror is already a slightly suspicious object once the lights go down, which makes this DIY Halloween Mirror a lovely starting point for an eerie entrance. The featured project uses removable decorations, allowing the mirror to return to everyday use afterwards. I’d suggest this for beginners who enjoy arranging a display and want to work with something they already own. Place it above a narrow table with a few dusty-looking props for a haunted-house welcome.
For a larger display, this DIY Lawn Coffin Halloween Prop introduces a wonderfully gloomy focal point. The featured build uses insulation board, making it an alternative to constructing a wooden coffin. It’s a better choice for makers comfortable measuring and cutting than for someone wanting a quick glue-and-go craft. I’d arrange it as part of a small graveyard scene, with plenty of clear space for visitors to walk past.
This Haunting Victorian Ghost Decoration has the sort of face that makes you look twice. Kindred + Willow combines a shaped chicken-wire body, layered cheesecloth and an optional face printed onto fabric using Solarfast dye. It’s a more involved project for a patient maker, although you can skip the printed face to simplify the process. The tea-stained fabric and old-fashioned silhouette would suit a sheltered haunted verandah beautifully.
I can cope with one decorative spider; a whole nest is another matter entirely. This Spider Egg Sac Halloween Decoration uses a foam shape, batting, white stockings and plastic spiders to create that unpleasantly convincing effect. The wrapping and gluing make it an approachable beginner project, with adult handling of the hot glue. Hang several at different heights in a sheltered doorway, then let a few extra spiders appear to escape across the surrounding wall.
An ordinary doll can become surprisingly unnerving with a Halloween makeover, as these Creepy Doll Halloween Decorations demonstrate. This is a good option for makers who enjoy customising secondhand finds and choosing how far to take the horror theme. Start with an inexpensive, unwanted doll rather than a treasured keepsake, and treat the project as a creative makeover rather than something that needs a perfect finish. My styling suggestion would be to give the finished doll its own chair—the quiet placement is half the fun.
This DIY Halloween Wreath with Skulls and Spiders gives the front door a suitably creepy introduction. The tutorial combines painted papier-mâché skulls, a floral ring, decorative gems and spider accents. It suits beginners happy to paint and assemble components, with drying time between stages. The black-and-white palette keeps everything coordinated, which is handy if your Halloween supply box contains a rather enthusiastic mixture of colours.
A DIY Skull Garland is a useful finishing piece when a mantel or shelf needs something more sinister. The Rural Legend’s project gives inexpensive plastic skull pieces a makeover with flat black spray paint. It’s an accessible choice for a beginner who wants a smaller decoration rather than a full-sized prop. I’d drape it among old books and LED candles, letting the repeated skull shapes pull the display together.
These Halloween Foam Tombstones are a larger project for anyone ready to build a homemade graveyard. The maker uses sheets of foam insulation board to create a collection of tombstone props. Allow more time for this one: it suits someone who enjoys construction and finishing work rather than a single evening of crafting. A group of different shapes would make a strong backdrop for your other decorations, especially with carefully positioned outdoor lighting.
This DIY Creepy Doll Head Planter gives a discarded doll a particularly strange second life. Swoodson Says shares a dedicated planter tutorial that includes painting the plastic doll. It’s best suited to adults comfortable modifying an object rather than simply adding decorations to its surface. For styling, I’d choose trailing foliage or faux stems and place it among ordinary pots, where visitors might take a moment to notice the unexpected face.
These Skull Bookends bring Halloween into a bookshelf display without needing a huge prop. Sawdust Girl’s black painted finish, distressed edges and spiderweb detail give the project an aged, gothic character. I’d put this on the list for makers who enjoy decorative finishing and are happy to follow a small build. Pair the finished bookends with worn book covers for a haunted-library corner that still feels like part of the room.
The trick is giving the eye somewhere to settle. Choose one main feature—a ghost, coffin or creepy doll—then use smaller pieces to support it. Repeating a few colours, such as black, aged cream and dirty grey, helps unrelated thrift-store finds feel like they belong in the same haunted house.
Lighting makes a difference too. Try illuminating a prop from below or slightly behind, then stand where guests will approach and check the effect. Keep enough light on steps and paths for people to move comfortably, and use LED candles around fabric, paper and other flammable decorations.
For outdoor displays, check each tutorial’s materials before deciding where to put the finished project. Papier-mâché, fabric and indoor paint finishes may need a sheltered spot. Secure lightweight props so they stay where you arranged them, and keep loose threads, wire edges and hanging pieces away from walkways.
You don’t have to turn the whole house into a horror film set. One thoughtfully arranged corner can be wonderfully creepy—and it leaves you enough time to enjoy the making. Though if that thrift-store doll starts appearing in different rooms, I’d be having a word with the teenagers.
Thanks for the labels. Really neat. What did you use to stick them on the bottles; glue or sticky sheets?
I always use a PVA or white craft glue for my bottles.