• Home
  • Suggest A DIY
  • DIY Newsletter

Home and Garden

Ideas For DIY

  • About CraftGossip
  • Our Network
    • Bath & Body Crafts
    • Candle Making Ideas
    • Crochet Ideas
    • Cross Stitch
    • Edible Crafts
    • Felting Patterns
    • Glass Art
    • Home & Garden Ideas
    • Indie Crafts
    • Jewelry Making
    • Kids Crafts
    • Knitting Patterns
    • Lesson Plans
    • Needlework
    • Party Ideas
    • Polymer Clay
    • Quilting Ideas
    • Recycled Crafts
    • Scrapbooking
    • Sewing Patterns
    • Card Making
    • DIY Weddings
    • Not Craft Ideas
  • Giveaways
  • Roundups
  • Store
  • Search

Put a mailbox in your garden

January 8, 2014 by Vikram Goyal

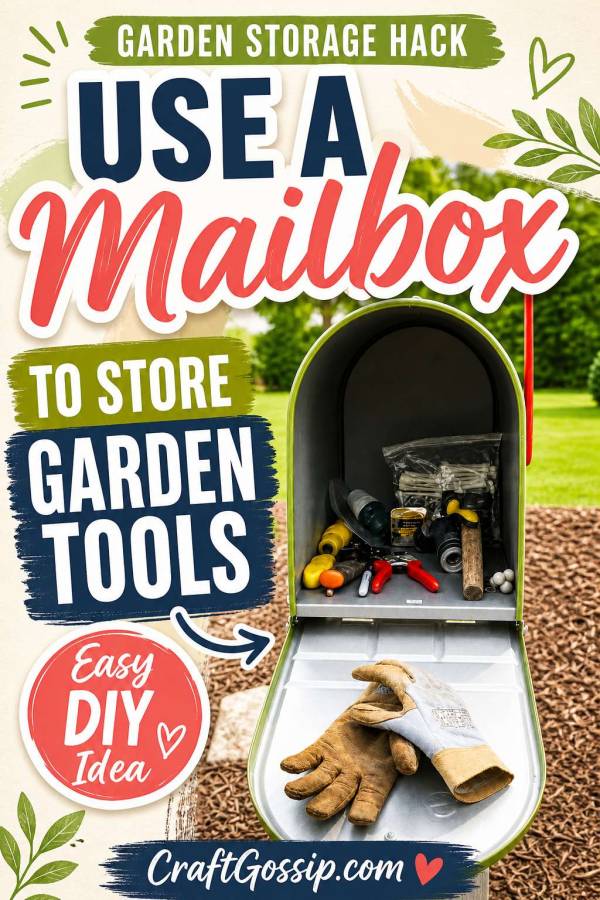
A garden mailbox might sound a little unexpected at first, but that is exactly why it makes such a charming outdoor decorating idea. We are so used to seeing mailboxes at the front of a house that placing one among flowers, herbs, or vegetables instantly gives the garden a playful, cottage-style feel. It is practical, a little quirky, and just the right amount of “why didn’t I think of that?”

Old mailboxes are brilliant for garden upcycling projects because they already have a sturdy shape, a hinged door, and that lovely hidden-storage element built right in. Tucked beside a potting bench, attached to a fence post, or nestled near a vegetable patch, a mailbox can be used to store garden gloves, seed packets, plant labels, small hand tools, twine, or even a pair of snips. No more wandering back to the shed with muddy shoes because you forgot the string — not that any of us have ever done that, of course.

You can also turn a mailbox into a decorative garden feature. Paint it in cheerful colours, give it a vintage farmhouse finish, stencil on a floral design, or let it rust naturally for that lovely weathered garden look. It can become a fairy garden house, a seed exchange box, a little note station for garden visitors, or a whimsical focal point in a flower bed.

This garden mailbox idea is perfect for anyone who loves upcycled garden décor, creative backyard projects, thrift store garden makeovers, and practical DIY garden storage. Whether you use a brand-new mailbox or rescue an old one from the “might come in handy one day” pile, it is a simple way to add personality and function to your outdoor space without spending a fortune.

Everything stays dry and is conveniently located. Mailboxes are cheaper than other storage solutions for the garden and can often be recycled or upcycled. Mailboxes are a great way to store things for your garden chores, such as garden gloves or other pruning snips. You could use a mailbox for other outdoor items too such as handballs, tennis balls or summer toys for summertime.

You can customize it the way you want and maybe have his and her’s box as well.

Found this on Pinterest, and thought I had to blog it (and implement it for my garden!).
«
»

Comments

  1. Candice C says

    January 8, 2014 at 4:38 pm

    I set up a mailbox for my tools in the garden and before too long I noticed wasps had set up a nest in the back of it. It seems to be the perfect set up for them being dark and out of the elements. I am allergic to stings so my husband drilled holes to let light in so eliminate the problem but of course, it then defeats the purpose as rain can get in and ruin the safe, dry, convenient place for gloves and tools and seeds.Back to the drawing board.

  2. B. F. Cross says

    February 2, 2014 at 12:01 pm

    what a good idea I will show it to my husband and he will put one up for us. Instead of dragging tools and other items back to the garden they will be conveniently stored for us.
    As far as bees spray the inside and outside to keep away bugs and bees. And keep spray inside to fight off occasional pests.

    thanks for the idea.

    • Cally says

      August 15, 2014 at 5:43 pm

      I prefer the idea of drilling holes to let light in and deter the wasps. The idea of grabbing a can of lethal spray to eliminate what we consider to be pests is WRONG. The sooner we stop this behaviour the better the environment will be.

      • ShirleyBagshaw says

        October 31, 2014 at 6:50 am

        I too am allergic and feel its wrobg ti use spray. Drill the holes and line the space inside with something clear like maybe vinyl or plastic.

    • Dan says

      April 11, 2016 at 1:28 pm

      Agree with B. F. Cross! A light spray, perhaps the odor, or some environmentally friendly deterrent is RIGHT to avoid the wasps and the aggressive behavior!

  3. Karla says

    February 17, 2014 at 5:14 pm

    What a great idea. I moved into a new house last year and I’m struggling with where to keep my tools so they are handy. I could put up one of these for the back yard to give me an extra storage spot. Thanks!

  4. Brenda says

    February 23, 2014 at 10:10 pm

    Great idea, I always forget where I put something then don’t find it till I don’t need it anymore. This will be an additional decoration in the garden as well

  5. Jan says

    March 15, 2014 at 7:54 am

    This is just the thing for my husband. He is constantly looking for his tools while gardening and this should surely help. His tools won’t be getting rusty either. Thanks so much .

  6. Carole Hall says

    March 30, 2014 at 1:40 pm

    Great idea!!! Can’t wait for the rain to stop so I/we can get out in the garden to start implementing so many wonderful, new ideas. Thanks so much for sharing with those of us with the will but not the creative ways!!

  7. Terri says

    May 24, 2014 at 1:20 pm

    This is a great idea. Throw a few mothballs in there to keep bugs out.

  8. Joy Pearce 20th June says

    June 22, 2014 at 1:52 am

    I am not so sure this great idea would be safe in Perth Australia, we have some bad guys here like red back spiders that would just love to hide in the mail box, and what about opening it and finding a curled up snake.

  9. Sandy says

    June 22, 2014 at 9:18 pm

    I did this years ago. I keep an extra set of clippers, gloves and small shovel in mine out in the yard. Then if I see something that I need to do I don’t have to walk all the way back to the house to get the tools. I keep my gloves in a small container with a lid so I don’t have to worry about anything crawling in them. I have not had any problem with wasp and such. I decorate it for the holidays,planted flowers around it and it is added color for the yard.

  10. Randy McDaniel says

    July 16, 2014 at 8:14 am

    Great idea, can’t wait to start the project. I’m thinking about putting the mailbox on a decorative post to blend into the garden.

  11. John says

    July 25, 2014 at 12:32 pm

    Put thymol crystals in the mail box as it will deter pest. It is pure menthol sold in honeybee supply catalogs for pest control. It might help repel the wasp.

  12. Corolyn Clay says

    July 31, 2014 at 11:14 pm

    I have been using this idea for years! I have 2 mailboxes that met their demise from being hit by cars and motorcycle. I even keep a box of tissues for my allergies out there! One spring I left one of them open by mistake and a wren nested in it.

    • Shirley Bagshaw says

      October 31, 2014 at 6:53 am

      That is so nice. I would love for a bird to feel so comfortable that it would nest there.

  13. Carla says

    May 22, 2015 at 4:17 am

    Where can I buy those mailboxes in the Netherlands??? Love the idea.

  14. Donna LaBorde says

    September 17, 2015 at 12:17 am

    I put one in my garden about 3 years ago. Already need to put a larger one in. Perfect for my tools….

  15. sharon says

    December 14, 2015 at 12:31 pm

    Drill holes on the bottom of the box to keep out rain 🙂

  16. Kay says

    December 30, 2015 at 1:11 pm

    Thank you for this idea. We made up these for family gardeners for Christmas and stenciled
    them to personalize them. They were a hit!

  17. S. says

    August 16, 2016 at 2:58 am

    Been doing this for a long time!! Enjoy!!

Have you read?

10 Tufted Wall Hanging Tutorials for Creating Cosy Textile Art

There is something wonderfully comforting about a piece of handmade textile art hanging on the wall. Perhaps it is the softness, the slightly uneven tufts or simply the fact that yarn instantly makes a room feel warmer. Whatever the reason, tufted wall hangings have moved well beyond the craft room and are now turning up in living rooms, bedrooms, nurseries and those awkward little corners that have been waiting patiently for something interesting.

Tufted wall art can be bold and colourful, soft and neutral, wonderfully shaggy or surprisingly neat and graphic. You can create it with a tufting gun, punch needle, latch hook tool or even a few humble pom-poms and tassels. That makes this a lovely craft trend to explore whether you are ready to invest in rug-tufting equipment or would rather begin with yarn already tucked away in your cupboard.

I have gathered ten tufted wall hanging tutorials covering a good mix of styles and techniques. There are proper rug-tufting projects for anyone intrigued by those mesmerising tufting-gun videos, along with smaller latch hook and yarn projects that are far easier to tackle at the kitchen table.

One small warning from a long-time yarn hoarder: textile wall art is an excellent excuse to buy more yarn while insisting that it is technically home decorating.

Beginner Rug Tufting and Tufted Wall Art Tutorials

How to Tuft a Rug: A Complete Beginner’s Tutorial

This detailed guide walks through the full rug-tufting process, including choosing a simple design, stretching the backing cloth, transferring the image, threading the tufting gun and securing the finished yarn. Although demonstrated as a rug, the same method works beautifully for a soft, graphic wall hanging—and wall art does not have to survive muddy shoes or Aloo racing across it.

Make Your First Mini Tufted Rug

Starting small is one of the least intimidating ways to learn rug tufting, and this mini-rug tutorial covers the project from design planning through to finishing. A small piece is also ideal for wall display because it is lighter, quicker to complete and much easier to fit into an existing gallery wall.

Beginner Step-by-Step Rug Tufting Guide

This beginner tutorial explains how a tufting gun pushes yarn through tightly stretched backing fabric to form either cut or loop pile. It is a useful starting point when all the equipment names sound like another language and you want to understand the complete process before ordering half a craft studio.

Complete Beginner’s Guide to Rug Tufting

This guide is worth bookmarking if you want a thorough introduction rather than a quick project overview. It takes you through the essential tools, frame preparation, yarn placement and finishing stages needed to create rugs or tufted wall art with clean, defined shapes.

Three-Step Tufted Wall Art Finishing Tutorial

Finishing the back and trimming the front are what turn a fluffy experiment into something you are proud to hang on the wall. This tutorial focuses specifically on tufted wall art and demonstrates a heat-activated adhesive method, surface trimming and optional backing for a tidy result.

How to Hang a Tufted Rug on the Wall

Once you have made your gorgeous tufted piece, you still need to stop it sliding down the wall at three o’clock in the morning. This practical guide covers several display methods, including D-rings, wooden slats, hook-and-loop strips and stretching the work over a canvas frame.

Latch Hook Wall Hanging Tutorials

DIY Latch Hook Wall Hanging

Latch hooking gives you that wonderfully thick, tufted appearance without needing an electric tufting gun or a large wooden frame. This beginner-friendly wall hanging is a satisfying way to experiment with colour, pile length and geometric designs using a simple latch hook tool.

DIY Latch Hook Wall Hanging Tutorial

This project creates a tactile yarn wall hanging using latch hook canvas and short lengths of yarn. I particularly like latch hook projects for using leftover yarn because even small quantities can become colourful stripes, arches or deliberately shaggy sections.

How to Latch Hook for Beginners

This guide explains the basic latch hook technique and how the yarn knots are formed on the canvas. Once you understand the simple movement, you can use it to create wall hangings, small rugs, cushions or wonderfully retro pictures that would not look out of place in a 1970s craft book.

Easy Yarn Wall Hangings with Tufted Texture

Easy Pom-Pom Boho Wall Hanging

This CraftBits tutorial combines handmade pom-poms, tassels, beads and a natural twig to create a soft bohemian wall hanging. It is not made with a traditional tufting gun, but it delivers plenty of plush yarn texture and is a far more accessible choice for children, group crafting or a relaxed afternoon project.

You may also like the DIY Boho Tassel Wall Hanging, another easy CraftBits project that turns ordinary yarn into soft, layered wall décor.

Choosing the Right Tufting Method

A tufting gun is the fastest option for producing dense textile artwork, but it also requires the largest investment. You will generally need a tufting gun, sturdy frame, primary tufting cloth, yarn, adhesive, backing material and a set of clippers or scissors for shaping the pile.

Punch needle and latch hook projects are slower, but they are much easier to begin at home and require fewer specialised supplies. They are especially good for small wall hangings, abstract patterns and projects made from leftover yarn.

For an even simpler interpretation, pom-poms and tassels can create a soft, tufted effect without any special textile tools. These are ideal when you want a quick project, something suitable for younger crafters or a reason to use the mysterious collection of half-finished yarn balls living in the cupboard.

Tips for Making Tufted Wall Art Look Polished

Begin with a simple shape or bold graphic design. Fine lettering, tiny curves and intricate facial details can be difficult to keep crisp when you are still learning how the yarn behaves.

Choose colours with enough contrast that the design remains clear from across the room. Subtle neutral shades can be beautiful, but it helps to vary the pile height or yarn texture so the different sections do not blend into one woolly beige cloud.

Trim gradually. You can always remove more yarn, but unfortunately there is no magical reverse haircut for an overenthusiastically shaved tuft.

Always secure the back carefully before removing or displaying the work. Wall hangings experience less wear than floor rugs, but the yarn still needs adhesive or another stabilising finish to prevent loose tufts.

Finally, choose a hanging method that suits the size and weight of the piece. Small designs may only need stitched rings or a dowel, while larger tufted wall hangings benefit from a wooden support that prevents sagging and curling.

More DIY Textured Wall Art Inspiration

Tufting is only one way to bring texture into your home. CraftGossip’s easy textured canvas wall art tutorial creates raised, sculptural artwork using joint compound and paint. It would look lovely displayed alongside a small tufted piece, particularly if you repeat the same colour palette across both projects.

Whether you choose a proper tufting gun, a latch hook tool or a fork full of pom-pom yarn, these tufted wall hanging tutorials offer plenty of ways to add handmade warmth to your walls. Start with something small, embrace the occasional uneven tuft and remember that those tiny imperfections are exactly what stop handmade décor from looking mass-produced.

Explore

Bedrooms Christmas Craft Ideas Easter Garden and Yard Halloween Holidays Home Decor Kitchens Living Areas Makeovers and Redos More DIY's Organizing Outdoor Decor Porches, Patios and Decks Recycled Crafts Seasonal Trash to Treasure Windows and Walls Wreaths

RSS More Articles

  • 10 Free Sunflower Machine Embroidery Patterns
  • Beginner Needle-Felted Strawberries: A Step-by-Step Tutorial
  • Celebrating Mexican Independence Day
  • 10 Tufted Wall Hanging Tutorials for Creating Cosy Textile Art
  • 10 Modern Zig Zag Quilts That Feel Fresh and Graphic
  • Colorful Maker Hat Crochet Pattern Review
  • 12 Emulsified Sugar Scrub Recipes That Rinse Away Like Lotion
  • 12 Floral Birthday Cards for Spring and Summer
  • The Pancake Market Bag – Free Crochet Pattern
  • Backpack Cross Stitch Patterns

Copyright © 2026 · CraftGossip | Start Here | Contact Us | Link to Us | Your Editors | Privacy and affiliate policy