• Home
  • Suggest A Craft
  • DIY Newsletter

Home and Garden

Ideas For DIY

  • About CraftGossip
  • Our Network
    • Bath & Body Crafts
    • Candle Making Ideas
    • Crochet Ideas
    • Cross Stitch
    • Edible Crafts
    • Felting Patterns
    • Glass Art
    • Home & Garden Ideas
    • Indie Crafts
    • Jewelry Making
    • Kids Crafts
    • Knitting Patterns
    • Lesson Plans
    • Needlework
    • Party Ideas
    • Polymer Clay
    • Quilting Ideas
    • Recycled Crafts
    • Scrapbooking
    • Sewing Patterns
    • Card Making
    • DIY Weddings
    • Not Craft Ideas
  • Giveaways
  • Roundups
  • Store
  • Search

Remove green tint from glass edge

July 9, 2013 by Vikram Goyal

before-green-tint

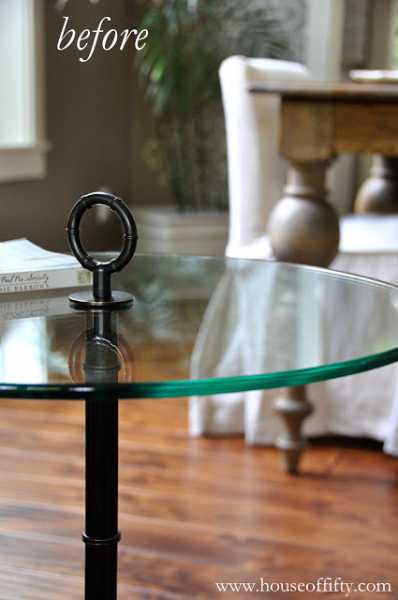
Did you know that the edge of glass tip is green because of iron in the sand used to make the glass?

Before reading this quick DIY tip from Janell Beals from HouseOfFifty, I had no idea either.

And before reading this tip, I had no idea that I would be bothered with it myself. 🙂 But now I am.

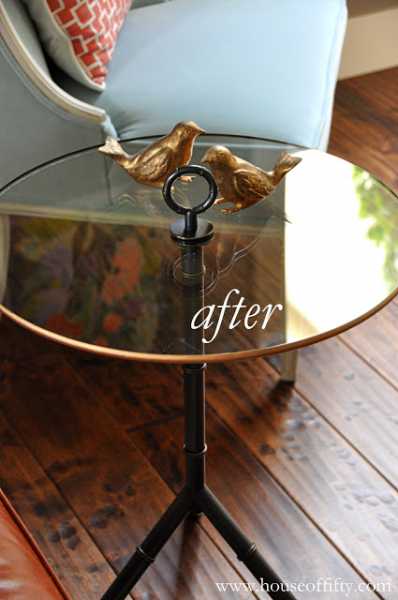
Thankfully, Janell’s blog post also offers a solution – use a tube of rub n’ buff. The transformation is quite subtle but effective. As you can see in the after picture below.

Go to her blog post on this quick tip on removing the green tint and see the rest of the details.

remove-green-tint

«
»

Comments

  1. Lesley says

    July 9, 2013 at 9:50 am

    It looks good, but you are not removing it, it is being covered up with another colour. Surely Rub’n’Buff will wear off?

  2. Lyn Cederholm says

    May 4, 2017 at 11:32 pm

    Has anyone tried this! I am in need of a solution for hiding the green tint on new glass shelves.

  3. marie-france Joyal says

    March 21, 2020 at 10:02 am

    Hi, i install new glass panel that havé this Green tint. Did you have succes hiding it?

Have you read?

Scrap Fabric Sunflower Decoration

Sunflowers have always held a special place in my heart. Their vibrant yellow petals and tall, sturdy stems make them a symbol of warmth, happiness, and resilience. Whenever I see a field of sunflowers, it’s impossible not to feel uplifted by their bright, sunny faces turned toward the sky. To me, sunflowers represent more than just beauty — they embody positivity, growth, and the simple joy of nature. That’s why I’m so excited to share this DIY project for making a cheerful scrap fabric sunflower decoration.

It’s a fun and creative way to bring a little piece of nature into your home and capture the essence of those radiant flowers that brighten any space. Whether you’re decorating for a special occasion or simply adding a touch of sunshine to your everyday surroundings, this craft is sure to bring joy and color to your home. Ready to dive in and create your own cheerful sunflower decoration? Check out the full guide and start crafting today! How to Make a Cheerful Scrap Fabric Sunflower Decoration. 

Explore

Bedrooms Christmas Craft Ideas Easter Garden and Yard Halloween Holidays Home Decor Kitchens Living Areas Makeovers and Redos More DIY's Organizing Outdoor Decor Porches, Patios and Decks Recycled Crafts Seasonal Trash to Treasure Windows and Walls Wreaths

RSS More Articles

  • How to Make a Rag Quilt – An Easy, Cozy Beginner-Friendly Tutorial
  • A Cross Stitch I Spy at the Beach
  • This Artist’s Breathtaking Embroidery Paintings Will Make You Rethink Needlework Forever
  • How Much Is Too Much Fabric?
  • Andrew Whitehead: Turning Rust into Regional Icons
  • Finding the Perfect Yarn for Shed-Free Crochet Blankets
  • Product Review: COLOP Stamps and Ink Pads
  • Scrap Fabric Sunflower Decoration
  • Monday Musings: Why I Still Can’t Sew a Perfect Buttonhole (And Why That’s Okay)
  • Felted Bag Knitting Patterns

Copyright © 2025 · CraftGossip | Start Here | Contact Us | Link to Us | Your Editors | Privacy and affiliate policy