• Home
  • Suggest A DIY
  • DIY Newsletter

Home and Garden

Ideas For DIY

  • About CraftGossip
  • Our Network
    • Bath & Body Crafts
    • Candle Making Ideas
    • Crochet Ideas
    • Cross Stitch
    • Edible Crafts
    • Felting Patterns
    • Glass Art
    • Home & Garden Ideas
    • Indie Crafts
    • Jewelry Making
    • Kids Crafts
    • Knitting Patterns
    • Lesson Plans
    • Needlework
    • Party Ideas
    • Polymer Clay
    • Quilting Ideas
    • Recycled Crafts
    • Scrapbooking
    • Sewing Patterns
    • Card Making
    • DIY Weddings
    • Not Craft Ideas
  • Giveaways
  • Roundups
  • Store
  • Search

Seaside Inspiration for Your Windows

June 11, 2013 by Amanda Formaro

Seaside Inspiration for Your Windows

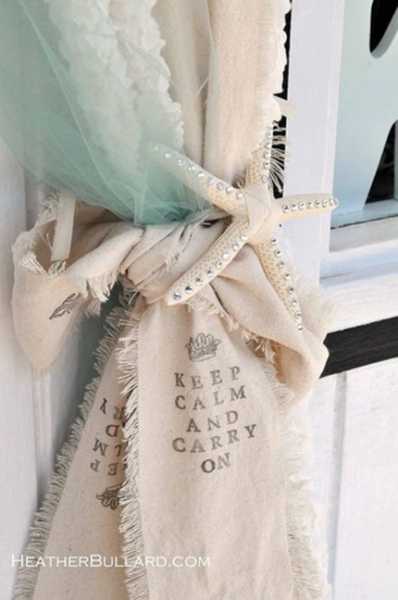
There’s no tutorial for this, I’m providing it to you strictly for inspirational purposes. Back in 2010 Heather Bullard visited Rachel Ashwell and was greeted by this lovely decoration on the front door. I quote “To welcome Rachel they had festooned the front door with swags of muslin, seashells and tulle. So PRETTY!”

Oh Heather, I couldn’t agree more! It wouldn’t be hard to do either. You’d need some muslin and maybe a stamp or a stencil for the words. From what I can see, they took a starfish (readily available at craft stores) and glued on some rhinestones, then wrapped a long strip of muslin around the center of the starfish and used it as a tie back. Throw some pretty sea glass colored tulle in the mix and voila! Done! You can see Heather’s full post about the visit here.

I also want to tell you that I found this image on Pinterest. However, that pin linked over to a Tumblr account with no credit to where it came from (big shocker, I know!). Luckily there was a watermark on the photo from HeatherBullard.com. So I went to her site and unfortunately, because I used “beach” and “window” as my keywords, a search failed me.

All was not lost though! If you don’t know already, you can usually find the source of an image via Google by going to Google and clicking on the Image tab. Then you enter the url of the image and it will pull up all similar images on the web. Many of them will be on Pinterest. I found the original source on page two.
«
»

Comments

  1. Kimberly Jones says

    June 11, 2013 at 5:12 pm

    I love this so much Amanda that I pinned it to my Sea Dreams Cottage Board! Thanks for taking the time to find the original source and provide a link to it. I try not to pin anything that doesn’t have the source included so I appreciate your effort!

Have you read?

Setting Up a Beginner Craft Space? A Practical Shopping List

A new craft hobby does not require a room that looks like a craft store. In fact, I think beginners have a much nicer time when they start with one project, a few dependable tools and somewhere to put everything away afterwards.

Whether you are setting up a sewing corner for yourself or putting together a creative gift for someone else, buy for the hobby they want to try now. You can add the fancy equipment later, once you know what they enjoy using.

Start with one project and its basic tools

For beginner sewing, that might mean fabric, matching thread, pins or clips, scissors and a simple pattern. The easy lunch tote bag on CraftBits gives a new sewist a practical goal.

For paper crafts, begin with cardstock, adhesive, a ruler and a reliable pair of scissors. For crochet, choose a beginner pattern, the yarn it calls for and a suitable hook. Resist the urge to buy a giant mixed kit if half its contents will sit untouched.

Amazon can be useful when you want to compare starter supplies in one place. With Amazon Prime, eligible items may qualify for Prime delivery. (Free 30 Day Trial) Check each listing and the delivery estimate for your address rather than assuming everything in the cart will arrive together.

Give the supplies a place to live

A lidded box, a small rolling cart or a few clear containers can make a beginner craft space much easier to use. I would organise by project first: keep the pattern, tools and materials for the current make together. There is nothing more discouraging than finally finding an hour to craft and spending half of it hunting for the needle packet.

Before buying storage, look at what you already have. These upcycled storage ideas may solve the problem without another purchase. Once you know what genuinely needs a home, you can choose containers that fit the supplies and the space.

Check the small details before ordering

For every tool or kit, read the size, material, compatibility and included-items list. A cutting mat that is too small for the project or a refill that does not fit the tool is no bargain. Reviews can be useful for spotting practical issues, but I would still check the listing specifications myself.

If you are considering Prime as part of your regular craft shopping, look at the current membership details and decide whether its benefits suit how often you order. A good beginner setup is the one that makes it easy to sit down, start the project and find everything again next time.

Explore

Bedrooms Christmas Craft Ideas Easter Garden and Yard Halloween Holidays Home Decor Kitchens Living Areas Makeovers and Redos More DIY's Organizing Outdoor Decor Porches, Patios and Decks Recycled Crafts Seasonal Trash to Treasure Windows and Walls Wreaths

RSS feed: More Articles More Articles

  • Free Animal Person Embroidery Design Review
  • DIY Halloween Sock Pumpkins: Easy Fuzzy Pumpkins With Ghosts, Stripes and Witch Hats
  • Free Felting Tutorial Friday: Felt Into Autumn with Heidi Feathers
  • Knit a Classic Aran Cardigan with this Free Knitting Pattern
  • Printable Letter Books for Preschoolers
  • How to Make an Interactive Halloween Mini Scrapbook Album
  • 10 Ice Cubes That Instantly Elevate Champagne
  • Setting Up a Beginner Craft Space? A Practical Shopping List
  • Thrift Store Upcycling: Rustic Pumpkin Decorations From Glass Bowls
  • Mini Pumpkins and Jack o’Lanterns to Cross Stitch

Copyright © 2026 · CraftGossip | Start Here | Contact Us | Link to Us | Your Editors | Privacy and affiliate policy