• Home
  • Suggest A DIY
  • DIY Newsletter

Home and Garden

Ideas For DIY

  • About CraftGossip
  • Our Network
    • Bath & Body Crafts
    • Candle Making Ideas
    • Crochet Ideas
    • Cross Stitch
    • Edible Crafts
    • Felting Patterns
    • Glass Art
    • Home & Garden Ideas
    • Indie Crafts
    • Jewelry Making
    • Kids Crafts
    • Knitting Patterns
    • Lesson Plans
    • Needlework
    • Party Ideas
    • Polymer Clay
    • Quilting Ideas
    • Recycled Crafts
    • Scrapbooking
    • Sewing Patterns
    • Card Making
    • DIY Weddings
    • Not Craft Ideas
  • Giveaways
  • Roundups
  • Store
  • Search

Send Me Your Organizing Posts!

August 28, 2010 by Amanda Formaro

I’ve collected some pretty cool posts recently about organizing your craft rooms, pantries, and other parts of the home. So many crafty minds out there, I don’t want to miss any! So if you have a post on your blog, or if you know of one that you thought was great, post a comment here. I’m putting together a collection and would love to feature you! If you need to get an idea of what I’m looking for, try one of these recent features:

Organized Pantry
Getting Organized with Labels
Decorated Magazine Holders

While I can’t guarantee I’ll feature them all, I will definitely look at all of them!

Need help with organizing your supplies? Check out these organizational products from Scrapbook.com

Looking for more ideas on Organizing your home? Check out our Facebook Group Organize My House & Get My Sh*t Together and read some of the most popular Organization articles we have written below.

5 Tips for Organizing your Craft Room with Style

Cricut Tutorial: Fabric organizing baskets for your craft room

Tips for Craft Room Organization – Scrap Booking

Declutter and reorganize your sewing space – Sewing

Organize your sewing room – free printable checklist
10 Best Craft Room Organization Ideas Worth Stealing

20 Office & Craft Room Organization Tips – Scrap Booking

«
»

Comments

  1. ashley says

    August 28, 2010 at 3:11 pm

    Ooooohhh, organizing–my best friend and worst nightmare…Here are my posts about organizing:

    http://littlemissmomma.blogspot.com/2010/04/o-is-for-organizing-and-then-shopping.html

    thanks 😉

    ashley

  2. Gina E says

    August 28, 2010 at 3:23 pm

    I had a jewelry box I wasn’t using and could never figure out what to put in it because it had a divider that most items wouldn’t fit into. One day I decided to see if I could get the divider out and it was actually very easy. So, I had a box with no dividers that I could now use for many things, but decided I could also use the divider (all one piece) if I put it up on my wall as a small shelf sort of like a shadow box. It has worked great to put my mini misters on, small glitter bottles, perfect pearls jars and some small jars of embossing powders. It actually freed up several other smaller containers and all those things are within easy reach and reminds me to use them.

  3. Mrs. Jones says

    August 28, 2010 at 4:09 pm

    Here’s a recent post I did on Lego Storage Labels.

    http://heatherjslife.blogspot.com/2010/08/lego-storage-labels-free-download.html

    ~Heather

  4. Cecily says

    August 28, 2010 at 5:31 pm

    http://craftopotamus.blogspot.com/2010/06/craft-room-redesign.html

    Here’s a link to my craft room redesign.

  5. Nancy says

    August 28, 2010 at 7:17 pm

    This site is an organizing challenge that goes on for 29 weeks. The blogger takes viewers through the process of organizing everything crafty. She has tips, pictures and links to other organizing sites which keeps people motivated and organized. Very helpful and encouraging!

  6. Mrs B says

    August 28, 2010 at 7:41 pm

    Don’t have a photo, my “office” is torn apart for painting. I use pizza boxes to store my scrapbook papers. We are lucky the shop we frequent puts the pizza on a line sheet so the box stays clean.I use them as well for small project boxes.

  7. Barbra says

    August 28, 2010 at 8:17 pm

    Pizza boxes is a fabulous idea.
    Mine: votive holders and baby food jars,labeled to hold buttons sitting inside small wood crates hung on the wall

  8. Mary Lou says

    August 28, 2010 at 10:47 pm

    I love shoe bags and stacking shelves that hang off closet rods. My craft area has an immovable pipe on the ceiling that hang the shelves off of and I just tacked the shoe bags onto the walls. They hold a lot!

  9. Diane Parker says

    August 28, 2010 at 7:06 pm

    CanI send you a picture?
    I lived in a small one bedroom apartment and sence I didn’t use my dining room much but needed a craft room this is what I did.
    I had book shelves for books, revolving card holder for cards I made, white wire shelving, a curtin rod for ribbon. clear boxes and colored boxes. fabric shelves to hange for yarn and fabric,a bulitin board, revolving paint holders. and more the pictures show it best. How can I send them? Diane

  10. Diane Parker says

    August 28, 2010 at 7:07 pm

    let me know how I can send a picture or two.

  11. Rae Ann says

    August 28, 2010 at 7:29 pm

    Today I did a post on my blog Stashmanicure.blogspot.com that shows an inexpensive way of organizing your fabric. I am not sure if that is what you are looking for, but you may want to check it out.
    There are also a lot of others that have contributed their ideas in earlier post.
    I set my blog up four months ago with the idea of having myself and others share ways to manicure and organize your stash of fabrics that we have on hand and to make room for more of that dreamy stuff we can not get enough of! The idea here is to rule your stash before it rules you! LOL!
    Rae Ann

  12. Kathleen Ashton says

    August 29, 2010 at 1:19 am

    SO weird! I was planning on doing a post tomorrow about organizing my jewelry making baubles and beads. If it actually comes to fruition I will send you a link!

  13. Karie says

    August 29, 2010 at 2:00 am

    Hey! I’m just getting the hang of the bloging thing, but I recently updated my “studio” and wanted to share…i Hope you enjoy it! I can share more If you are interested!
    -Karie

  14. Megan Butler says

    August 30, 2010 at 2:19 am

    I’ve posted these two, very simple organizational ideas on my blog….

    http://mbellishedyou.blogspot.com/2010/07/getting-organized_25.html
    And
    http://mbellishedyou.blogspot.com/2010/08/as-you-all-might-know-i-love-anything.html

    Thanks for YOUR great blog, BTW…I enjoy everything you do!!
    Megan

  15. amy says

    August 30, 2010 at 7:55 pm

    I just posted about organizing my soups and canned food. I posted a tutorial of sorts on how to make a DIY can sorter. http://thenshemade.blogspot.com/2010/08/souper-storage-idea.html

  16. Mrs. Jones says

    August 31, 2010 at 12:55 pm

    Here’s how I organized the ribbon pile in my craft room:

    http://heatherjslife.blogspot.com/2010/08/use-what-you-have-organizing-ribbon.html

    ~Heather

Have you read?

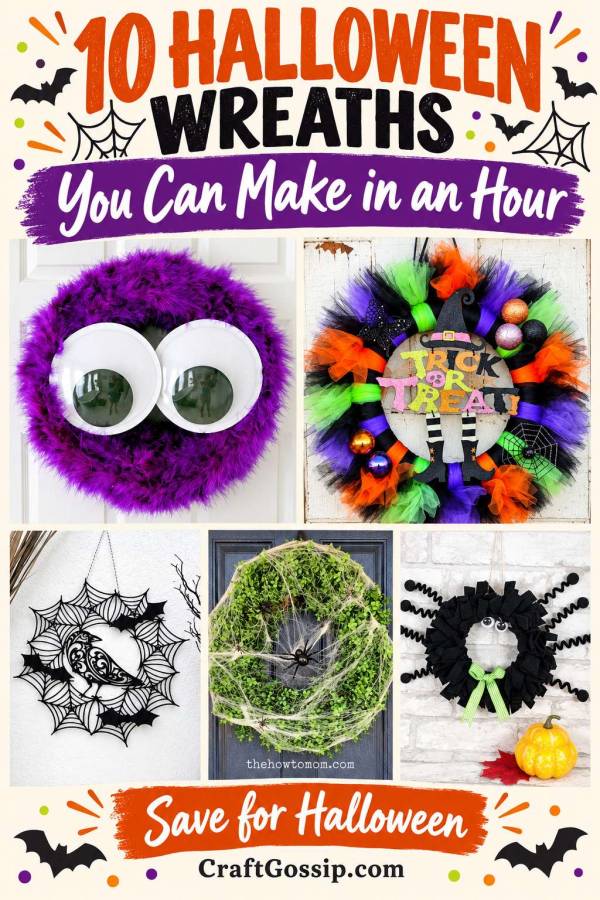
10 Halloween Wreaths You Can Make in an Hour

There’s always that moment when you look at the front door and realise the Halloween decorations haven’t made it outside yet. The craft supplies are there, the ideas are there, but somehow the afternoon you were going to spend making a wreath has disappeared into everything else.

That’s when a quick project earns its place in the craft room.

These easy Halloween wreaths are designed for a manageable making session, with fluffy monsters, spiderwebs, colourful tulle and a few wonderfully spooky finishing touches. Some start with a wreath you already own, which is particularly appealing if your seasonal decoration cupboard is beginning to require its own postcode.

You don’t need to make every embellishment from scratch, either. Ready-made spiders, a Halloween sign or a handful of decorative picks can do the fancy work while you concentrate on putting everything together.

A little timing note: these projects fit roughly an hour of hands-on crafting with supplies ready. Where a tutorial includes painting, glue drying or extra cooling time, I’ve noted it below. Beginners may want a little more breathing room—especially when learning a cutting machine or tying lots of strips.

Fluffy Monster Wreath

This Easy DIY Monster Wreath from The Country Chic Cottage is a lovely choice when you want Halloween decorations that make people smile. Feather boas wrap around a foam wreath form, and enormous googly eyes supply all the personality it needs. Angie describes it as an approximately ten-minute project, making it especially suitable for beginners or a last-minute decorating session. Keep the finished monster indoors or protected from moisture; those fluffy feathers aren’t made for a rainy doorstep.

No-Glue Pool Noodle Halloween Wreath

This No-Glue Halloween Wreath from Moms Confession starts with a pool noodle, which is a useful reminder that wreath forms don’t have to come from the floral aisle. Duct tape, creepy cloth, wire and decorative extras turn the noodle into a spooky door decoration without a glue gun. The tutorial presents it as a roughly thirty-minute make, and it’s a good option for beginners who prefer wrapping and fastening to fiddly gluing. Gather the lights, sign and ribbon before starting so your crafting session doesn’t turn into a treasure hunt.

Colourful Tulle Tutu Wreath

The Tutu Halloween Wreath from Busy Creating Memories has that wonderfully full, cheerful look that suits a family Halloween display. Knotted strips of orange, purple, lime and black tulle create the volume, with ornaments and a sign added afterwards. The project card lists fifteen minutes of preparation and thirty minutes of active work, although the instructions also recommend an additional thirty-minute rest after gluing. It’s beginner friendly, but cutting your strips in batches is the sensible way to keep the hands-on session moving.

Candy Corn Pick Wreath

This Easy Candy Corn Wreath from Kelea’s Florals uses decorative candy corn stems rather than actual sweets. A grapevine base, black garland pieces, a pumpkin accent and ribbon give it a layered look, with the creator describing the make as taking less than thirty minutes. It’s best for someone who enjoys arranging floral picks and is comfortable using hot glue, although the video helps explain the placement. Have your bow and embellishments ready first, especially if choosing ribbon combinations is usually the longest part of your project.

Cricut Paper Spiderweb Wreath

For the paper crafters, this DIY Spiderweb Wreath from 100 Directions offers something a little different from a traditional wrapped wreath. Black cardstock webs connect into a circular design, with a raven and folded bats adding character. Jen describes it as an under-an-hour Cricut project, making it a useful choice for someone already familiar with Design Space and cardstock cutting. Allow the glued connections to set before hanging, and display this delicate paper wreath indoors.

Spiderweb Boxwood Wreath

If you already own a green wreath, this Easy Halloween Wreath with Spiders and Boxwood from The How To Mom could be your quickest option. The transformation simply involves stretching faux webbing over the greenery and adding plastic spiders, and the creator says it took only minutes. It’s ideal for beginners and for anyone who wants a seasonal makeover without buying another wreath base. Stretching the webbing thinly is the detail that makes the effect work; a few wispy strands look much more convincing than a thick white blanket.

Black Glitter Spider Wreath

This Halloween Spider Wreath from Mom Always Finds Out keeps the design wonderfully simple: a black grapevine wreath covered in glittery spiders. The tutorial lists fifteen minutes of project time plus spray-paint drying, so start with an already-black wreath if you want to assemble and hang it within the hour. Hot-gluing the spiders around the ring is straightforward enough for a beginner, and their different positions keep it from looking too regimented. The optional dangling spider is a small detail with plenty of doorstep drama.

Felt Scrap Spider Wreath

This Spider Felt Scrap Wreath from The Purple Pumpkin Blog turns a small embroidery hoop into an entire spider character. Knotted black felt strips create the fluffy body, while coiled pipe cleaners become legs and oversized googly eyes finish the face. The tutorial lists one hour of active time, so it suits a relaxed beginner session with scissors and felt ready to go. I particularly like this one for an indoor door or a small Halloween display where a full-sized wreath would overwhelm the space.

Purple Garland and Spider Wreath

This Spooky Spider Wreath by Kat Benninger combines purple garland, plastic spiders and battery-operated lights for a brighter Halloween look. The tutorial lists a one-hour making time and uses a small grapevine wreath as its base. It’s an approachable wrapping-and-gluing project, although the glitter applied with white glue needs time to dry. For a quicker version, my suggestion would be to use ready-glittered spiders and concentrate on arranging the lights and hanging spider details.

Spooky Feather Wreath

This Spooky Feather Halloween Wreath is another useful option when you want plenty of texture without a long construction session. The creator describes it as taking less than an hour and includes a video to guide the process. It suits beginners who like following a visual demonstration and want a darker, more atmospheric wreath. I’d keep the surrounding decorations simple so the feathery texture can be the feature.

Make Your Crafting Hour Count

The easiest way to finish a wreath quickly is to make a few decisions before you begin. Choose your colour palette, check that you have enough material to cover the base, and set out the embellishments where you can see them.

For tied-strip wreaths, cut everything together before starting the knots. For floral designs, arrange the picks loosely before securing them. And if you’re using a cutting machine, open the project and check the materials before counting that hour.

There’s also no rule saying your wreath needs a bow, a sign, lights, spiders and three different kinds of ribbon. One strong feature often looks better—and leaves you with a project you can actually finish before dinner.

I’d choose the boxwood spiderweb wreath for a truly last-minute makeover, the fluffy monster for a cheerful family display, or the paper spiderweb wreath for a chance to use the cardstock stash. Whichever one you make, give it a quick look from a few steps away before hanging. Sometimes the only thing it needs is a little fluffing and permission to call it finished.

Explore

Bedrooms Christmas Craft Ideas Easter Garden and Yard Halloween Holidays Home Decor Kitchens Living Areas Makeovers and Redos More DIY's Organizing Outdoor Decor Porches, Patios and Decks Recycled Crafts Seasonal Trash to Treasure Windows and Walls Wreaths

RSS feed: More Articles More Articles

  • From Trash to Illusion: Thomas Deininger’s Recycled Art Challenges Perception and Promotes Sustainability
  • Fun Halloween Worksheets for Kids
  • How to Start Junk Journaling with Items You Already Have
  • Free Printable Witch Hat Bag Toppers for Doritos
  • Granny Square Along by Lori Holt: A Crochet Book for Lovers of Vintage Colour
  • 10 DIY Scary Halloween Decorations for a Seriously Spooky Home
  • Pumpkin Man Doughnut Treats With a Free Halloween Printable
  • How to Make a Double Interactive Cauldron Card for Halloween
  • Book Review: Stitch Alphabets & Numbers
  • Knit a Leopard Print Shawl and Learn about Yarn Substitution

Copyright © 2026 · CraftGossip | Start Here | Contact Us | Link to Us | Your Editors | Privacy and affiliate policy