 These are so cool don’t you think? I originally saw these on Pinterest (you can find me on Pinterest here) and followed them back to Workbench Magazine. They have created these really cool cabinets that are designed to make use of an often wasted space. Love these! You can see them and get the builders plans here.
Comments
Have you read?
Christmas on a Budget – 7 Christmas Table Decorations You Can Make from Paper to Save Money
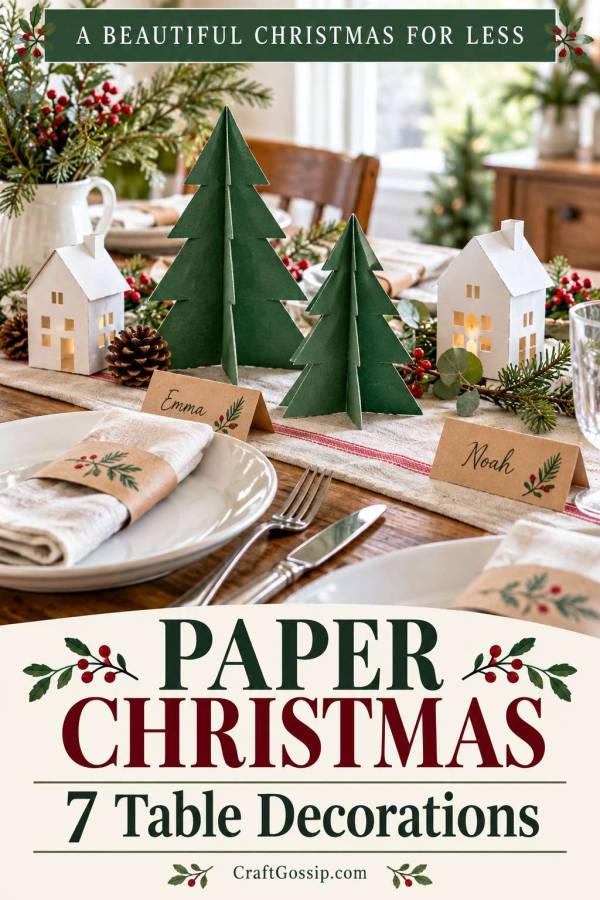
Before buying Christmas table decorations, open the paper drawer.
Leftover gift wrap, scrapbook offcuts and plain cardstock can become name cards, little trees and festive table details.
You do not need a cutting machine or a coordinated craft kit. A pair of scissors, a ruler and a little patience will cover most of these projects.
Paper is particularly useful when you want a colour-pop Christmas table on a small budget. Repeat one or two colours across a few simple decorations and the setting starts to feel coordinated.
Pick two or three projects rather than trying to make all seven.
Gather your supplies first
Look for:
- Cardstock or clean, suitable packaging card.
- Wrapping-paper scraps.
- Plain paper.
- Scissors and a ruler.
- A pencil and a writing pen.
- Existing paper glue or double-sided tape.
Card works best for standing decorations. Thin wrapping paper is better for covering a card base.
Make a sample before cutting enough pieces for every guest.
1. Folded name cards
Cut cardstock into rectangles measuring approximately 10 × 8 cm.
Mark the halfway point along the 8 cm sides, then fold to create a standing card with a face approximately 10 × 4 cm.
Write the name before adding embellishments.
A small drawn star or a narrow paper strip is plenty. Check that the name is readable from the guest’s seat.
Saving tip: use the plain side of suitable card and cover unwanted printing only where necessary.
2. Paper napkin bands
Cut paper strips approximately 4 cm wide.
Wrap one around a folded napkin to find the required length, including a small overlap. Secure the ends with tape or glue.
Make the bands loose enough to slide off without tearing.
Use one paper across all settings or repeat a shared colour through different patterns.
Saving tip: gift-wrap offcuts are useful here because the napkin supports the paper.
3. Slot-together paper trees
Draw a symmetrical tree shape with a flat bottom and cut two identical pieces from sturdy cardstock.
On the first tree, cut a slit from the top to the midpoint. On the second, cut from the bottom to the midpoint.
Slide the shapes together at right angles. Adjust the slit width gradually to suit the card thickness.
Test that the tree stands before cutting the rest.
Saving tip: two or three trees can be enough for a small display.
4. A miniature Christmas village
Our paper Christmas town tutorial provides a more detailed project with houses and trees.
Use one colour for a simple village or limit yourself to two coordinating shades.
Allow the glue to dry thoroughly before moving the buildings.
Saving tip: display the village on a sideboard if your dining table needs every centimetre for lunch.
5. Paper angel napkin holders
These paper angel napkin holders make a traditional Christmas detail.
Test the template size with one napkin before preparing a full set. Decorate the card with suitable fabric or paper scraps.
Saving tip: use the same base colour while allowing small differences in the paper covering.
6. Flat paper stars
Draw or trace a simple star onto card.
Cut it out, cover it with paper if needed and add a guest’s name. Place it beside the plate or attach it to a napkin band.
Keep decorative paper away from uncovered food and damp dishes.
Saving tip: a few larger stars are easier to tidy and store than dozens of tiny pieces of confetti.
7. A paper-star wreath
Our paper-star wreath tutorial uses covered card shapes arranged on a ring.
Hang it near the table using a suitable fixing. This gives the dining area a focal point without taking serving space.
Saving tip: use the same paper on the wreath and name cards to connect the room.
Keep all paper decorations away from flames, heat and wet surfaces. Pack dry pieces flat where possible and label the box for next year.
The paper scraps you nearly discarded might be all the Christmas colour your table needs.
I actually have something very similar to this that I had made about 15 years ago. I live in a split level so the upstairs go down halfway to a landing and turn for the 2nd half. I was tired of all the wasted space and saw an idea in an old home remodeling book that I had made. The problem I had was I should have had wheels like yours put on and the multiple handles is a great choice. Do you have problems or a solution to getting them to line up correctly when you push them closed? I am thinking I need some kind of guide for the wheels to line up in, kind of like at the carwash?
This is so brilliant, it made me squeal. Makes me wish I lived in a two-story house!
I don’t have stairs, but these cabinets make me wish I did. I LOVE them!!!
This is well design home storage. It is good to follow these tips at home.
very clever design is there a way to get more specifications on this idea?